
This post may contain affiliate links, please see our privacy policy for details.
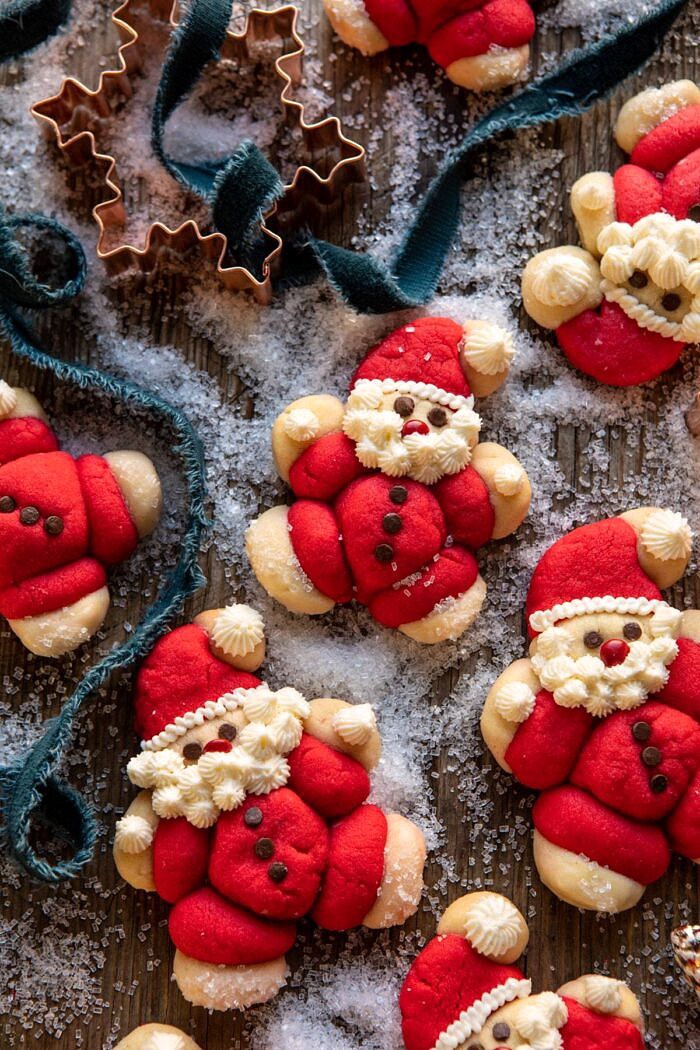
Festive, easy, and fun…Holly Jolly Santa Cookies – Tis’ the Season! Simple vanilla sugar cookies shaped into the cutest, fattest little Santas, made effortlessly by shaping the dough into round balls. Frosted with a deliciously sweet whipped cream cheese frosting and you’ll have yourself the most perfect Christmas cookie. Fun to bake, delicious to eat, a great homemade gift, and a festive addition to your holiday cookie box!
As I write this the snow is falling outside my NYC hotel room, and well, it’s beginning to look a lot like Christmas! This is so cheesy, but New York in December, and with white fluffy snow, is the most magical experience. I am so happy it decided to snow on my last day here in the city. I’ll be home by the time you read this, and back in the deep, deep Colorado snow. But I’m feeling extra thankful that I was able to see NYC this time of year…and in snowy winter weather too. Next year I’m bringing my mom and little Asher with me. It’s always better with family, especially those two Christmas loving freaks. They would be loving every minute of this snowy, Christmas scene.
Anyway, it feels very fitting to be writing this post as the snow falls. Whether you celebrate Christmas or not, these cookies are cute wintry cookies…and of course, delicious. Something about a fat little Santa covered in sweet frosting (and even some chocolate candies too) is always adorable.
Those of you who’ve been following HBH since the VERY early days, there’s a slight chance you’ll remember these cookies. I shared a version of this recipe only a month and a half into HBH’s inception. While looking back through old content a few weeks ago, I stumbled across this recipe.
The crazy thing about developing so many new recipes is that sometimes I forget about the old (and really GOOD) recipes I’ve created. Even though the photos of these cookies were horrid, I still found them to be so cute. And I remember Asher having so much fun helping me bake them. So I’m bringing one of my favorite cookies back to life. And while it is a slightly decadent cookie, I love them so much.
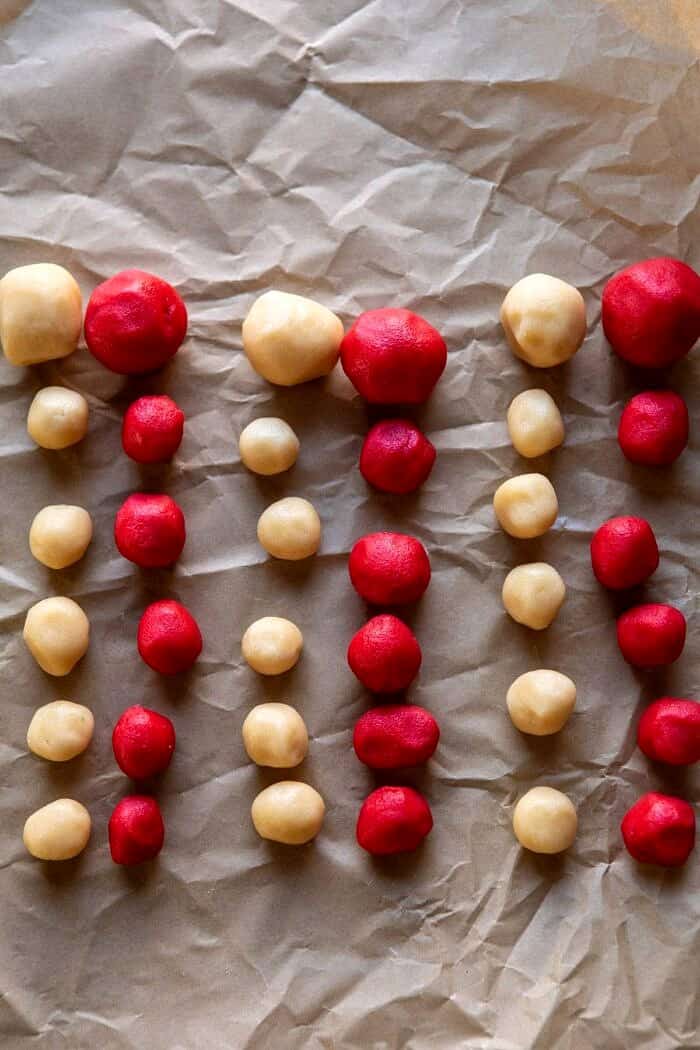
(cookie dough balls lined up and ready to assemble)
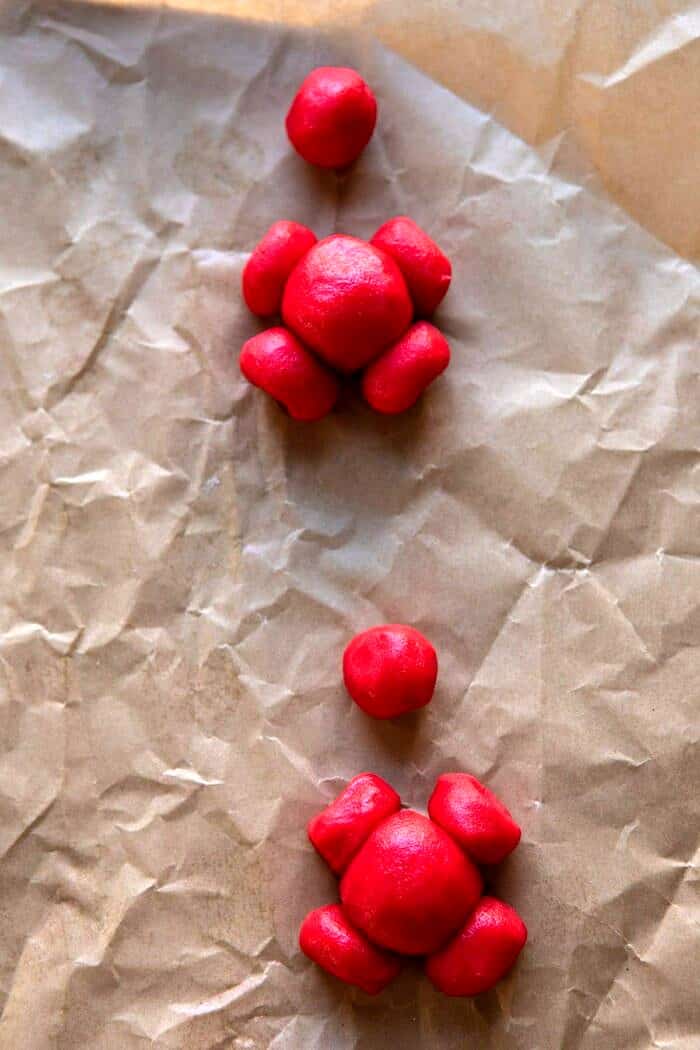
(assembling the red parts of Santa)
As you all know, I am no professional when it comes to decorating sweets. BUT I still love to make my desserts, especially the holiday ones, as cute and festive as possible. Enter these easy, rolly, polly, Santa cookies.
The idea is to take simple sugar cookie dough, roll it into tiny balls, attach them together into a “Santa” body, and bake. If you use the photos as guides, it’s the easiest sugar cookie you will make. Not to mention, so much fun! No stress, no pulling out your hair, just fun. Exactly what holiday baking should be.
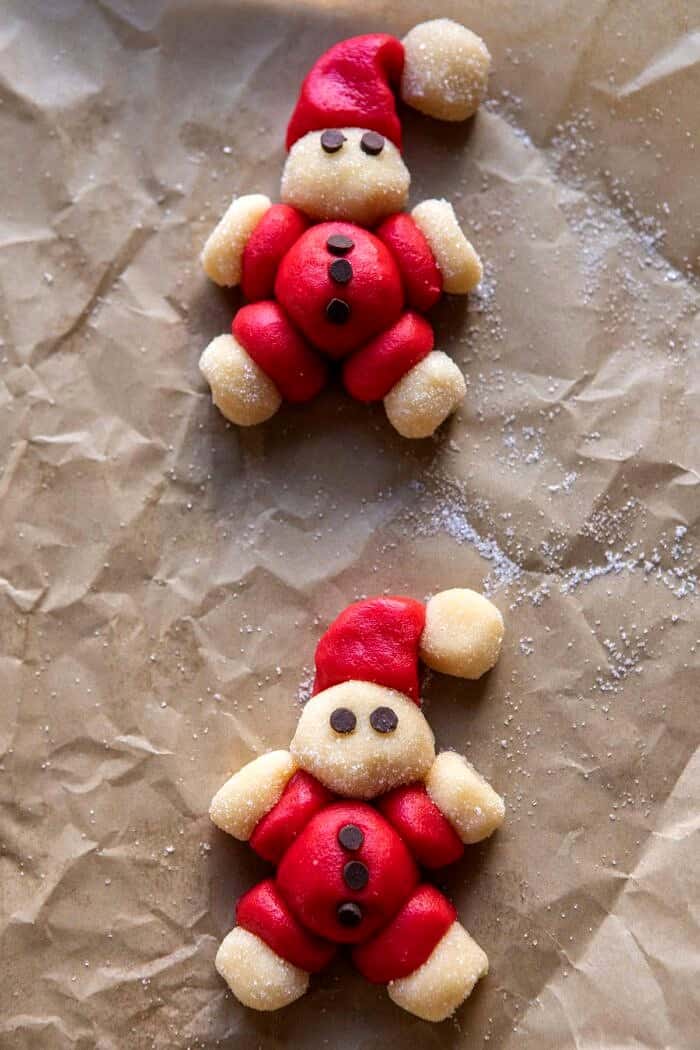
Here is how you make these Holly Jolly Santa Cookies.
Start with the dough. I used my favorite sugar cookie dough that’s heavy on the butter…and vanilla. I died half of the dough red using food coloring and kept the other half of the dough plain. If you can find a great natural red food die, I would highly recommend using that. Sadly I’ve yet to find one that works well. If anyone has found one they use and love, please let me know!
Once the dough is died, it’s literally as simple as rolling each dough into multiple balls. Again, if you look through the photos you will most likely understand the process much, much easier. You need five white dough balls and five red dough balls to make one Santa.
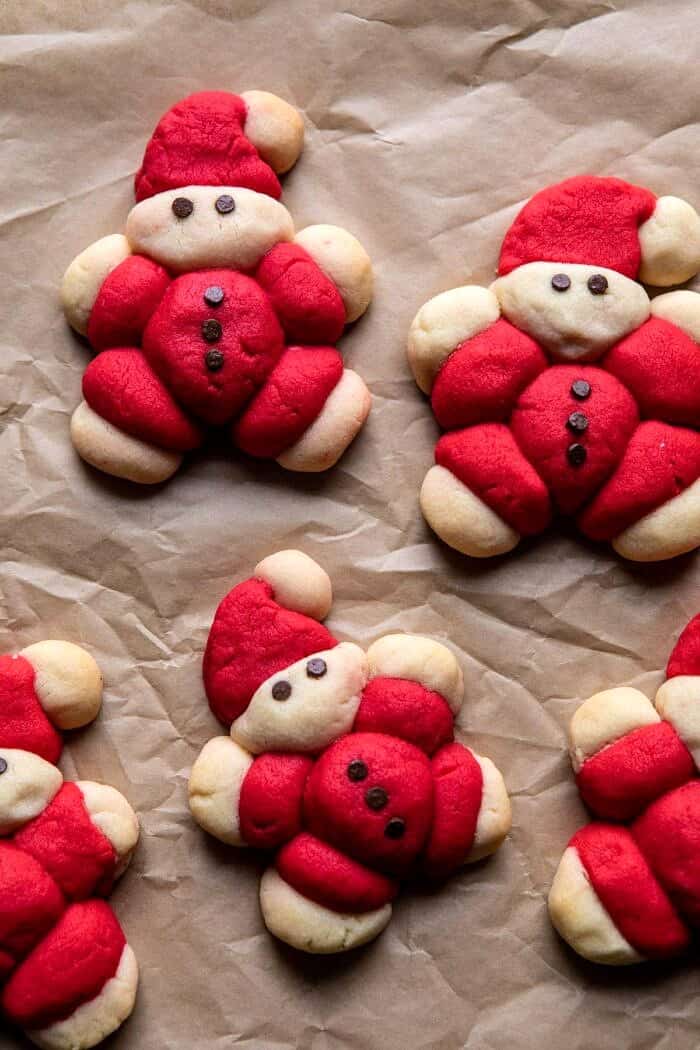
Attaching the pieces…
This is the step that you might think will be tricky, but it’s actually so easy. To make each Santa, just gently push the dough balls together. Once again, use the photos as guides. Nothing needs to be shaped perfectly or lined up just right. As long as you have a rough body formed, the cookies bake up like adorable fat Santas.
Promise.
Once you have your Santas formed, add mini chocolate chips for eyes and buttons, then bake! The process of rolling the balls will take a little time, but to me, this is easier than cutting out shapes…and I think they are way cuter, not to mention a little more unique. Because let’s be real, everyone is making your basic sugar cookies this time of year. Bake something a little different!
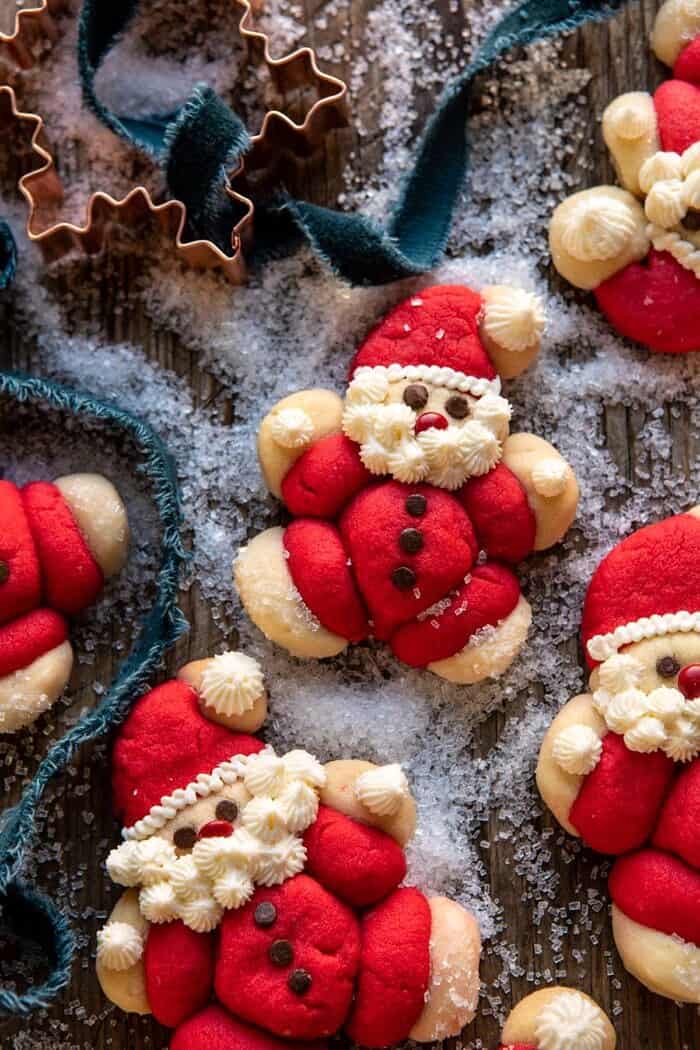
Decorating is easy.
Since the cookies themselves are already so cute, decorating is EASY. I used a sweet, creamy, whipped cream cheese frosting to add a layer of excitement to each bite. The frosting is used for Santa’s beard, hat, and hands, but my recommendation? Keep a small bowl of the frosting aside for adding to each cookie while eating. The frosting is SO GOOD and the cookie is made even better with a bit of additional frosting spread all over our little Santas.
For Santa’s nose, I use a mini red M&M. Simple, easy, and so cute.
These cookies make a delicious addition to any holiday party, cookie plate, or even cookie gift box. And if you have young kids these are a must bake before Christmas. They’ll have so much fun attaching the pieces since it’s something they can easily do all by themselves!
I’m really hoping to be able to set aside time one of these days before Christmas to do a baking day with Asher. These are the perfect cookies to make with her!

If you make these holly jolly Santa cookies, be sure to leave a comment and/or give this recipe a rating! Above all, I love to hear from you guys and always do my best to respond to each and every comment. And of course, if you do make this recipe, don’t forget to tag me on Instagram! Looking through the photos of recipes you all have made is my favorite!
Jolly Santa Cookies

Ingredients
- 2 sticks (1 cup) salted butter, at room temperature
- 1/2 cup granulated sugar
- 1 large egg, at room temperature
- 2 teaspoons vanilla extract
- 2 1/4 cups all-purpose flour
- 1/2 teaspoon kosher salt
- 1-2 teaspoons red food coloring
- mini chocolate chips, (for eyes and buttons)
- mini holiday M + M s, (for Santa's nose)
Cream Cheese Buttercream
- 1 stick (1/2 cup) salted butter, at room temperature
- 2 ounces cream cheese, at room temperature, (optional)
- 1 teaspoon vanilla extract
- 1 1/2 cups powder sugar
Instructions
- 1. Preheat the oven to 350 degrees. Line 2 baking sheets with parchment paper. 2. In a large mixing bowl, cream together the butter, sugar, and vanilla until light and fluffy, about 3-5 minutes. Add the egg and beat until combined. Add the flour, and salt, beat until combined, and the dough begins to form a ball.3. Remove 1 cup of the dough and set aside. With the remaining dough, add in 1 teaspoon red food coloring, adding more if needed for better color. Keep in mind that the color will darken over time.4. From the red cookie dough, make 1 (1-inch) ball and 5 (1/2-inch) balls. From the plain cookie dough, make 1 (3/4 inch) ball and 5 (1/4-inch) balls. You will have a body, head, hat, four red arms and four white hands and a white ball for the top of the hat. I find it easiest to make all the parts first, then assemble. 5. On the prepared baking sheet, place the red 1-inch ball, gently flatten until 1/2 inch thick. Attach four of the red 1/2-inch balls for arms and legs. Next, attach the plain 3/4-inch ball for a head, gently flatten until 1/2 inch thick. Attach the plain 1/4-inch balls for hands and feet. Shape the remaining red 1/2-inch ball into a triangle for a hat and attach it. Repeat with remaining dough, arranging the cookies 2 inches apart on the baking sheet. Add chocolate pieces for eyes and buttons (see above photos for visuals, this will help!).6. Transfer to the oven and bake the Santa's for 12-15 minutes, until lightly golden7. To make the frosting. Add the butter and the cream cheese to the bowl of a stand mixer and whip until extra light and fluffy, about 3-4 minutes. Add the powdered sugar and vanilla. Beat together until whipped, about 2 more minutes.8. To decorate. Transfer half the frosting to a piping bag fitted with a small tip. Or, take a ziplock bag and snip a very small portion of the corner off the bag. Use the bag to go around Santa's face, arms, and legs. Put a small dot on the tip of his hat and then place one red mini M&M on his face as his nose.
Notes
Nutrition
Nutritional information is only an estimate. The accuracy of the nutritional information for any recipe on this site is not guaranteed.
Did you make this recipe? Please rate & comment below.



















Does this recipie use baking soda or baking powder? I didn’t see any listed.
Hi Michaela,
Nope, this recipe doesn’t need either so that the Santa’s can keep their shape. Please let me know if you give this recipe a try! xT
Is it possible to make these ahead a few days and store just the dough? Thanks!!
Hey there,
You bet! Let me know if you give these cookies a try, I hope they are a hit! xT
Have you ever substituted plant butter for real butter? My daughter has an allergy to dairy and I would be able to make these with real butter.
Hi Jen,
I’ve not tried this, but let me know how it works for you! I hope these turn out well. Happy Holidays! xx
I’ve made these cookies several times now using plant based butter and they turn out perfectly! I also have a dairy allergy and think they are delish (and the rest of my family thinks so too!)
Thanks so much for sharing Sarah!!
Which plant butter do you normally use for them? Thanks!
Hi-
Trying to get a jump start on my holiday cookie boxes. Do you think it would be okay to form the Santa shapes and then freeze them to bake off later?
Hey Andrea,
Yes, that will work well for you! Please let me know if you have any other questions! Happy Holidays! xT
These are so cute! What tip number did you use to decorate the beard?
Hi Kelli,
Thanks so much! I used a Wilton 32. Please let me know if you have any other questions! xx
These are so tasty! My grandson and I made them! Awesome recipe!
Hey Tanja,
Fantastic!! Thanks a lot for trying this recipe and your comment, I love to hear that it was tasty! Have a great weekend:)
Damn autocorrect. I fully typed out unnecessary.
They ALL look so awesome I can’t wait to make em!!! Thanks for sharing!!
Thanks so much Lorraine!! I hope you love the recipe! xx
So delicious and adorable. I substituted one cup ww flour. So yummy.
Hey Raquel,
Happy Wednesday!! I truly appreciate you giving this recipe a try and sharing your review, so glad to hear it was a hit:)
A lot of time, but totally cute and tasty cookies!
Forgot to note that I got at least 12 cookies from one recipe. Next year I will double.
Hey Teresa,
Thanks you so very much for trying this recipe, I love to hear that it was enjoyed! xxTieghan
Hey Tieghan, I used the 14 cookie serving recipe, followed all the measurements to a tee and was only able to make 5 cookies with a little bit of dough leftover. I’m not sure how I could’ve squeezed out almost 3x the number of Santa. Nonetheless they were so cute and enjoyable to make with my family. Thank you for the creative recipe!
Hi Allie,
Thank you so much for making this recipe, I am so glad to hear it was enjoyed! Merry Christmas!?? xT
I made these cookies to contribute to family dinner this year! Mine do NOT look like the picture, but they still are cute and obviously Santa. I was unsure how to measure them so I guessed. Some Santa’s are not exactly proportionate. But a real nice center piece for the table.
Hi Abby,
Thank you so much for making this recipe, I am so glad to hear it was enjoyed! Merry Christmas!?? xT
I was only able to get six cookies out of one batch but they turned out adorably, we’re surprisingly easy to make and tasted so yummy!!
Hi Morgan,
Happy Holidays! Thank you so much for making this recipe, I love to hear that it was enjoyed!?? xTieghan
These cookies are so cute!! Was a little nervous to make them because they looked kind of hard but actually had so much fun in the kitchen baking and decorating. Mine are a little rustic, but still gorgeous and utterly delectable!?
Thanks for the recipe Tieghan I had so much fun with these!?
Hi Brooke,
Happy Holidays! Thank you so much for making this recipe, I love to hear that it was enjoyed!?? xTieghan
I made these with 2, 9 year olds and a 7 year old. I thought for sure I would be posting fail pictures… but they are SO SO cute and fun for the kids to assemble. We will be making these again! They are also soft a delicious. Thanks for a great, creative recipe.
Hi Sydney,
Happy Holidays! Thank you so much for making this recipe, I love to hear that it was enjoyed!?? xTieghan
It’s my second year making these and I can confirm that they are the absolute best Christmas cookies! They are so cute, easy, and delicious! Thank you for your fabulous recipes!!!
Hi Sarah,
Happy Holidays! Thank you so much for making this recipe, I love to hear that it was enjoyed!?? xTieghan