Next Post
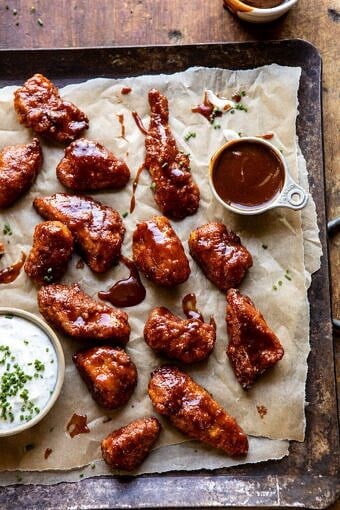
Baked Boneless Honey BBQ Chicken Wings with Spicy Ranch.
This post may contain affiliate links, please see our privacy policy for details.
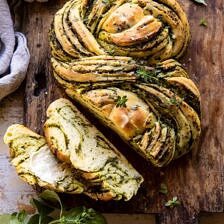
This light, doughy, and super soft bread is swirled with herb butter, hinted lightly with garlic, and makes for the most delicious and extra fancy companion to your dinner table. It’s easy, but impressive, and best served warm right out of the oven with just a little smear of butter. You will LOVE this bread. Bonus? This is a great way to use up all the end of summer herbs from the garden.

With Labor Day behind us, I’m ready to slowly start transitioning into the season the brings all the coziest recipes. I know it’s only the 3rd of September, and that the temperatures may still be warm, but autumn is in the air, especially around here. I couldn’t be more excited about this, as I said on Sunday, it’s my favorite season.

(dough log after slicing in half lengthwise)

With September here, my focus has shifted to a bit to cozier recipes. Recipes that are perfect for things like Sunday night dinner with the family, a simple gathering with friends, or tailgating before Sunday’s game (can you believe football starts on Thursday?).
Enter in this swirled garlic herb bread. It’s so pretty and so delicious. It’s going to be perfect for all your upcoming Sunday night family dinners, and gatherings with friends on fall evenings.
And the best part…while I mean, aside from the taste…while this bread may look super complicated to make, it’s really fairly simple. If you’re a visual person like me, the pictures within this post are going to be VERY helpful, so study them closely.

(dough after twisting)
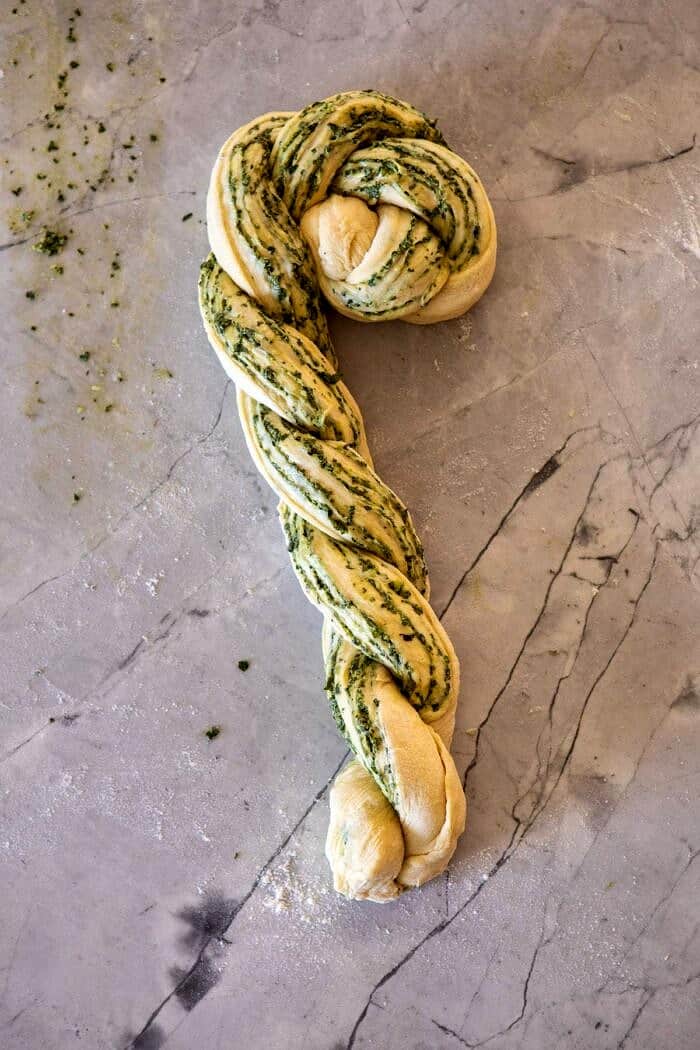
(dough after the 1st coil)

First, the dough. I used my go-to base dough recipe for soft breads. It’s kind of a mix between an eggy brioche bread and a more simple dinner roll type bread. It has your basic bread dough ingredients – milk, yeast, a touch of honey, eggs, flour, butter, and salt. Nothing new here, but yet still so good.
The real flavor in this bread is hidden between the layers. Or better yet, between the swirls, and it’s in the form of herb butter with garlic. The classic go-to flavors that I am craving so much of right now…
Well, that and the fact our herb garden is so full of end of summer herbs. So full that some of the basil is blossoming and becoming dry. Meaning, I need to use it up fast. So that’s kind of the reason for all the herb-filled recipes as of late. The good news is that I love herbs and I don’t mind using them in literally everything…even my cocktails.

For the butter, I used a mix of basil, thyme, and sage, BUT you all can use whatever herb combination you love most. I’m sure a touch of oregano or maybe some parsley would be great!
And another note…use salted butter and only just the right amount of garlic. The salted butter is key because it adds that special touch that makes everyone go back for a second slice, or two. For the garlic, I like to use 1-2 cloves. You want the flavor, but you don’t want it to overpower the bread, just a subtle hint.

Now, the rolling and twisting process.
I promise, this is not as scary as it looks. If you’ve made cinnamon rolls before you can make and shape this bread.
You’ll start out by rolling the dough up into a log. Then you simply cut the log in half vertically to expose those pretty, herby, buttery layers. Now, twist the two the pieces of dough over each other to create a loose twist. And finally, coil the dough up into a shape that resembles an S. Again, the words make it seem trickier than it really is. Use the photos as your guide, I’m telling you, they will help so much!!
Once you have the bread shaped, let it rise, and then bake. Please, please, please, enjoy this warm, right out of the oven, and preferably with a light smear of butter too.

SO GOOD. Oh, and the smell while this bakes? It. Is. Heavenly.
What every special dinner from now through December really needs…a side of pretty, swirled, garlic herb bread. I’d recommend serving this alongside one of my favorite September recipes, instant pot broccoli cheddar zucchini soup.
Can I use dried herbs instead of fresh?
Yes—dried herbs are more potent. A good general rule is to start with about one-third the amount and bloom them briefly in warm butter or oil for better flavor.
How do I keep the swirl from separating or leaking?
Roll the dough tightly, leave a clean strip to seal, and pinch the seam well. Proof until puffy before baking so the structure sets around the swirl.
Can I shape this as rolls or mini loaves?
Totally—divide the dough evenly and tuck into a buttered muffin tin or mini loaf pans. Keep the same visual cues: puffy before the bake, deep golden when done.
How do I know it’s baked through?
Look for a deep golden crust; the loaf should sound hollow when tapped and feel set in the center (not squishy). Let it cool before slicing so the swirls hold their shape.

If you make this swirled garlic herb bread be sure to leave a comment and/or give this recipe a rating! Above all, I love to hear from you guys and always do my best to respond to each and every comment. And of course, if you do make this recipe, don’t forget to tag me on Instagram! Looking through the photos of recipes you all have made is my favorite!
Nutritional information is only an estimate. The accuracy of the nutritional information for any recipe on this site is not guaranteed.

As Seen In


Hi Tieghan, quick question— if I’m used unsalted butter, how much extra salt would you add?
Thank you! I’ve made this twice and it was fantastic!
Hey Maria,
So glad to hear you have been enjoying this recipe! I would use 1/4 teaspoon of salt. Please let me know if you have any other questions! xx
I made this and my bread is HUGE. Like. Twice the size of the pics. I’m sure it’ll still be good. But I don’t know what happened.
Hi Jules,
Thanks for trying the recipe! Sorry it’s so big, let me know how it tastes!! xT
Hi Tieghan,
The taste is amazing. I’ve made it a half dozen times AT LEAST since then. It’s still big but everyone LOVES it 🙂 TY!
Love to hear this Julie, thanks so much!!
Did you use the metric conversion? It’s way off. AP flour weighs 120-125 grams per cup, so this recipe calls for 420-500 grams of flour, not the 937.5 grams listed. If you used 937.5 grams of flour, your finished product would be approximately twice the size of the one pictured.
Hi Lily,
I’ve done both! It’s big but delicious and comes out the same every time I make it. But thank you!
Hi- this recipe sounds delicious!!
question; can I use dry sage & thyme? If so should I be using less?
I have fresh basil.
Thanks!
Hey Mac,
Sure, that would work! For every 1 tablespoon of fresh herbs you will want to use 1 teaspoon of dried herbs. I hope you love this recipe! xx
Hi/ so I substituted the fresh Sage & Thyme – and it worked out terrific! I loved it….definitely will be making it again 🙂 TY!!
Hi Mac,
Perfect! I appreciate you making this recipe and sharing your feedback, I am so glad it was a hit! xx
Is there a way to make this without milk?
Hi Tavia,
A non-dairy milk that you enjoy will work well for you! I hope you love this recipe, please let me know if you give it a try! xx
This may sound like a stupid question, but I’m using this recipe for my very first bread bake!! The instant yeast, do you just dump the package in with the rest of the first ingredients or are there directions on the yeast package you have to do first?
Thank you!
Hi Heather,
You can follow the recipe exactly as written using instant yeast:) Please let me know if you have any other questions! xx
I have made this about 10 times and it’s perfect!!
Hey Lisa,
Happy Sunday! I am delighted to hear that this recipe was enjoyed, thanks so much for making it! xTieghan
This is really good! Mine got huge, so I cut the slices in half to serve them. I did use bread flour, though, so I’m sure that’s why. It has such a nice, subtle herb flavor. The garlic adds a nice touch. My family loved it! I wish I could post a picture.
Hi Christina,
Happy Friday!? Thanks a lot for trying this recipe out, I love to hear that it was a winner! xx
Made this today and it was an instant family favorite! Great recipe and outstanding pictures to help guide with shaping. Thank you!
Hi Liz,
Happy Wednesday! I really appreciate you taking the time to make this recipe, I love to hear that it was a hit! xxT
Made this today and just realized I left out the cheese but it was still delicious! Oh well. Guess I’ll have to make it again! 😉
Hey Deborah,
Wonderful!! Thanks a bunch for trying this recipe out, I am so glad it was enjoyed! xTieghan
Used leftover fresh pesto and it was delicious. Very easy to make but the twists make it fancy.
Hey Kalin,
Happy Wednesday!! Thanks a bunch for making this recipe and sharing your review, I love to hear that it was tasty!?
Pretty easy to follow. It tastes really good. I wish I could post images of my results. my roll/twist isn’t perfect, but I’m still happy with the end result.
Ah, I added an egg wash at the end with a sprinkle of kosher salt and the rest of the herbs I had laying around.
Hi there,
Thanks for your comment! So glad to hear that this recipe was a winner, thanks a lot for giving it a go! ?xTieghan
Hello! Will this recipe work out without the cheese? 🙂
Hi Anna,
Sure, that would be okay for you to do! I hope this recipe turns out amazing, please let me know if you give it a try! xx
Th metric conversion for flour is WAYYY off. like more than double the amount. I doubled the rest of my ingredients in the dough and i’m hoping for the best as it rises, but i’m not optimistic 🙁
Hi Patsy,
So sorry about that!! Let me know how the recipe turns out, I will have to look at the conversions. xTieghan
I wish I had read this one before I started! Have just realised the same, chucked the first lot away, started the second lot to find the milk is completely out too!!!!! what a waste?
Sorry to hear this Clo, these are the metric measurements according to our online calculator.
This. I’m returning to this recipe again after attempting it the first time a few months ago and it was awful. I double checked the conversions and the flour conversion is ridiculous. Not sure which online calculator you are using because flour should be around 437.5 grams, NOT 937.5 grams.
Hi Jess,
So sorry about this! The online calculator gave this measurement. I am working with our tech team to see if we can manually adjust the measurement, if not we will fully remove the metrics for this recipe. Have a great day!! xTieghan
So delicious! It came out beautifully. I used almond milk and vegan butter. Everyone loved it and was so impressed! Thank you!
Hey Kelsey,
Perfect!! Thanks so much for giving this recipe a go, I am thrilled to hear that it was a winner! Have the best week!? xT
Can I use active yeast instead of instant?
Hi Ava,
You bet, just proof it first with the milk and honey. I hope you love this recipe, please let me know if you give it a try! xx
Love this bread but I have a hard time knowing when it’s done! The outside will be golden brown and the inside doughy. Any tips?
Hey Danielle,
Happy Sunday!! Thanks so much for making this recipe, I am so glad to hear that it was enjoyed! How long do you bake it for? xx
Tieghan, bake bread until it’s 190° F internally. If it starts getting too brown, put foil loosely over top.
Thank you!
I’ve made this recipe a few time and really enjoyed it. I’m wondering how can I store this? I want to make it the night before. Is it best left uncovered overnight, paper bag, or plastic? Thank you.
Hey Rubie,
Awesome!! Thanks so much for sharing your feedback, I love to hear that this recipe was enjoyed! I would keep in an airtight container. xx