Next Post

This post may contain affiliate links, please see our privacy policy for details.
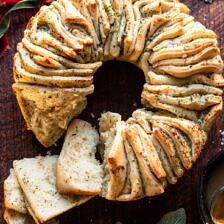
This festive Pull-Apart Garlic Butter Bread Wreath is light, soft, buttery, garlicky, perfectly salted, and SO delicious. Serve this warm right out of the oven with a light sprinkle of flaky sea salt for a bread that’s melt in your mouth good…and oh so impressive. Bonus? This is simpler than you’d think to make, and uses pantry ingredients like milk, butter, and of course, garlic. The perfect pull-apart bread for all of your upcoming holiday dinners.
This post is sponsored by Vermont Creamery.

This year’s December recipes have been some of my favorites to date, and this incredible bread is no exception. Not only is it festive, fun, and pretty, it’s also easy and SO DELICIOUS. I’m talking roll your eyes back and eat all the bread before you even look at dinner, kind of delicious.
Dramatic, but true. There’s nothing not to love about this soft buttery bread.
With Christmas quickly approaching, I knew I needed a new bread recipe to serve on Christmas Eve. In our house, no holiday dinner is complete without a side of homemade bread. Most of the time I’ll make some form of a soft, buttery roll. But this year I wanted something a bit more festive, and that’s when I decided to make a bread “wreath”. Going into this recipe I wasn’t sure how it would turn out, but I’m happy to say that it ended up coming out better than I’d imagined.
Love when that happens!

So what is a bread wreath?
I know this bread might look like it takes hours to make, but trust me, it’s simple. Simply make a milk-based bread dough, roll it out, spread on plenty of garlic butter, then cut the dough into small squares. The squares of dough are then stacked, one on top of the other, and arranged in a tube pan…just like Dominos.
Watch the video and you will understand, promise this is easy and you too can create this bread!
What’s great about this pull apart bread is that while it’s a nice addition to your dinner party menu, it also works as an appetizer that people can easily graze on once the walk in the door. I’ll often have this ready as soon as my family comes over for Christmas Eve dinner. They love to snack on this bread and enjoy cocktails while exchanging gifts. It’s always nice to have something for people to graze over while chatting away.

The details.
Start with the dough. I like to keep it simple with a mix of flour, instant yeast, and a pinch of salt. My secret…to use both milk and heavy cream in the dough. The combination creates a beautiful golden crust on the outside, but the inside stays incredibly soft and fluffy.
I prefer to use instant yeast to keep the dough making process quick and simple! When using instant yeast, you can skip the entire hour-long rise. Which is great if you’re not the best planner. Then you can still have beautiful, delicious bread with dinner in under two hours!
Of course, you can also use active dry yeast as well, but you will need to make some adjustments to ensure the dough rises properly!

The garlic butter…
Is there anything better than garlic butter? Pretty sure that’s a no, it’s always a good addition. But especially on a soft dinner bread like this pull-apart garlic butter bread wreath.
I use my favorite Vermont Creamery Cultured Butter for the very best flavor. Cultured Butter is richer and creamier than traditional butter, and the flavor just doesn’t compare. Using high-quality ingredients are so important to me. I love knowing that Vermont Creamery’s butter uses only two simple ingredients: cream and cultures (and sea salt if you’re using the salted butter).
Unlike traditional butter, Vermont Creamery’s Cultured Butter is fermented for 20 hours then churned to 82% butterfat. This provides the butter with an incredibly rich taste and creamy texture. It has notes of buttermilk throughout, which pair so well with the garlic and herbs in this recipe. It’s what makes this bread extra “special”.
Once the bread has risen, simply roll the dough out, layer the squares, then arrange in a tube pan. If you don’t own a tube pan, I’d recommend dividing the dough between two traditional bread pans. That works great too!
Let the bread rise until it is puffy on top, then bake. Wonderful smells will waft from your oven.
Here’s the thing, you can’t stress if your unbaked bread dough looks a little crazy. Know that the layers of dough do not need to be perfect…just bake the bread. As soon as you pull this out of the oven you’ll be impressed. And no matter what, it’s going to be good.
The most important thing you must do? Serve the bread warm with a tiny pat of additional butter and a sprinkle of flaky sea salt.
Truly nothing is more delicious. I can’t wait to serve this to my family on Christmas Eve…my brothers are already excited.

Some holiday entertaining tips…
This is the perfect dinner party bread, so I want to share a few tips!
Tip one: Keep things simple and easy. Don’t go overboard with a menu that’s fussy, just create a simple menu that you feel your guests will all enjoy. My menu suggestion? Slow cooked short ribs, a simple side salad, and bread…this bread to be specific.
Tip two: Serve pitcher cocktails and have some wine on hand for those who might not enjoy the “fancy” drinks. This Holiday Cheermister Bourbon Punch is one of my favorites to serve.
Tip three: Have holiday music playing, but in the background, so it’s not too loud. Have your favorite candles burning, and/or the fire on to create a welcoming, cozy space. You want your guests to feel immediately welcomed and relaxed the minute they walk through your doors!
Tip four: Send guests home with a small box of cookies. It’s extra work, but such a nice way to end a great night.
Hoping this helps you host a relaxing night in with friends or family all holiday season long!

If you make this pull-apart garlic butter bread wreath, be sure to leave a comment and/or give this recipe a rating! Above all, I love to hear from you guys and always do my best to respond to each and every comment. And of course, if you do make this recipe, don’t forget to tag me on Instagram! Looking through the photos of recipes you all have made is my favorite!
Watch the How To video:
Pull-Apart Garlic Butter Bread Wreath.
Servings: 10
Calories Per Serving: 470 kcal
Nutritional information is only an estimate. The accuracy of the nutritional information for any recipe on this site is not guaranteed.
Watch the How-To Reel
Ingredients
- 4 3/4 cups all-purpose flour plus more if needed
- 2 packets instant yeast
- 1 teaspoon kosher salt
- 1 cup warm whole milk
- 2/3 cup warm heavy cream
- 3 tablespoons honey
- 2 tablespoons Vermont Creamery Cultured Butter, at room temperature
- 1 large egg, at room temperature
- 1 stick (8 tablespoons) Vermont Creamery Cultured Butter, at room temperature
- 2-3 cloves garlic, grated, use to your taste
- 1/3 cup freshly grated parmesan cheese
- 2 tablespoons dried parsley
- 1 tablespoon chopped fresh sage or oregano
- flaky sea salt, and fresh thyme, for topping
Instructions
- 1. In the bowl of a stand mixer combine the flour, yeast, and salt. Add the warm milk, warm heavy cream, honey, the egg, and 2 tablespoons butter. Using the dough hook, mix until the flour is completely incorporated, about 4-5 minutes. If the dough seems sticky, add the remaining 1/4 cup of flour. Cover the bowl with plastic wrap and let sit at room temperature for 30 minutes to 1 hour. 2. To make the garlic butter. Combine 1 stick butter, garlic, parmesan, parsley, sage, and a pinch of salt together in a small bowl.3. Transfer the dough to a work surface and cut into 4 equal pieces. Working with 1 dough piece at a time, roll into a large rectangle (roughly 14×10 inches) on a lightly floured surface. Spread 1/4th of the garlic butter over the dough, then cut lengthwise into 3 strips. Cut the strips crosswise into 4 strips each, making 12 squares (see above photo). Stack all 12 dough squares, 1 on top of the other. Repeat with remaining 3 dough pieces and remaining garlic butter. Arrange stacks in a lightly buttered tube pan, standing up like little books, allowing gaps between dough pieces (see above photo).4. Cover the pan with plastic wrap, and let rise in a warm place until the dough almost reaches the top, about 1 hour. Preheat oven to 350 degrees F.5. Transfer to the oven and bake until the bread is golden brown, 30 to 40 minutes. Let stand in the pan 5 minutes, then carefully remove. Brush with additional melted butter, if desired, and sprinkle with flaky sea salt.
Notes
Alternate Baking Pan: you can divide the dough between 2 regular size bread pans and bake 25-30 minutes.
To Make Ahead: prepare the rolls through step 4. Do not let the bread rise at room temp. Cover the bread and place in the fridge (up to overnight). When ready to bake, remove the bread from the fridge 30 minutes prior to baking, then bake as directed.
To Prepare and Freeze: assemble the bread through step 4, then cover the pan and freeze for up to 3 months. Thaw the bread overnight in the fridge or on the counter for a few hours. Once thawed, bake as directed.
To Bake and Freeze: bake the bread as directed and let cool completely. Cover well and freeze for up to 3 months. Thaw and warm before serving.
*Dough adapted from Food and Wine.

{This post is sponsored by Vermont Creamery. Thank you for supporting the brands that keep Half Baked Harvest cooking!}
This post was originally published on December 12, 2019


Any non-dairy alternative for the milk and heavy cream you would suggest for success of this recipe?
Hi Michelle! I haven’t ever tried this without non dairy milk, but you could maybe give coconut milk a try? xT
To make ahead, you don’t allow the dough to raise at all before putting it in the fridge?
This bread was amazing, and it looks so pretty!
Thanks so much Deborah! xT
Hi Tieghan!
I absolutely love this recipe! But, I was unsure – which rising step can I skip if I use instant yeast rather than the active dry? Thanks!
Recipe takes a long time. Waiting to rise multiple times. However, mine hardly rose the first time, 2.5 hours later, I rolled it out, cut put in a warner place and nothing. Because I’ve had trouble before with regular yeast I was excited about the “instant” version. But,nope.
Hi! So sorry this recipe wasn’t a winner for you! Is there anything I can do to help? xT
Me and my husband have been huge fans of yours for a long time and love your recipes, style, tips, all of it. I made this bread last night and we all just fell down dead over it. So delicious, not too difficult to make, so many uses, just incredible. Yet another 5 star recipe from Tieghan! Thank you!
Hey Erika,
Wonderful!! I love to hear that you enjoyed this recipe! Thanks so much for your feedback and trying the recipe! Happy Thanksgiving! xT
I just made this bread and it was incredible! The directions made perfect sense and were easy to follow. The bread was delicious and the butter spread was to die for.
Can’t wait to make it for thanksgiving!
Hey Andressa,
Happy Sunday!! Thanks so much for giving this recipe a try, I appreciate you making it and your feedback! x
I have made this fresh and loved it! For making in advance, do you recommend baking and freezing or freezing it unbaked? Just to get the best result!
Hi Jemma,
Love to hear this!! Thanks so much for making this recipe and your feedback! I would freeze this unbaked:) Have a great day! xT
Hey Tieghan, 2 packets of instant yeast is how many tsp?
Hey there,
1 packet of yeast contains 2 1/4 teaspoons. Please let me know if you have any other questions! xx
Any tips on how to keep this from falling apart? Have tried making it a few times and the bread just falls apart when taking it out of the pan….
Hey Jane,
Thanks for giving this recipe a try! What kind of pan are you using? Is there anything you might be adjusting in the dough? When it bakes, is it full and around or are there spaces in between the pieces? Let me know how I can help! xT
Thanks for the response! I’ve tried both a ring and Bundt pan…I didn’t make any adjustments to the dough. It seems like it’s full and around when it baked but then as soon as it starts to cool, it falls apart. Have had no issues with any of your other recipes – all are delicious!! 🙂
Hmmm so strange!! So sorry about that Jane, I’m not sure what would be causing that!
Hello – if I only have active dry yeast, what adjustments would you make to the recipe?
Hey Carol,
You’ll need to proof the yeast in the warm milk and honey first and then you can follow the recipe as written:) Please let me know if you have any other questions, I hope you love this recipe! xT
This may sound dumb but I’m new to baking; what’s the difference in active dry yeast and instant yeast? Also what does it mean to “proof” the yeast? Thank you!!!
Hi there,
“Active” describes any dry yeast that needs to be activated prior to use, while “instant dry yeast” describes any dry yeast that’s ready for use the instant you open the package. Proofing is just the time you are allowing the yeast to work. Please let me know if you have any other questions! xx
This looks amazing for ANY season! Tips for making this whole wheat or mostly whole wheat?
Hey Ashley,
Thanks so much! I’ve only tested this recipe with all purpose flour, but I don’t see why whole wheat wouldn’t work for you! Let me know if you give the recipe a try! xT
This recipe turned out beautifully – I used an angel food cake pan which worked well except the butter dripped into the oven and made a big mess…just thought I’d put it out there to put a sheet pan underneath if you use a pan with removable bottom 🙂
Hi Nicole,
I appreciate you trying this recipe and sharing your feedback, love to hear that it was enjoyed! xT
I want to make this for a late holiday celebration – about how much dough does this recipe make? Curious just in case I want to take a short cut and buy pre made bread dough
Hi Marissa,
So sorry, not sure on the exact amount, but it makes enough for one wreath:) I would assume one ball of pre-made dough would be just fine for you to use! Please let me know if you have any other questions! xx
What can I use if I don’t have bread pans or the ring pan?! Help!
Hi Stephanie,
So sorry, you either need a tube pan or loaf pans for this recipe! Please let me know if there is anything else that I can help with! xx
Hello! made this a couple of christmas eve’s ago and LOVED it! Making again and want to mix it up – would this work with roasted garlic butter? Thanks
Hey Sonja,
I appreciate you making this recipe and sharing your review, I am so glad to hear it was enjoyed! Yes, that will definitely work! Merry Christmas! 🎁🎄