Next Post
The Studio Barn: Kitchen Appliances by KitchenAid.
Originally published Jun 14, 2019 • Updated Aug 14, 2025
This post may contain affiliate links, please see our privacy policy for details.
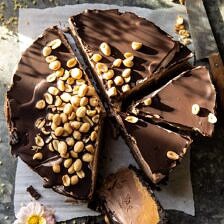
Nonnie’s 6 Ingredient Chocolate Peanut Butter Ice Cream Cake is the go-to summer dessert…super easy, super simple, yet so delicious. The filling is made with two base ingredients, high-quality chocolate ice cream, and creamy peanut butter. The crust is a mix of sweet chocolate wafer cookies and salted butter. When combined with the creamy chocolate peanut butter ice cream filling it makes for a mouthwatering cake that’s chocolatey, peanutty, super creamy, and a touch salty. Once the cake is frozen, top with homemade “magic shell” fudge and salty peanuts. This is everyone’s favorite summertime ice cream cake!

Clearly, I am all about cake on Fridays…
Last week it was all about this pretty blueberry lemon layer cake, which I am still overly excited about…did any of you make it? I am dying to make it again very, very soon. But this week it’s all about this ice cream cake. More specifically, my Nonnie’s chocolate peanut butter ice cream cake. Oh how I LOVE this cake! It will forever be a favorite. This cake is hands down in my top 10 most loved desserts. It’s both my dad’s and my older brother Brendan’s favorite dessert.
So yes, it’s safe to say that this easy ice cream cake is very much loved around here. With Father’s Day this Sunday, I knew that today was the perfect time to share this cake with you.
Why? Two reasons.
Reason 1…because dads love this cake.
Reason 2…because it is SO EASY to make, which is great for YOU!

Here’s the story. My Nonnie was good at a lot of things, but she was a pro entertainer. She knew how to throw an amazing party like no other. I learned so much from her when it comes to design, florals, entertaining, and making things “pretty”. She passed away a year and a half ago, so sharing this cake today feels extra special. This would be the cake she would have made for Father’s Day.
While I miss my grandma so much, I’m thankful to have recipes like this ice cream cake to always remember her by. I’m also thankful that I get to share these stories (and recipes) of hers with you guys! They bring back the best of times for me!

My Nonnie loved to entertain, but here’s the thing. While she enjoyed cooking and baking, she was always all about the simple recipes. Which is why her recipes are truly the best. Nonnie didn’t mess around with anything too complicated. She took short cuts when needed, and that is why I love her (and her recipes) so much. She taught me that not everything has to be made from scratch. Taking help from the store sometimes is just what you need to do.
Don’t get me wrong, I love doing all homemade as much as possible. But sometimes life gets busy. You need to give yourself a break and accept that the store has great time-saving options too.
This ice cream cake is the perfect example of one of Nonnie’s simple but delicious recipes.
This recipe requires 6 pantry staple ingredients, zero oven time, and almost no effort. The trickiest part about this cake? Waiting for it to freeze.

Let me break it down into steps.
Step 1: make the crust. This is super easy. Just combine crushed chocolate cookies with melted butter. I find this easiest to do in a food processor, but it can also be done in a bowl. Do what works for you. Now, press the cookie crumbs into a springform pan. Done with that.
Step 2: the ice cream filling. Are you ready? Mix slightly softened chocolate ice cream and a jar of creamy peanut butter together until they are just mixed and have pretty swirls throughout. Spread the layers of ice cream over the crust. Done with that.
Step 3: freeze.

Step 4: make the “magic shell”. Mix melted chocolate with coconut oil until smooth. You now have a “magic shell”. Pour the “magic shell” over the ice cream cake and garnish with peanuts. The shell will harden and the peanuts with be secured into place. Done with that.
Step 5: Slice and eat. Simple, easy, and so darn delicious!

I’m not sure if that process seems too easy, but while this is a simple cake, it’s so so good. The crust is sweet and slightly crunchy, while the ice cream is sweet and so darn creamy. And that chocolate on top? It’s salty, chocolatey, and adds a nice crunchy “crack” with every bite.
To sum this cake up… It’s sweet, heavy on the chocolate, heavier on the peanut butter, so creamy, but a little crunchy too. Oh, and just a little salty as well. It’s perfect, and every bite leaves you wanting another…which admittedly is a very dangerous thing.
If you put this cake out at a party, it will get eaten, and it will be the first dessert to disappear. Only crazy people don’t love this cake.

I make this cake from Memorial Day through Labor Day, for pretty much every summer party or dinner with friends. It’s my “back pocket” ice cream cake that never ever fails me.
Best part? It’s an ice cream cake, no bake, so you can make it today as Sunday’s Father’s Day dessert and it’s going to be delicious…because it’s FROZEN.
Best. Ice Cream. Cake!
Make it, enjoy it, and have the happiest Father’s Day weekend!

If you make my Nonnie’s 6 Ingredient Chocolate Peanut Butter Ice Cream Cake, be sure to leave a comment and/or give this recipe a rating! Above all, I love to hear from you guys and always do my best to respond to each and every comment. And of course, if you do make this recipe, don’t forget to tag me on Instagram! Looking through the photos of recipes you all have made is my favorite!
Nutritional information is only an estimate. The accuracy of the nutritional information for any recipe on this site is not guaranteed.

As Seen In


My husband said it was his favorite dessert EVER! Thank you!
Hi Holly,
Thanks so much for trying this recipe, I love to hear that it was enjoyed! Have a great week! xTieghan
You list “chocolate wafer cookies” but link to what look like chocolate chips–is there a specific kind of cookie/chocolate we should be using for this? Like sandwich cookies or just the brown part?
Hey Katie,
You can use Oreo’s without the cream filling or any other chocolate wafter cookie that your local grocery store carries. Please let me know if you have any other questions! xx
Thanks–this is what I did! My grocery store didn’t have any plain chocolate cookies so now I can find something fun to do with the extra cream. This was a huge hit for Father’s Day! I couldn’t keep the peanut butter from getting pretty mixed in with the ice cream, but we love chocolate-PB so no one minded!
Hey Katie,
Fantastic!! Thanks a lot for trying this recipe and sharing your review, I love to hear that it was enjoyed! ?Tieghan
Silly question but what do you keep it in if you make it early and want to keep it in the freezer for a bit?
I saw that the chocolate wafers in the link cost $15. Would Oreos without the filling count as chocolate wafer cookies, or do you have other, less expensive ideas?
Hi Erin,
Yes, that would be a great idea to use the Oreo’s minus the filling! Let me know if you give the recipe a try, I hope you love it! xx
I think the wafers linked are not cookies but chocolate. I bought the cookie wafers today and they were around $3. . Can’t wait for the cake to be frozen and ready for the magic shell and peanuts – thanks for the yummy recipes!!
Thanks for pointing that out Deb, I will have to fix that link!! Let me know how the recipe turns out!! xx
Hi Erin
Just FYI, every time I make an oreo cookie crust, I just throw the whole oreos into a food processor and mix with melted butter. No need to remove the cream filling-it actually acts as ‘glue’ to hold the crust together….
Hey Mary Beth,
You can put it back into the springform pan or you can keep covered on a cake plate or any old plate will do:) Let me know if you give the recipe a try! xTieghan
This was sent to me by a friend! Total hit! The only thing I changed the second time I made it was the crust..instead of the bottom layer I just layered Oreo cookie crumbs as a middle layer. Found the bottom layer as written was just too hard to cut through when eating it.
Hey Stephanie,
Happy Sunday! Thanks so much for making this recipe and sharing your feedback!! Love to hear that it was a winner:) xxT
Could the Magic Shell be used to top a Bosto Cream Cake?
Thank you
Hi Sarah,
I’ve never tried that but you could certainly give it a go! xTieghan
Yum! Made this for fathers day this year and it was delicious!!
Thanks so much! So glad you enjoyed this recipe 🙂 xxTieghan
This was delicious. It was a big hit with my whole family. I’d like to make it for Thanksgiving. Any tips for lining a round cake pan with parchment paper for this recipe? Should I line the whole pan, or just the bottom?
Hi Stef,
Thanks so very much for giving this recipe a go, I love to hear that it was enjoyed! You could just line the bottom. Happy Thanksgiving! xTieghan
Just going on a binge and making all your recipes! ?
Made this for my husband’s birthday! He doesn’t usually like ice cream cake like DQ but this one was a hit and so simple to make!
Hey Nicole,
Happy Sunday! I am thrilled to hear that this recipe was a winner. Thanks a lot for giving it a try! xTieghan
great recipies, with chocolate and peanut butter, thanx
Hey Doris,
Happy Wednesday! Thanks so much for making this recipe, I am thrilled that it was enjoyed! xTieghan
So so good! Perfect summer dessert.
Hey there,
Happy Monday! Love to hear that this recipe was enjoyed, thanks a bunch for giving it a try! xxTieghan
So so good!! Making again today.
Hey Kristen,
Happy Monday! Love to hear that this recipe was enjoyed, thanks a bunch for giving it a try! xxTieghan
AMAZING and so easy !
Hey Michelle,
Happy Sunday! Thanks so much for giving this recipe a try, I love to hear that it was enjoyed! xTieghan
Hi! How far in advance can I make this dessert and keep frozen? Thank you xxx
Hey Karen,
This will stay good in the freezer for up to 3 months. I hope you love the recipe, please let me know if you give it a try! xTieghan
AMAZING and so good !
Hey Michelle,
Happy Sunday! Thanks so much for giving this recipe a try, I love to hear that it was enjoyed! xTieghan
Absolutely perfect, yes this recipe came out absolutely perfect. I’ll be making this again along side my husband, he helped. We had a great time putting this together, Soo easy, sooo delicious.
Hey Sandra,
Happy Sunday! Thanks so much for making this recipe, I love to hear that it was enjoyed! xxTieghan
I used vanilla ice cream instead of chocolate and everyone still ate every last bite!
Hey Susan,
Wonderful! I am so glad to hear that this recipe was enjoyed, thanks so much for making it! xTieghan
Easy and delicious! I used almond butter because of allergies and. It was terrrrific!
Hey Maria,
Happy Monday! Thanks so much for making this recipe, I love to hear that it was enjoyed! xxTieghan