Next Post
Chinese Mushroom Dumplings with Sweet Chili Ginger Sesame Sauce.
This post may contain affiliate links, please see our privacy policy for details.
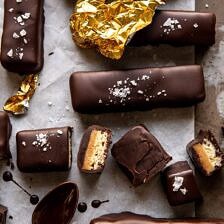
Sharing a healthier take on the classic Twix bar with my Homemade Vegan Twix Bars. Layered with dark chocolate, toasted coconut “shortbread”, maple syrup-based “caramel”, additional dark chocolate, and finished with flaky sea salt. Every last bite is sweet, nutty, hinted with caramel-like flavors, extra chocolatey, and so DELICIOUS. Absolutely nothing not to love about these homemade candy bars. Bonus? These Twix bars are easy to make, have no processed sugars, and are even gluten-free!

If there’s one thing I know for sure, it’s that even when trying to eat healthy…ish, chocolate should always be included. After all, chocolate is actually one of the most antioxidant-rich foods there is. It’s true, and I know this because my mom has read up on cacao and the benefits of enjoying it…daily. Which is why she has a steaming mug of hot cacao every single morning upon waking…and every single night before bed!.
My point here is that those New Years’ diets should include a dark chocolate treat. Which is where these Twix bars come in. Honestly, I didn’t grow up eating Twix. Instead, I very much preferred a Reese’s Peanut Butter Cup, or just a simple Milk Chocolate Malley’s Bar. I kept things simple when it came to sweets, and didn’t really eat much candy. That said, I’ve had a lot of requests to create a homemade Twix bar. But it wasn’t until my cousin Abby requested them over Christmas break that I decided to work on testing a healthier, homemade version of the classic Twix bar.
These took a while to perfect, but I finally got them just right. And well they might not be identical to the store-bought Twix, they sure are delicious.

These bars have two layers, the first layer is a coconut shortbread/biscuit. It’s nutty, perfectly sweet, and just a little crumbly too. I’ve found it very much imitates that of the biscuit layer in a classic Twix bar. The second layer is a creamy maple based “caramel”. This doesn’t taste exactly like a rich, buttery caramel, but it’s delicious in its own unique way.
You’ll want to start with the coconut layer. This is a very simple mix of shredded coconut, almond flour, and coconut oil. It bakes in the oven until lightly golden and toasted. It’s simple, yet delicious. This is my favorite layer, I love the nuttiness the coconut adds, and once baked, this layer tastes sweet and “buttery”. Very much like a classic shortbread cookie, but in my opinion, better.

While the coconut base layer cools, make the “caramel”. As I said this is not your average caramel, but it’s just as delicious. I use maple for sweetness, coconut milk for creaminess, and nut butter to thicken the caramel up enough to stay inside the bars.
Once the coconut layer has cooled off, pour the caramel layer over top, then freeze the bars. You’ll only need them to freeze for thirty or so minutes. This step is really just to help the bars set up quicker, to make them easier to cut through, and to make them solid enough to dip into the chocolate…which is the final step. I used melted dark chocolate to enclose all the fillings. I then finished with a sprinkle of flaky sea salt for that salty, sweet flavor combination.
The family’s verdict? Not exactly a Twix bar, but close enough. And most importantly…beyond good!

Tip one, use a finely shredded coconut. This is the exact coconut I used and I found it to work really well for these bars. It’s finer shred creates the perfect cookie-like texture.
Tip two, use full-fat coconut milk and only use the cream, discard or save the coconut water for another use. You’ll want to use just the cream to ensure your caramel sets up nicely and is not too runny.
Tip three, make sure the bars are thoroughly chilled before dipping in chocolate. This is probably my biggest tip. If the bars are frozen, the chocolate will quickly set up on the bars and be easier to work with. Trust me, freeze the bars, then dip through the melted chocolate.
Tip four, if you want a thick chocolate-coated candy bar, dip your bars once, re-freeze until set (which will only take a matter of minutes), then dip in chocolate again. This is not NEEDED, but it sure is a good idea. Double the chocolate, please.

A Twix bar, but better.
Well, wait. These are definitely not an exact replication, but they have the very same flavor profiles. The biggest difference is that these bars are made minus any processed sugars, unhealthy fats, and instead of a sugar-induced headache, these will leave you feeling satisfied.

I love keeping these in the fridge for an afternoon snack or late night dessert. Just one thing? Don’t skip that sprinkle of flaky sea salt at the end. Love a good salty, sweet “candy” bar, you know?
Yes, yes. Let’s take some time to do a little Tuesday night baking. It’s winter, so the extra time next to the oven is always welcomed. Enjoy!

If you make these homemade vegan Twix bars, be sure to leave a comment and/or give this recipe a rating! Above all, I love to hear from you guys and always do my best to respond to each and every comment. And of course, if you do make this recipe, don’t forget to tag me on Instagram! Looking through the photos of recipes you all have made is my favorite!
Nutritional information is only an estimate. The accuracy of the nutritional information for any recipe on this site is not guaranteed.

As Seen In


One last question, what kind of texture should the almond/cashew butter be then? Should it be more on the liquid-y side? What brand of cashew butter do you recommend?
Hey Winnie,
Yes, I think something a bit liquidy and smooth is great for this recipe, I get mine from Whole Foods. I hope you love the recipe, please let me know if you have any other questions! xTieghan
Hey Tieghan! Thanks for responding. Sorry I can’t seem to reply to your comment directly. I followed the recipe exactly and used MaraNatha almond butter (which is no stir/more solid — maybe a culprit?). I had the caramel boiling for 12 minutes and it came out crumbly :'( I put it on medium-low heat after it started boiling as well.
Hey Winnie,
So sorry about this! I am thinking it could have been the almond butter. I think the different textures of almond butters could cause a little bit of a difference. xTieghan
I followed this recipe, but my “caramel” layer ended up dry. It looked like it was thickening as I was boiling it; but once I put in the almond butter, it got extremely dry. Disappointed because the ingredients were more expensive than what I usually expect 🙁 Do you know why my caramel didn’t work?
Hey Winnie,
So sorry about this! Was there anything you may have adjusted in the recipe? It sounds like the caramel could have possibly been overcooked. Let me know how I can help! xTieghan
I didn’t make these fully as I found out that my boyfriend doesn’t like coconut, so I got as far as not getting the chocolate on them. The reason for posting is that I over cooked the “caramel.” I cooked it far longer than I should, and it somewhat solidified. So DO NOT OVERCOOK THE CARAMEL! Follow the directions! I was able to get it to go over the cookie mixture, but it was like working with warm wax and it didn’t pour.
Subsequently, my boyfriend ate what was made, so he should’ve just let me complete the recipe. Men. Sigh.
Hey Sharon,
Thanks so much for making the recipe, I am so glad it was enjoyed! Have a great week! xTieghan
These are soooo good! Definitely require a bit of skill to pull off but so worth it! I gotta say tho, I would compare them more to a Samoa Girl Scout cookie flavor than a Twix bar! And I’m not mad about it – they’re my favorite! Thanks for this recipe. ?
Hey Jess,
I am delighted that this recipe was enjoyed, thanks so much for making it! xTieghan
So I doubled the recipe for a 9×13 pan and it was just right. I’ve made them three times so far and they are a HUGE hit. Everyone asks for more! This last time in addition to the almond butter, I added a couple of teaspoons of peanut butter and really liked the flavor even more. Is there anything you recommend that can be done about the chocolate that hardens around the bars?
Hey Lilia,
I am so glad the recipe was enjoyed, thanks so much for giving it a try! The coconut oil really helps to create the chocolate shell. xTieghan
Yum! Can you specify in the steps how Much coconut oil to use? For the base it isn’t specified, so I put in the entire 1/4 cup which I assumed was correct…and then the 1 tablespoon for the chocolate layer.
Hey Diana,
Yes, that is correct! I hope you love the recipe, please let me know if you have any other questions! xTieghan
So delicious, Tieghan! Just made them for the 2nd time. I think I’m doing something wrong though. The caramel layer starts to harden immediately after taking it off the heat. Also, some of them break when I cut them before the chocolate dip. Any thoughts what I’m missing?
Thanks!
Hey Carol,
I am so so glad that you liked the recipe, thanks a lot for making it! I am thinking your caramel might be overcooked if it is becoming too hard. Happy Friday:) xTieghan
Hi Tieghan! These look incredible. I’ve tried making them but am really struggling with the caramel. My first batch burned and the second was paste-like, not a velvety caramel sauce. I didn’t substitute any ingredients and followed the instructions. Any recommendations? Thank you!
Hey Elizabeth,
I am so sorry you are struggling with the caramel. It sounds like your heat could possible be too high. I would recommend turning it down a bit and see if that helps anything. Let me know! xTieghan
My “caramel” never thickened, even after boiling for 30+ minutes. I consider myself pretty experienced in the kitchen so I’m bummed. Everything is setting in the freezer so I hope it turns out. But after reading many of the comments from people who actually made the recipe, I’m not hopeful.
Hey Nicole,
So sorry you had issues with the caramel. Was there anything you adjusted? Let me know how they turn out! xTieghan
These were so good! However, my caramel layer turned into a really weird texture… what causes this?
Hey Tia,
Thanks so much for giving the recipe a try. So sorry to hear about your caramel, can you tell me more? What do you mean a really weird texture? Let me know how I can help! xTieghan
If I have ghiradelli dipping chocolate, do I need to mix in coconut oil with melting down the chocolate?
Hey Mikayla,
Yes, the coconut oil helps to create the chocolate shell. I hope you love the recipe, please let me know if you have any other questions! xTieghan
Recipe turned out great! I melted less chocolate than what the recipe called for and still had about 1/2C left over, would melt down less in the future. I also was skeptical about the caramel turning out but everything was perfect. Thanks so much!
Hey Amy,
Thanks so much for giving the recipe a try, I am thrilled it was enjoyed! xTieghan
I accidentally put the caramel on the coconut base before baking the coconut. Is there any saving it?? Or should I just toss it and start over?
Hey Ellen,
Sorry I think you need to start over. Let me know how it turns out! xTieghan
Can you sub light maple syrup or does it need to be the real maple syrup? Can’t wait to make these!
Hey Cass,
I prefer real maple syrup, but use what you have on hand:) I hope you enjoy the recipe. Let me know if you have any other questions! xTieghan