Next Post
Chinese Mushroom Dumplings with Sweet Chili Ginger Sesame Sauce.
This post may contain affiliate links, please see our privacy policy for details.
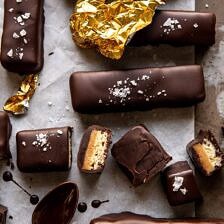
Sharing a healthier take on the classic Twix bar with my Homemade Vegan Twix Bars. Layered with dark chocolate, toasted coconut “shortbread”, maple syrup-based “caramel”, additional dark chocolate, and finished with flaky sea salt. Every last bite is sweet, nutty, hinted with caramel-like flavors, extra chocolatey, and so DELICIOUS. Absolutely nothing not to love about these homemade candy bars. Bonus? These Twix bars are easy to make, have no processed sugars, and are even gluten-free!

If there’s one thing I know for sure, it’s that even when trying to eat healthy…ish, chocolate should always be included. After all, chocolate is actually one of the most antioxidant-rich foods there is. It’s true, and I know this because my mom has read up on cacao and the benefits of enjoying it…daily. Which is why she has a steaming mug of hot cacao every single morning upon waking…and every single night before bed!.
My point here is that those New Years’ diets should include a dark chocolate treat. Which is where these Twix bars come in. Honestly, I didn’t grow up eating Twix. Instead, I very much preferred a Reese’s Peanut Butter Cup, or just a simple Milk Chocolate Malley’s Bar. I kept things simple when it came to sweets, and didn’t really eat much candy. That said, I’ve had a lot of requests to create a homemade Twix bar. But it wasn’t until my cousin Abby requested them over Christmas break that I decided to work on testing a healthier, homemade version of the classic Twix bar.
These took a while to perfect, but I finally got them just right. And well they might not be identical to the store-bought Twix, they sure are delicious.

These bars have two layers, the first layer is a coconut shortbread/biscuit. It’s nutty, perfectly sweet, and just a little crumbly too. I’ve found it very much imitates that of the biscuit layer in a classic Twix bar. The second layer is a creamy maple based “caramel”. This doesn’t taste exactly like a rich, buttery caramel, but it’s delicious in its own unique way.
You’ll want to start with the coconut layer. This is a very simple mix of shredded coconut, almond flour, and coconut oil. It bakes in the oven until lightly golden and toasted. It’s simple, yet delicious. This is my favorite layer, I love the nuttiness the coconut adds, and once baked, this layer tastes sweet and “buttery”. Very much like a classic shortbread cookie, but in my opinion, better.

While the coconut base layer cools, make the “caramel”. As I said this is not your average caramel, but it’s just as delicious. I use maple for sweetness, coconut milk for creaminess, and nut butter to thicken the caramel up enough to stay inside the bars.
Once the coconut layer has cooled off, pour the caramel layer over top, then freeze the bars. You’ll only need them to freeze for thirty or so minutes. This step is really just to help the bars set up quicker, to make them easier to cut through, and to make them solid enough to dip into the chocolate…which is the final step. I used melted dark chocolate to enclose all the fillings. I then finished with a sprinkle of flaky sea salt for that salty, sweet flavor combination.
The family’s verdict? Not exactly a Twix bar, but close enough. And most importantly…beyond good!

Tip one, use a finely shredded coconut. This is the exact coconut I used and I found it to work really well for these bars. It’s finer shred creates the perfect cookie-like texture.
Tip two, use full-fat coconut milk and only use the cream, discard or save the coconut water for another use. You’ll want to use just the cream to ensure your caramel sets up nicely and is not too runny.
Tip three, make sure the bars are thoroughly chilled before dipping in chocolate. This is probably my biggest tip. If the bars are frozen, the chocolate will quickly set up on the bars and be easier to work with. Trust me, freeze the bars, then dip through the melted chocolate.
Tip four, if you want a thick chocolate-coated candy bar, dip your bars once, re-freeze until set (which will only take a matter of minutes), then dip in chocolate again. This is not NEEDED, but it sure is a good idea. Double the chocolate, please.

A Twix bar, but better.
Well, wait. These are definitely not an exact replication, but they have the very same flavor profiles. The biggest difference is that these bars are made minus any processed sugars, unhealthy fats, and instead of a sugar-induced headache, these will leave you feeling satisfied.

I love keeping these in the fridge for an afternoon snack or late night dessert. Just one thing? Don’t skip that sprinkle of flaky sea salt at the end. Love a good salty, sweet “candy” bar, you know?
Yes, yes. Let’s take some time to do a little Tuesday night baking. It’s winter, so the extra time next to the oven is always welcomed. Enjoy!

If you make these homemade vegan Twix bars, be sure to leave a comment and/or give this recipe a rating! Above all, I love to hear from you guys and always do my best to respond to each and every comment. And of course, if you do make this recipe, don’t forget to tag me on Instagram! Looking through the photos of recipes you all have made is my favorite!
Nutritional information is only an estimate. The accuracy of the nutritional information for any recipe on this site is not guaranteed.

As Seen In


Hey! Thanks for the recipe, mine are currently in the freezer before I chocolate coat them! I think I’ve done something slightly wrong though… the coconut base went well (I replaced the maple syrup for date syrup) but my caramel layer has a very odd consistency. I’m thinking I may have overcooked it, when i added the nut butter and vanilla it instantly became solidified and crumbly.. do you know why? Did I just over cook it?
Hey Phoebe,
Thanks so much for trying the recipe, so sorry to hear about your caramel, it does sound like it is overcooked. Next time, I would just reduce your cooking time. I hope this helps! xTieghan
Second time making these and they are SO good! Can you suggest a good amount of time to let the caramel cool before adding the vanilla and nut butter? Thanks!
Hey Becca,
Thanks a lot for making this recipe, I am delighted that it was enjoyed! You are not letting it cool, you are just removing from the heat and adding the vanilla and nut butter. Happy Friday:) xTieghan
Any idea why my caramel turned into this hard crumbly texture as soon as I added the all natural almond butter in?! It was perfect then turned into like graham crumbs. I followed the recipe to a T!
Hey Jessica,
I am so sorry to hear this! Unfortunately, I can’t quite say since I do not know what the caramel looked like, but it sounds like it could have possibly been overcooked. Next time, just be sure to keep a careful eye on it. I hope this helps! xTieghan
Do you have any recipes or suggestions for what do do with the rest of the coconut milk? The cream really is the best part, but I do t want to throw the rest away.
Hey Julia,
You can keep your coconut milk covered in the fridge, I use it in a lot of recipes. Here are some ideas:
https://www.halfbakedharvest.com/thai-turmeric-chicken-and-noodles/
https://www.halfbakedharvest.com/butter-chicken/
https://www.halfbakedharvest.com/gingery-coconut-sweet-potato-and-rice-stew/
Let me know if you have any other questions! xTieghan
Hi,
My “caramel” hardened quickly in the pan, it was smooth then went to hard nut butter. Did I maybe cook the maple syrup and coconut too long?
Hey Ericka,
So sorry about this, yes it sounds as though it was overcooked. xTieghan
These taste sooo good! I was a little worried about the caramel turning out ok but did the full 15 minutes and it is such a creamy consistency. Watch the Insta highlights if you’re worried about that step! Don’t have any issues cutting like a few others mentioned. I did add a little sprinkle of salt to the caramel too to make it pop. They’re a fun project and I love that they don’t contain any refined sugar! Thank you! These may be a cookie box staple now ?
Hey Alejandra,
Thanks so much for making the recipe, I am so glad it was enjoyed! xTieghan
Great Recipe! But I have a question on the caramel…. I used unsweetened coconut cream and added maple syrup. The mixture started to get thick but then started separating into what looked like oil and crystallized sugar? I tried it two times, once I left it on high heat and only stirred about 5 times. Second, I stirred constantly while on medium heat then to low heat when it started bubbling a lot. Any explanation to what I’m doing wrong? Thank you!
Hey David,
Thanks so much for making the recipe, I am so glad it was enjoyed. So sorry about the caramel, it can be super tricky and easily overcooks. Nex time, try stirring constantly on a lower heat. I hope this helps! xTieghan
After I boiled and melted the syrup & coconut oil, I had the thickened caramel syrup but once I stirred in the peanut butter and vanilla it turned into a cookie crumble and completely lost the liquidity of it. I still made them and it was delicious! But it was more like chocolate covered cookie! Any idea why?
Hey Katie,
So sorry about this! Was there anything you adjusted in the recipe? One thing that could have happen is the caramel was overcooked. It is hard to say without seeing what this looked like. Let me know! xTieghan
I burnt the first batch of carmel so was careful for the second time, watching and boiling it on medium. It thickened and looked good, so I added in the almond butter, it was fine, and then as soon as I added in the vanilla it started bubbling. I mixed it and it instantly hardened, turning into a kind of peanut butter looking paste. Was it too hot when I put it in? Wondering what wrong here.
Thanks!
Hey Madeline,
So sorry to hear this. Unfortunately the caramel can be super finicky and over cook easily. Just be super careful next time! xTieghan
What oil can you use instead of coconut oil? Would avocado oil work?
Hey Llatt,
Yes, that would work! I hope you love the recipe. Please let me know if you have any other questions! xTieghan
Made these today….AWESOME!! Believe me they will not last long in the fridge…we will have eaten them all in a few days! THANKS T!
Hey Carol,
I am so glad you enjoyed the recipe, thanks for making it! xTieghan
We made these and the flavor is amazing! We froze the “caramel sauce” on the coconut mixture. It was very sticky and hard to work with when trying to cut them into bars. We put the blobs on a baking sheet, poured the chocolate on top and froze it. Didn’t look too pretty but so good once cut. Wondering if it would be easier for to pour the chocolate on top and then freeze and cut? The chocolate wouldn’t be on the bottom though. Any tips!? Would love to try them again!
Hey Megan,
Thanks for trying the recipe, sorry you had issues with the caramel. I am thinking it needed to set a little longer, I hope this helps for next time! xTieghan
If you don’t have coconut, would you add more almond flour or would it just work without coconut?
Hey Megan,
I would add more almond flour. I hope you love the recipe. Let me know how they turn out! xTieghan
GREAT recipe!! However when I made the caramel sauce, it wasn’t liquidy at all, but more of a harder consistency. Is it possible I cooked it too long? 🙁
P.S. I’m a HUGE fan of your recipes! 🙂
Hey Valerie,
I am so glad you liked the recipe, thanks for giving it a go! Yes, if the caramel was too hard, that means it was overcooked. Happy Sunday! xTieghan
Hello, what can i use to substitute almond butter?
Hey Hayfa,
Another nut butter will work in place of the almond butter. I hope you love the recipe, please let me know if you have any other questions! xTieghan