Next Post
Easy Healthier Crockpot Butter Chicken
Originally published Sep 8, 2013 • Updated Oct 15, 2022

This post may contain affiliate links, please see our privacy policy for details.
I really love homemade bread, especially this homemade naan. I put together step by step photos and instructions for you guys, so there is really no messing up this one! There is even a video…..ok, you guys have to try this!! You won’t regret it, promise!

Well, actually my mom really loves homemade bread and I love to making her happy! I think I will always love making my mom happy, whether I am nineteen or fifty (oh my gosh, I cannot even imagine). It’s just something that makes me happy, so I guess it’s a win win!
Plus, I mean homemade Naan? Yeah, there is not much better. It’s stinkin amazing!
It’s so easy that I thought you guys would like seeing the process a little bit. The pictures are not awesome, but you’ll get the idea. So here we go!
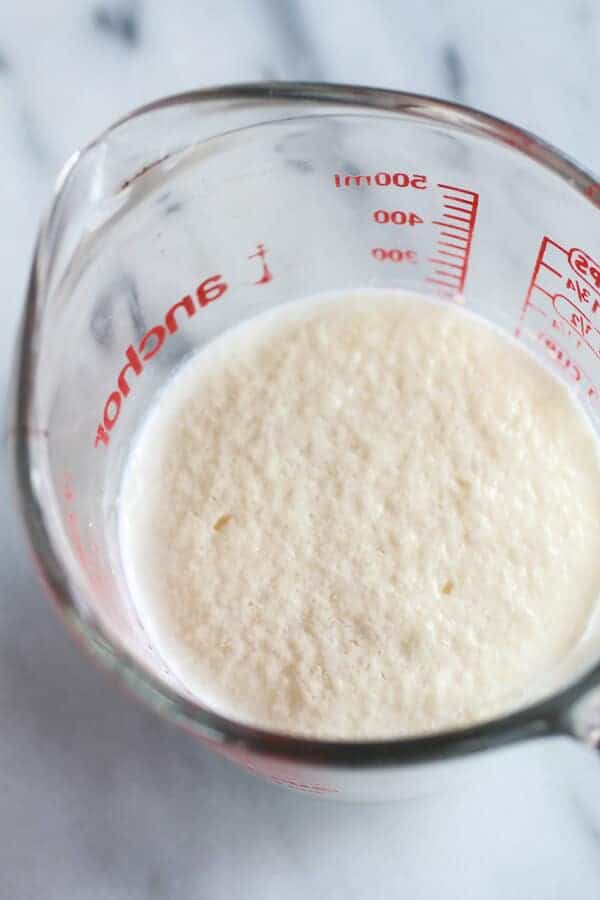
Start by activating the yeast. Combine the warm water with the sugar and yeast. Let sit for 10 minutes until foamy. It should smell bread like.
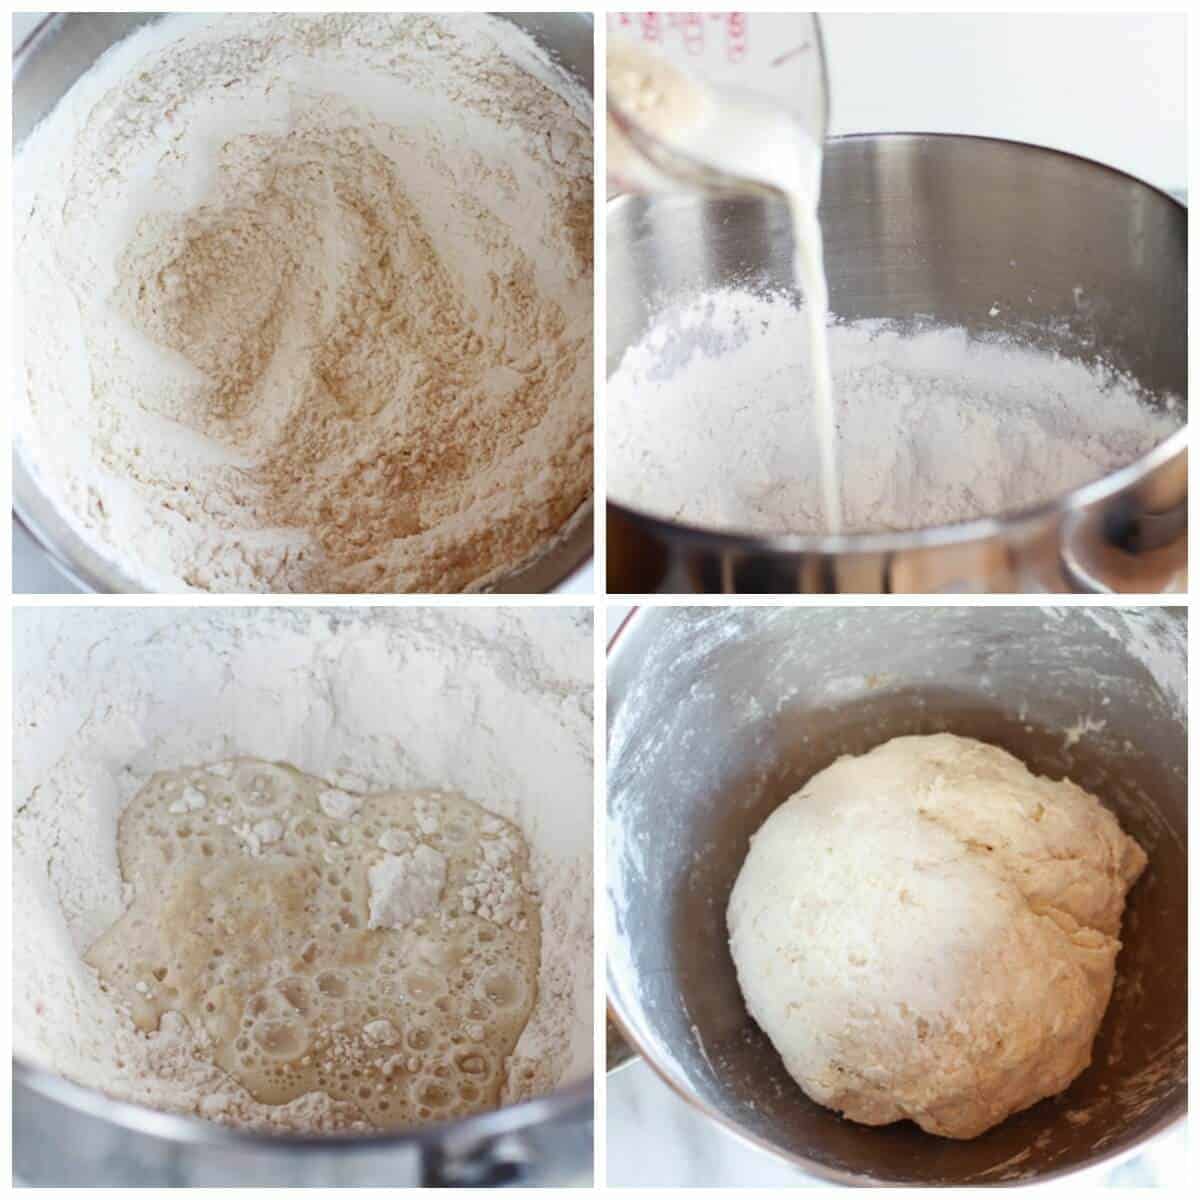 Add the flour, baking powder and baking soda to a large bowl. Then add the warm milk and yogurt to the yeast mixture. Pour the yeast into the flour. Mix with a wooden spoon until dough starts to come together and then finish mixing the dough with your hands until a smooth but still sticky ball forms.
Cover the dough with a damp towel or plastic wrap and let sit in a warm place for one hour. 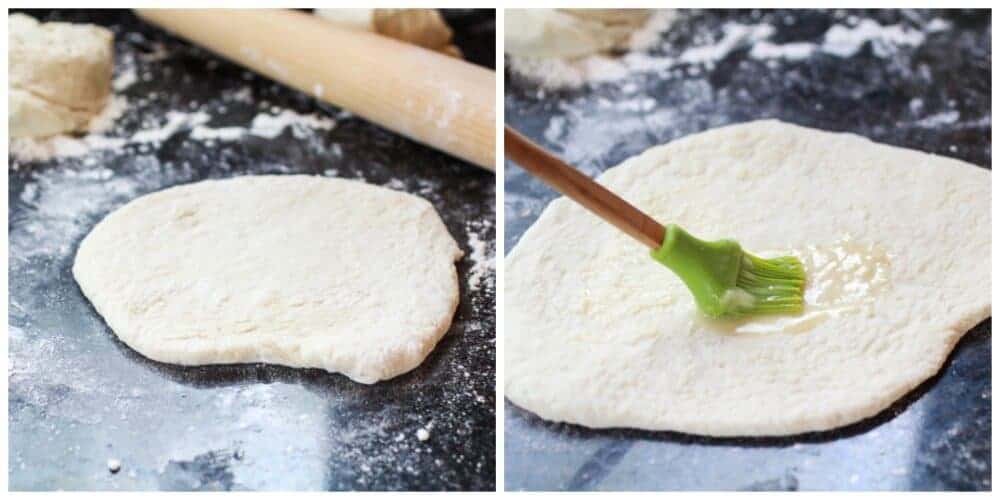 After one hour punch the dough down and divide into eight equal balls. Using a rolling-pin, roll each piece of dough into an oval shape. The dough should be about 6-8 inches long and about 1/4-inch thick, but no thinner. Repeat this method with the rest of the dough.
Warm a cast iron skillet over medium-high heat (you want a hot pan). Brush both sides of the Naan with melted butter and if desired sprinkle on any spices you enjoy, such as cumin and garlic. I did not flavor my Naan, but only because one, I know my family is picky and two, I knew we would be eating the leftover Naans for breakfast and well I love garlic, I do not normally want it for breakfast!
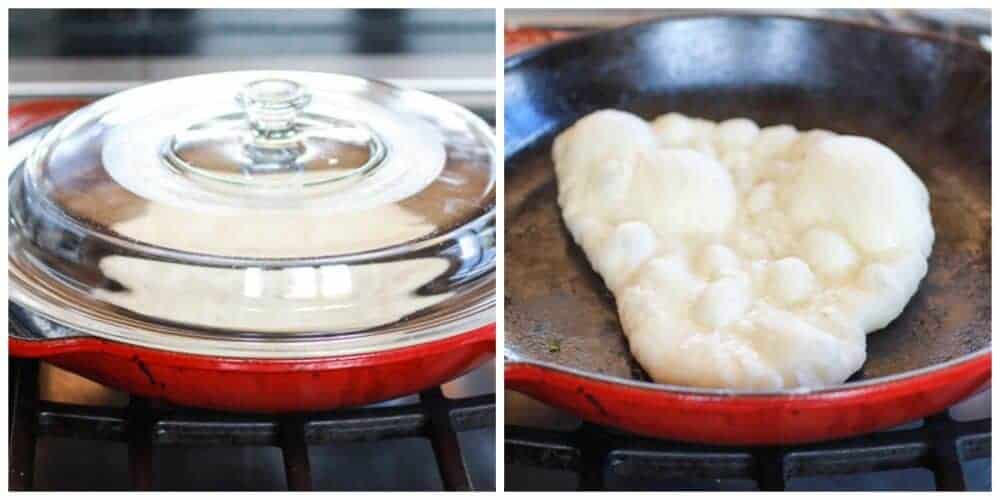
Place the Naan on the hot skillet, cover and bake for 1 minute, until you see bubbles starting to form. Flip and cook for 1-2 minutes on the other side until large toasted spots appear on the underside. Brush with a bit more butter if desired and sprinkle with a little kosher salt, fresh cilantro (loved the fresh cilantro naans) or other herbs. Place the Naan in a tea towel-lined dish. Repeat with the rest of the Naans.
Done!
Pretty easy, right?

And so good!
It is actually very similar to this pita bread, but maybe even better. I think it is the yogurt in the dough. It adds the best flavor and oh my gosh it is so soft and those giant air pockets? Yeah they are awesome!
Seriously,
I just can’t even get over these. There are no words.

Nutritional information is only an estimate. The accuracy of the nutritional information for any recipe on this site is not guaranteed.

Except expect yum!
As Seen In


I must have done something wrong…flat not fluffy, dense and bready 🤷🏼♀️🤷🏼♀️. I will try again!
Hi Denise,
Thanks for giving this recipe a try, sorry to hear you had some issues. Did you dough rise correctly? I would check on the yeast! Let me know how I can help! xx
This was relatively easy and soooo good! Thank you!
Hey Janet,
Amazing!! Love to hear that you enjoyed this recipe, thank you so much for making it and your comment! xx
I found this nearly 10 years ago as an amateur chef and have made it 100s of times and now am a cook 🙂
Thanks so much Kevy!! So glad to hear you have been enjoying this recipe for so long, it’s a family fave over here too! xT
Hi! Would the recipe still work if I left out the sugar? Doing sugar-free January.. Thank you!!
Hi Chantal,
I would use honey in place of the sugar:) Please let me know if you give this recipe a try, I hope you love it! xx
I’ve made this many times and every time it comes out perfect. Recently I made it using cup for cup gluten free flour and it turned out great. Thank you!
Hey Dee,
Happy Friday!! I appreciate you making this recipe so often and sharing your review, so glad to hear it is always a hit!⛄️ xT
I’m mid-way in making the naan but found that with 4 cups of flour the dough was anything but wet or sticky: very dry. So I added some milk. We’ll see how that goes.
Hi Doug,
Sorry to hear this. What kind of yeast did you use? Let me know how I can help! xx
Hi,
You mention that this is an old recipe and that you have updated it. Where can we find the newest version? Can you share the link?
Thanks!
Elizabeth
Hi Elizabeth,
You can always find all of my recipes on the blog:
https://www.halfbakedharvest.com/herbed-garlic-butter-naan/
Please let me know if you have any other questions! xx
Hi Tieghan!
I LOVE this naan recipe and my mum does too, but what she DOESN’T love is how much smoke I kick up when I fry the naan in the pan. Am I doing something wrong? Our whole kitchen will fill up with smoke! How can I cook but not look like I’m setting the kitchen on fire? Thank you so much!
Hey Payton,
I truly appreciate you making this recipe and sharing your feedback, so glad to hear it turned out well for you! Lol the smoke is normal:) xx
I don’t have a cast iron skillet. Can I use a regular frying pan?
Hi Colleen,
Yes, that will work well for you! I hope you love this recipe, please let me know if you give it a try! xx
I have coconut milk in the can. Do you think I can replace the milk with that?
Hey Jessica,
Yes, that should work well for you! I hope you love this recipe, let me know if you have any other questions! xx
Hi Tieghan!
I just made this with my girls and it turned out awesome! Quick question- will only one side have bubbles, or did I do something wrong when placing the naan in the pan?
My 3.5 year old loves to help in the kitchen and your recipes have been some of our favorites! Thanks so much
Hey Shayna,
Happy Monday!! Thanks a lot for making this recipe and sharing your review, I am so glad it was enjoyed! Yes, only one side will have the bubbles. Have a great week! xx
When the dough comes together, do you oil the dough when it rest? I also found that the door was extremely sticky to work with when I tried to roll it out on the granite countertop. It’s stuck as well as to the rolling pan. I did flour it some but it was extremely sticky. Just wanted to make sure I didn’t do some thing wrong. 🙃
Hi Brandi,
Thanks for trying this recipe! Nope, I don’t oil the dough! Was there anything you adjusted in the recipe? Sounds like you may have just needed to use more flour when rolling the dough out. Let me know if this helps! xx
Thanks for the reply the recipe was loved
Also, do you have a recommendation for a cast iron skillet with a glass lid?
Yes! Staub is my fave:)
These are absolutely the best!!! And so easy to make! Thank you for this recipe
Hey Donna!
Wonderful!! I love to hear that this recipe was a winner and really appreciate you making it:) xTieghan
Would you be able to freeze the dough after letting it rise?
Hi Lauren,
Yes, that will work well for you! Please let me know if you have any other questions! xT
Great recipe but please note that your description for the method in the post does not match your instructions in the directions section.
You note to mix the yogurt and milk with the yeast mixture then add that to a bowl with the dry ingredients. In the recipe instructions you say to add everything to the yeast mixture.
Could be a bit confusing for some!
Hi Amiee,
Thanks for sharing your feedback, please note this recipe is extremely old, I have much newer and updated versions of this recipe:) xx
Hi Tieghan,
So where can we find the updated recipe?
Thanks!
Elizabeth
Here you go:
https://www.halfbakedharvest.com/herbed-garlic-butter-naan/
Good grief, so yummy. I had to use a bit more flour on my board as my dough was still very sticky, but then it rolled out nicely. I brushed mine with olive oil mixed with a couple of minced garlic cloves and it was so tender and delicious. I did have to lower the heat closer to medium to get the right color but it was so perfect with your Crockpot Butter Chicken!
Hey Lucy,
Fantastic!! Thanks a lot for trying this recipe and sharing your review, I love to hear that it was enjoyed! ?Tieghan
Absolutely amazing! So delicious and easy.
Hi Emily,
Wonderful!! Love to hear that this recipe was a winner, thanks for sharing your review and making the recipe!! xTieghan