Next Post
Easy Healthier Crockpot Butter Chicken
Originally published Sep 8, 2013 • Updated Oct 15, 2022

This post may contain affiliate links, please see our privacy policy for details.
I really love homemade bread, especially this homemade naan. I put together step by step photos and instructions for you guys, so there is really no messing up this one! There is even a video…..ok, you guys have to try this!! You won’t regret it, promise!

Well, actually my mom really loves homemade bread and I love to making her happy! I think I will always love making my mom happy, whether I am nineteen or fifty (oh my gosh, I cannot even imagine). It’s just something that makes me happy, so I guess it’s a win win!
Plus, I mean homemade Naan? Yeah, there is not much better. It’s stinkin amazing!
It’s so easy that I thought you guys would like seeing the process a little bit. The pictures are not awesome, but you’ll get the idea. So here we go!
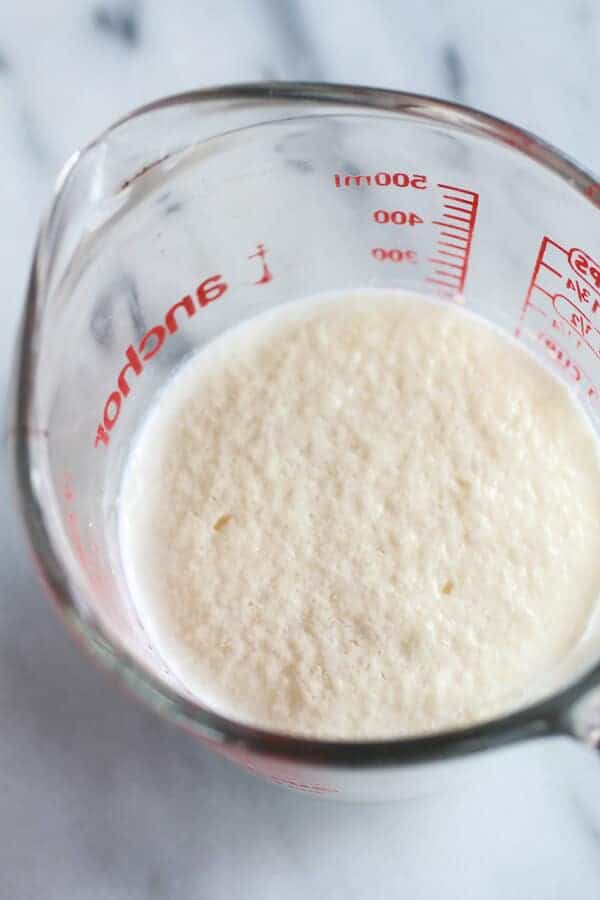
Start by activating the yeast. Combine the warm water with the sugar and yeast. Let sit for 10 minutes until foamy. It should smell bread like.
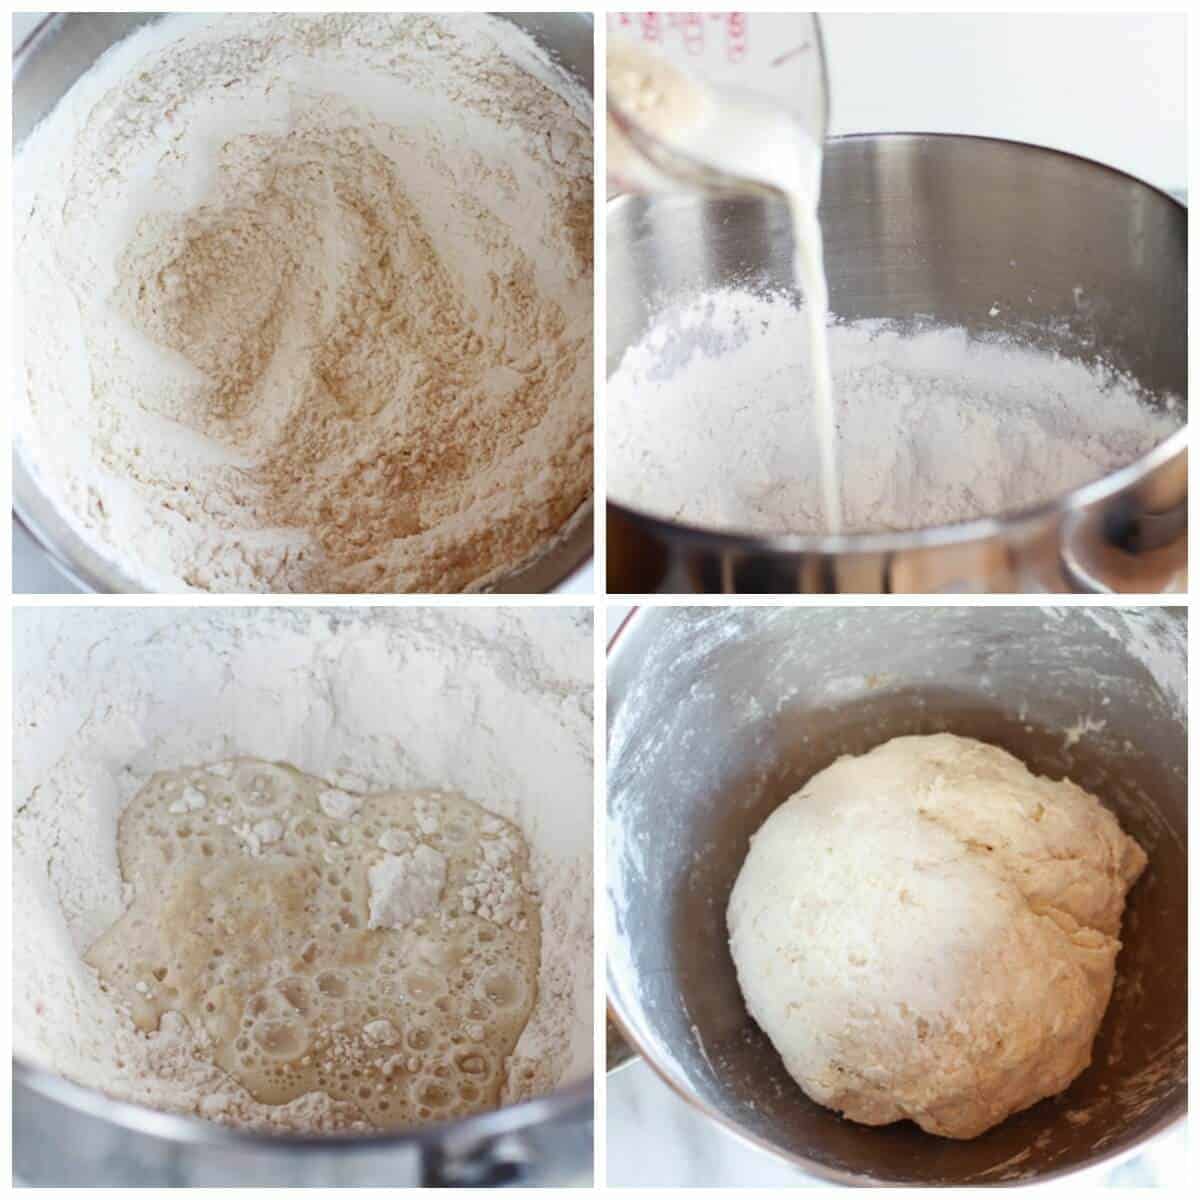 Add the flour, baking powder and baking soda to a large bowl. Then add the warm milk and yogurt to the yeast mixture. Pour the yeast into the flour. Mix with a wooden spoon until dough starts to come together and then finish mixing the dough with your hands until a smooth but still sticky ball forms.
Cover the dough with a damp towel or plastic wrap and let sit in a warm place for one hour. 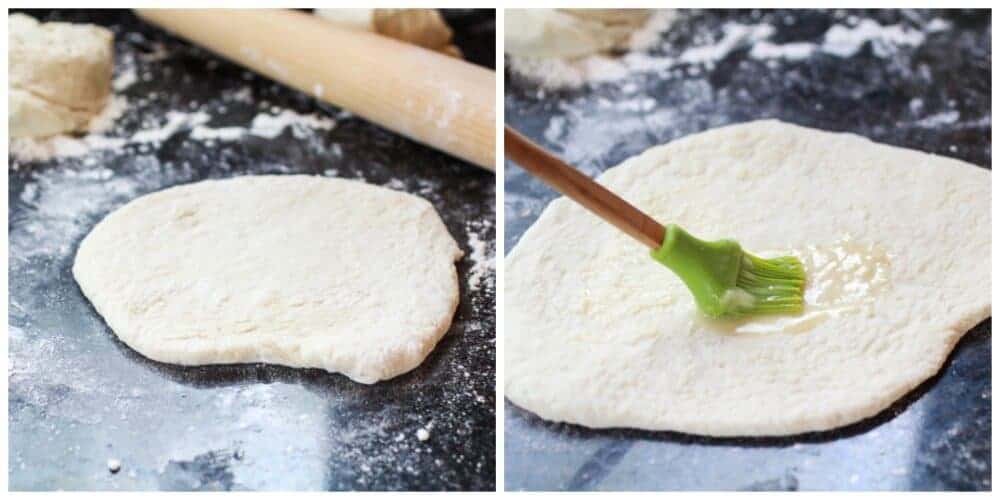 After one hour punch the dough down and divide into eight equal balls. Using a rolling-pin, roll each piece of dough into an oval shape. The dough should be about 6-8 inches long and about 1/4-inch thick, but no thinner. Repeat this method with the rest of the dough.
Warm a cast iron skillet over medium-high heat (you want a hot pan). Brush both sides of the Naan with melted butter and if desired sprinkle on any spices you enjoy, such as cumin and garlic. I did not flavor my Naan, but only because one, I know my family is picky and two, I knew we would be eating the leftover Naans for breakfast and well I love garlic, I do not normally want it for breakfast!
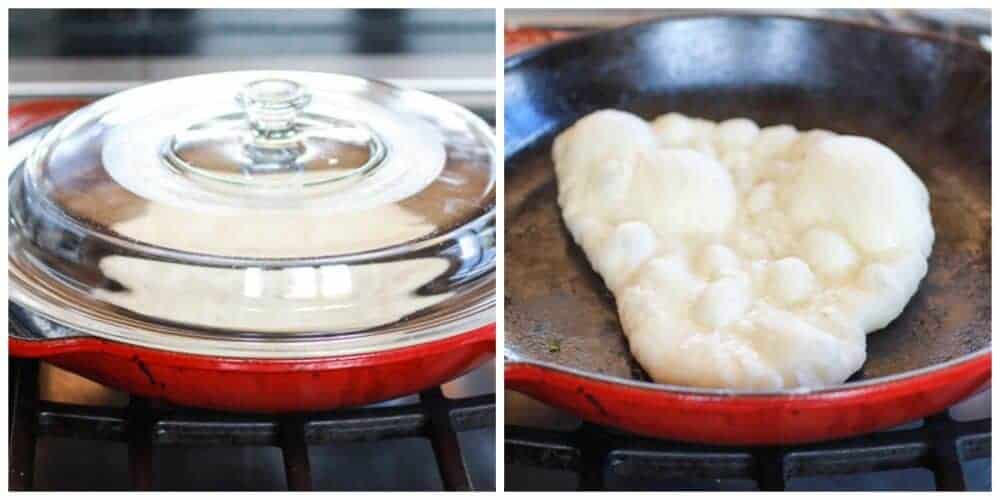
Place the Naan on the hot skillet, cover and bake for 1 minute, until you see bubbles starting to form. Flip and cook for 1-2 minutes on the other side until large toasted spots appear on the underside. Brush with a bit more butter if desired and sprinkle with a little kosher salt, fresh cilantro (loved the fresh cilantro naans) or other herbs. Place the Naan in a tea towel-lined dish. Repeat with the rest of the Naans.
Done!
Pretty easy, right?

And so good!
It is actually very similar to this pita bread, but maybe even better. I think it is the yogurt in the dough. It adds the best flavor and oh my gosh it is so soft and those giant air pockets? Yeah they are awesome!
Seriously,
I just can’t even get over these. There are no words.

Nutritional information is only an estimate. The accuracy of the nutritional information for any recipe on this site is not guaranteed.

Except expect yum!
As Seen In


Anyone else find the dry to liquid ratio WAY off? Am I missing something?
Followed all the steps and ended up needing to add more liquid to get anywhere close to a ball of dough and even then had almost 3/4 cup dry ingredients left in the bottom of the bowl that never incorporated.
Help??
Hi Enise,
So sorry to hear you are having some issues! What kind of yeast did you use? Any chance your water was too hot? Let me know:)
Great recipe and directions! Last time I made a different recipe, and they weren’t fluffy—They tasted good, but were more chewy and dense. I think it’s your specific directions that really help. The only thing I change—using my black nonstick skillet instead of the cast-iron and buttering only after they are cooked. (Like when using the outdoor tandoori oven.)
I do have a question. Sometimes I might not have the yogurt, but decide I want naan without having to go to the grocery store. I am wondering if you have ever tried making naan using sour cream, which is a refrigerator staple at our house. Please let me know if you or any of your readers have tried this. I might risk it and try next time, but I’m not quite sure if I’d need to adjust the liquid amount. Thank you!
Hey Mimi,
Happy Friday! Thanks a bunch for making this recipe and your comment! So glad it was enjoyed!
I think sour cream would be perfectly okay for you to use!
Yay! I’ll let you know how it turns out when I do it! I just made naan last night! My husband is the master homechef unless he’s working long hours like he was yesterday (I made him a wonderful curry to go with the naan), but he never makes the breads regardless. Ha ha
The dry ingredient to wet ingredient ratio was off for me. I had a lot of unmixed dry ingredients remaining after all of the liquid was absorbed into the mix. This naan is very plain. Consider adding more salt and I would definitely add garlic or some fresh herbs and nuts.
Hi there,
Thanks for trying this recipe and your feedback, sorry to hear it was not enjoyed!
It would be okay next time to increase your salt and sugar if you like—try 1 tsp salt and 3 Tbs sugar.
To the moisture ratio you experienced: Recipes in the USA tend to list cups instead of grams which can cause a variable in the water to flour ratio. Where you live can make a bit of a difference, but how you fill that measuring cup can make a HUGE difference in the actual amount of flour being added. If you simply scoop your flour from its container and level off, that tends to be much heavier (more flour per volume) than other methods. If a weight measurement is not given, it’s always best to stir the flour in the container to aerate before measuring; after, use a tablespoon to fill the measuring cup with flour bit by bit, overfill, then level off with the back of a table knife—otherwise, in my experience , the moisture level is hit or miss, mostly miss.
Some recipes call for sifted flour—in those cases, if a recipe says “1 cup sifted flour,” you should sift the flour first, then lightly spoon it into your measuring cup and level it off. If it says “1 cup flour, sifted,” measure first as described previously (aerate, lightly spoon into cup, and level) THEN sift.
Clarifying on the additional sugar, add one of the tablespoons in with the yeast to bloom, add any additional sugar to the dry ingredients. Sorry about that.
Naan was okay not great.
Hi Aaliyah,
So sorry to hear you didn’t love the naan, please let me know if the is anything that I can help with!
I brown my butter just slightly as I bloom the herbs prior to brushing on the already cooked naan, just as a personal preference.
This naan, as you have created it, is perfection.
Thanks so much:) Love to hear you enjoyed this recipe, I appreciate you making it! Happy Sunday!
If not using the dough immediately (using it tonight, but want to prep early)… Should I let the dough rise for an hour and then store it in the fridge?
Hi Lindsey,
I would just keep it covered on the counter, that will be just fine.
I hope you love this recipe!
Call them naan, or pitas, since, if you roll them smaller and thinner and cut them in half they open into a lovely pocket for stuffing. My search for the perfect flatbread by any name has ended. So soft, flavorful and easy to make. I thank you. Fold them over with something tucked inside, or cut in half and stuff the pocket, or sit with one in your lap, tearing off pieces and eating plain. The Best!
Hi Catherine,
I appreciate you giving this recipe a try, so glad to hear it turned out nicely for you! Have a great summer weekend!
Can this be made with whole wheat flour without any other changes?
Hi Alma,
Yes, that would be just fine for you to do. I hope you love this recipe, please let me know if you give it a try!
Ms. Tieghan,
Can these be made with almond flour as my daughter cannot eat white or wheat flour and so many food items are made with one or the other.
Hi Annie! I haven’t ever tried this with almond flour before so I can’t say for sure! Let me know if you give it a try! 🙂 xT
“As soon as it comes together, stop kneading.”
I saw directions to stir with a wooden spoon. When is kneading required?
Made the Naan tonight to use with chicken and tzatziki gyros and oh my! I was nervous about the dough at first, but they came out awesome!!! Thank you Tieghan! I will never buy naan again (unless I’m in a hurry! 😂)
Hey Allison,
Happy Sunday! I’m thrilled to hear this recipe turned out well for you, thanks a lot for making it! xx
Teagan, when you make your wraps, it seems like the proportion size for this recipe dividing it into eight equal parts wouldn’t be large enough to hold the for instance pot roast tacos. do you just make the proportion size larger instead of dividing it into eight you make only four per recipe to make it large enough to hold the ingredients? Just curious I love this non-recipe but it doesn’t seem like it would hold much without it being larger thank you.
Hi Brandi,
I can usually get 8 large sized naan from this recipe, but you could certainly adjust to your liking. I hope this helps! xx
Im already messing up Step One. Why is mine not foaming?
Hi Shannon,
So sorry to hear this! What kind of yeast did you use? xx
I’m sorry, not sure if this was asked already. But if it’s going in the fridge overnight, then take it out to rise next day or just an hour or so before cutting into separate pieces. Thank you!
Hi Nathalie,
No worries, you can let it rise the next day for an hour. I hope you love this recipe, please let me know if you have any other questions! xT
The naan was amazing. I made it with your Curry chicken meatballs. That was amazing as well. Skipped the rice for the Naan! 😋
Fantastic! I appreciate you trying this recipe, I’m so glad it turned out nicely for you! xx