Next Post
Strawberry Hibiscus Ginger Margarita.
Originally published Apr 26, 2019 • Updated May 21, 2024
This post may contain affiliate links, please see our privacy policy for details.
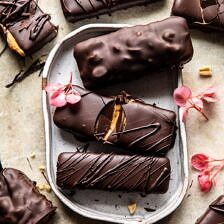
The healthy weekend chocolate bar, Chocolate Covered Creamy Peanut Butter Cup Bars. A sweet “cookie dough” base, layered with creamy peanut butter, and covered entirely in dark chocolate. This is the ultimate homemade chocolate candy bar. Think of these as your vegan peanut butter cup, but in candy bar form. So much better than its overly sugary store-bought rival. Best part? These are SO easy to make, calls for only 7 pantry staple ingredients, and requires zero baking. They feel super decadent, but are packed full of healthy ingredients, are 100% vegan, and so delicious!

The last few weeks I’ve been in serious baking mode, a non-chocolate, berry filled baking mode. It’s been delicious, fun, and pretty. But today I felt like we needed some chocolate, and we needed it to be on the healthier side. And yes, I’m going to go as far as saying that these peanut butter bars are healthy, because their ingredient list is top-notch. Dark chocolate, creamy peanut butter, dates, and just a touch of real maple syrup. Low on the sugar, high in protein, and rich in antioxidants.
When it comes to dessert, this is health food, and I am very much on board with it. Amazing cakes, sweet french toast, and homemade banana cream pie are all wonderful, and all should have their place in our lives, but as I always say balance is key and everything in moderation.
So today it’s the healthier dessert Friday, and trust me when I say, these feel every bit as indulgent as home baked cookies. You’d never guess they are actually healthy. High claims, I know, but trust me here, these bars are magical.
But then, aren’t most things with peanut butter and chocolate?

When it comes to peanut butter and chocolate, the combination will most likely be my favorite forever…and ever. It’s 100% my fall back combo when I want something to fill a sweet craving. Even as kid who really didn’t like candy, peanut butter cups were my favorite. They were the only Halloween candy I’d actually go for…other than those giant Malley’s chocolate bars. Those were like finding the “golden” ticket on Halloween.
Anyway, point is, I love peanut butter cups, and for years and years I’ve been trying to come up with a recipe that would be healthy, and taste just as good as the original, if not better. It might seem like an easy thing, but I’ve found it to be rather challenging. Until now.
These bars changed my world. You guys they are soo good – and so simple! Their biggest downfall is the chill time, but trust me, it will be worth it in the end.

The very first layer of these bars is almost like raw cookie dough. It’s a mix of nuts and dates. You need this layer. It helps to keep the bars together and makes covering them in chocolate actually doable. Press this “crust” into a square baking pan and spread the peanut butter mix overtop.
And the peanut butter mix? It’s soo simple. Salted creamy peanut butter, a splash of maple syrup for sweetness (just the tiniest amount), and a touch of vanilla. That’s all you need, and yes, organic, a no sugar peanut butter is ideal here. BUT I do recommend using a no-stir peanut butter so that you don’t end up with any oil separation.
Now, here is the key to these bars. You must freeze them, and freeze them solid, before covering them in chocolate. If the bars are not completely frozen, they will be a mess to dip. So listen to me when I tell you to allow time for the bars to freeze.
Frozen bars make chocolate dipping a breeze.

Once the bars are frozen solid, dip them into the chocolate. The chocolate will quickly harden. At this point you can enjoy the bars right away. Or keep them in the fridge until you’re ready for your peanut butter chocolate fix.
If you eat the bars straight out of the fridge they will be a bit more firm. But if you pull them out 5 or so minutes before you’re ready to eat, they will turn extra creamy and soft inside (like you see in the photos here). Both cold and semi room temperature are DELICIOUS. They remind me so much of a classic peanut butter cup, but you know why these are better?
Because the peanut butter to chocolate ratios are just right. These are not just heavy on the peanut butter, they’re heavy on the chocolate too. Just as they should be.

I’m excited to make these all spring and summer long. They’re the perfect no-bake dessert bar to enjoy on hot days, bring along on picnics (I’d keep them in a cooler), or serve up at your next BBQ.
Really though? The only real reason I need to make and enjoy these, is that fact that it’s Friday and my body needs some peanut butter and chocolate…
GOING FOR IT.
Happy Friday! See you tomorrow for a special cocktail post!

If you make this these peanut butter cup bars, be sure to leave a comment and/or give this recipe a rating! Above all, I love to hear from you guys and always do my best to respond to each and every comment. And of course, if you do make this recipe, don’t forget to also tag me on Instagram! Looking through the photos of recipes you all have made is my favorite!
Nutritional information is only an estimate. The accuracy of the nutritional information for any recipe on this site is not guaranteed.

As Seen In


Yum!!! Will make these again..simple and delish! ?
That is so great! Thank you so much Sharon! xTieghan
Thoughts on replacing the PB with almond butter (it’s what I have on hand)?
Hi Christina! Almond butter will be great I am sure! Please let me know if you have any other questions. I hope you love this recipe! Thank you! xTieghan
I made these and they were amazing! I did do some tweaking to cut back on fat/calories. I did use 8 OUNCES of dates, not 8 dates. I added a tablespoon of ground flax seed to the base for extra fiber.I also used 1/2 cup of regular peanut butter and for the other cup I used reconstituted peanut butter powder. I was able to make more of a peanut butter batter/dough that way since I added the water myself for the right consistency. It was less messy and froze easily. I also used half the chocolate listed and just dipped the tops of the bars in it, dusted with a bit of flaked sea salt. It still tasted plenty decadent!
Thank you so much Samantha! I am so glad these turned out amazing for you! xTieghan
These were so easy to make and SO DELICIOUS! What a perfect healthy but still decadent snack!
Thank you so much Jamie! xTieghan
These look amazing Tieghan! Can’t wait to give your recipe a try!
Thank you Mary Ann! xTieghan
These are such a winner! I made them yesterday and even my father, who is extremely skeptical when it comes to healthy baking, had to admit that they were AMAZING. Mine didn’t turn out as beautiful as the ones on the pictures, but I’m sure that they were just as delicious!
I am sure they looked amazing, Ania! I am so glad you enjoyed these bars! xTieghan
Is there a qreal need to add the oil to the chocolate before dipping? I don’t have much experience with things like this but I found that in the past that when I add oil to the chocolate it makes it so when you take it out of the fridge it just melts. We are excited to finish this recipe today.
Hi there! You can certainly leave the oil out, but it does give the chocolate a nice shine and keeps it softer, BUT it is not needed. Please let me know if you have any other questions. I hope you love this recipe! Thank you! xTieghan
I can’t wait to make these! Do you have any tips for covering stuff in chocolate… it’s always so messy. Just curious!
HI Piper!! I like to use a fork to dip each bar in melted chocolate, then allow the excess chocolate to drip back off through tins of the fork. I find this to work really well! As for the nutrition, I do not have specifics as I don’t base “healthiness” off of calories and fat count. So sorry, wish I could help you more in this area, but I am no nutritionist. Please let me know if you have any other questions. I hope you love this recipe! Thank you! xTieghan
These sound so great!! Do you think pecans could replace the walnuts in the crust?
HI! I am sure pecan will be great! Please let me know if you have any other questions. I hope you love this recipe! Thank you! xTieghan
These bars look so freaking addictive. Lately I have been craving peanut butter and chocolate together, but the fact that you integrated dates into this recipe induced me to question my way of eating. HOW DID I NOT include dates into my meals?! But with creating these bars, I think I’d eat at least three of these bars in one sitting. Probably more. Whelp what can you do. 😀
Haha I totally do that too! I hope you love these Cassie! Thank you so much! xTieghan
These look amazing! You could add ‘gluten-free’ to the list of great reasons to make these bars. We have a friend with Celiac’s and it can be difficult to find simple recipes that don’t call for all kinds of specialized ingredients.
YES! I am so glad you like these and I hope you try them! Thank you Carolynn! xTieghan
HOW do you cover them in chocolate ?
What is nutrition Al info. You’ve said they are healthy but would be very good info to know more details. Thanks
Can’t wait to try them!
Hi Rena, I like to use a fork to dip each bar in melted chocolate, then allow the excess chocolate to drip back off through tins of the fork. I find this to work really well! As for the nutrition, I do not have specifics as I don’t base “healthiness” off of calories and fat count. So sorry, wish I could help you more in this area, but I am no nutritionist. Please let me know if you have any other questions. I hope you love this recipe! Thank you! xTieghan
You made these look so yummy. I love to bite into hard dark chocolate.
Thank you Charlotte! xTieghan
Are you trying to kill me ? I’m a huge fan if the cambo peanut butter-cholate but these bars are a dream ! I, now, need to make them tomorrow. Thank you !!
YES you do! I hope you love these Syrine! xTieghan
Anything chocolate and peanut butter just draws me in! These look incredible, and the nut/date crust is a great idea. It not only holds the bars together, but I bet it adds a nice flavour contrast to the peanut butter mixture! Can’t wait to try these!
YES me too! I hope you love this Leanne! xTieghan