Next Post
Spicy Pomegranate Ginger Paloma.
Originally published Nov 12, 2021 • Updated Aug 18, 2025
This post may contain affiliate links, please see our privacy policy for details.
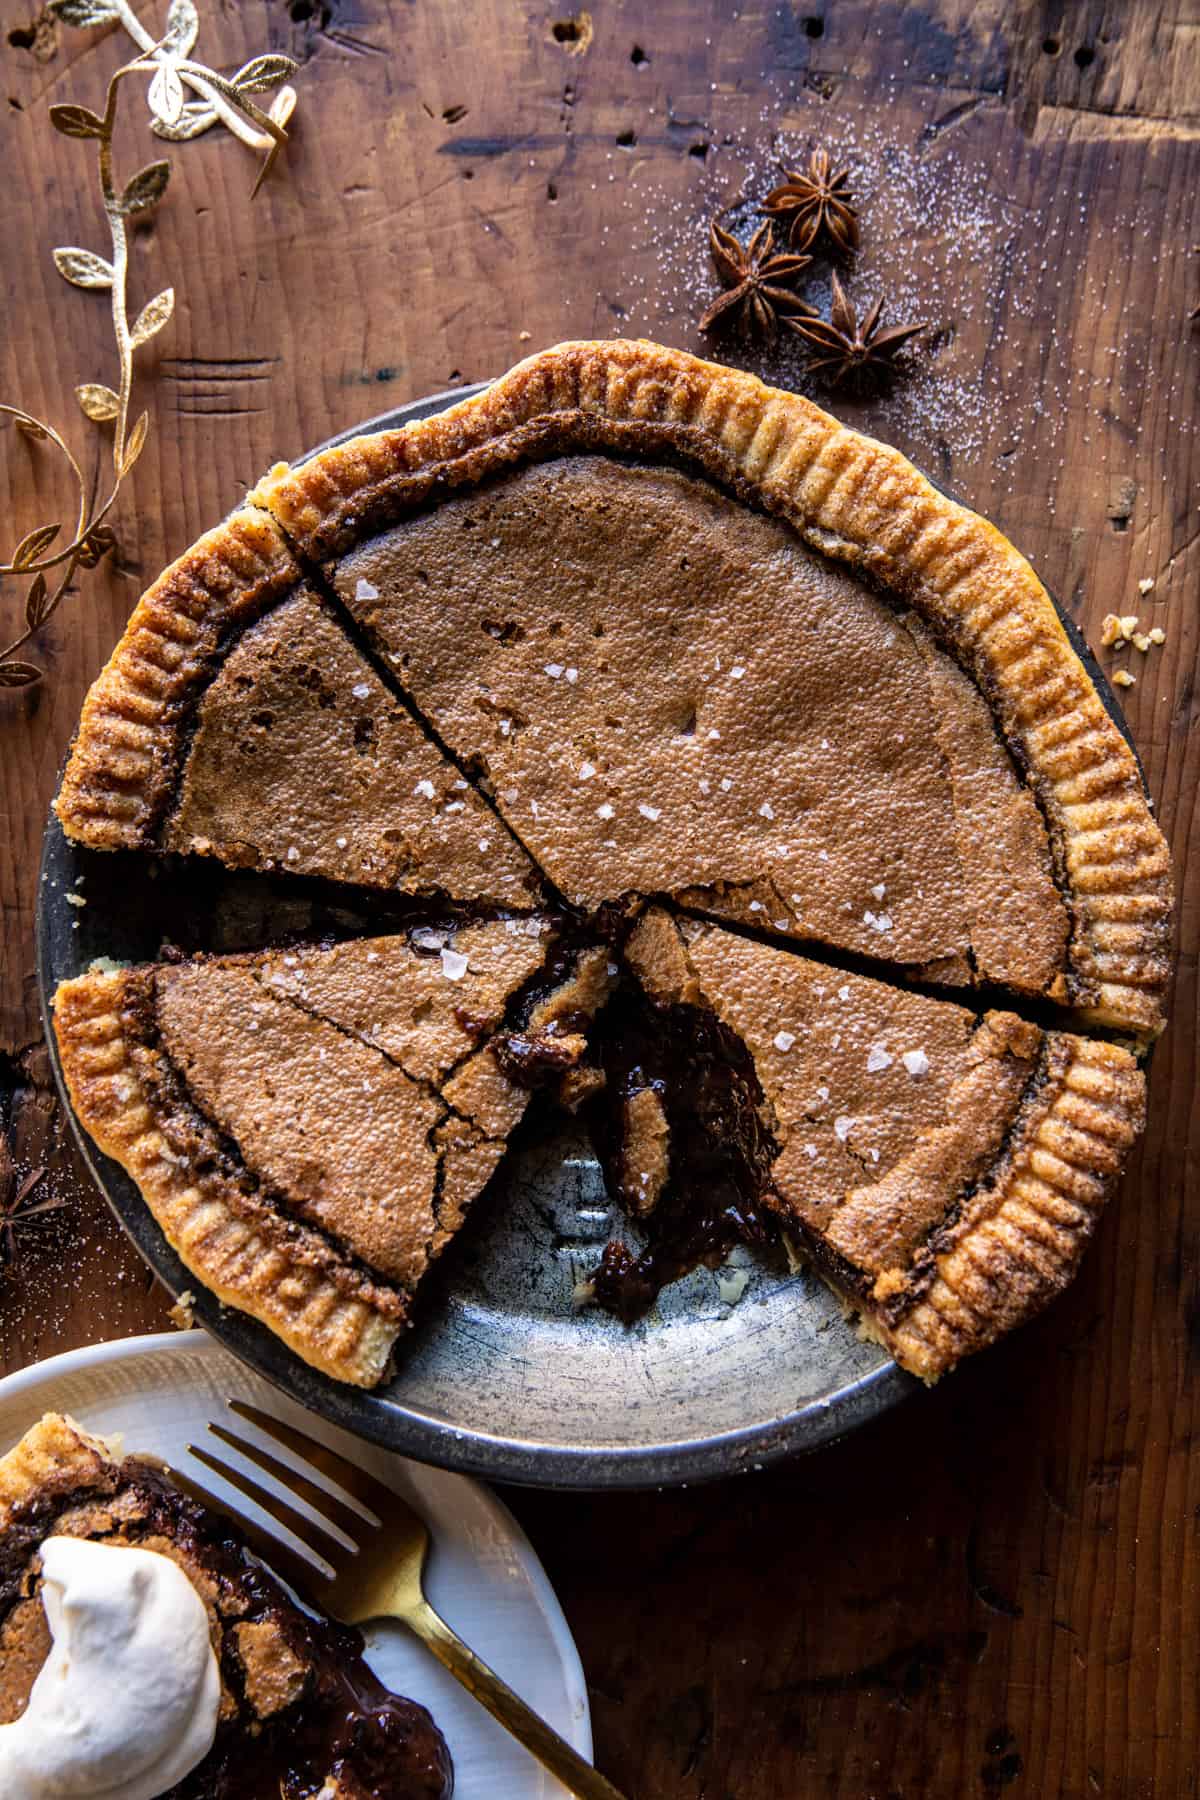
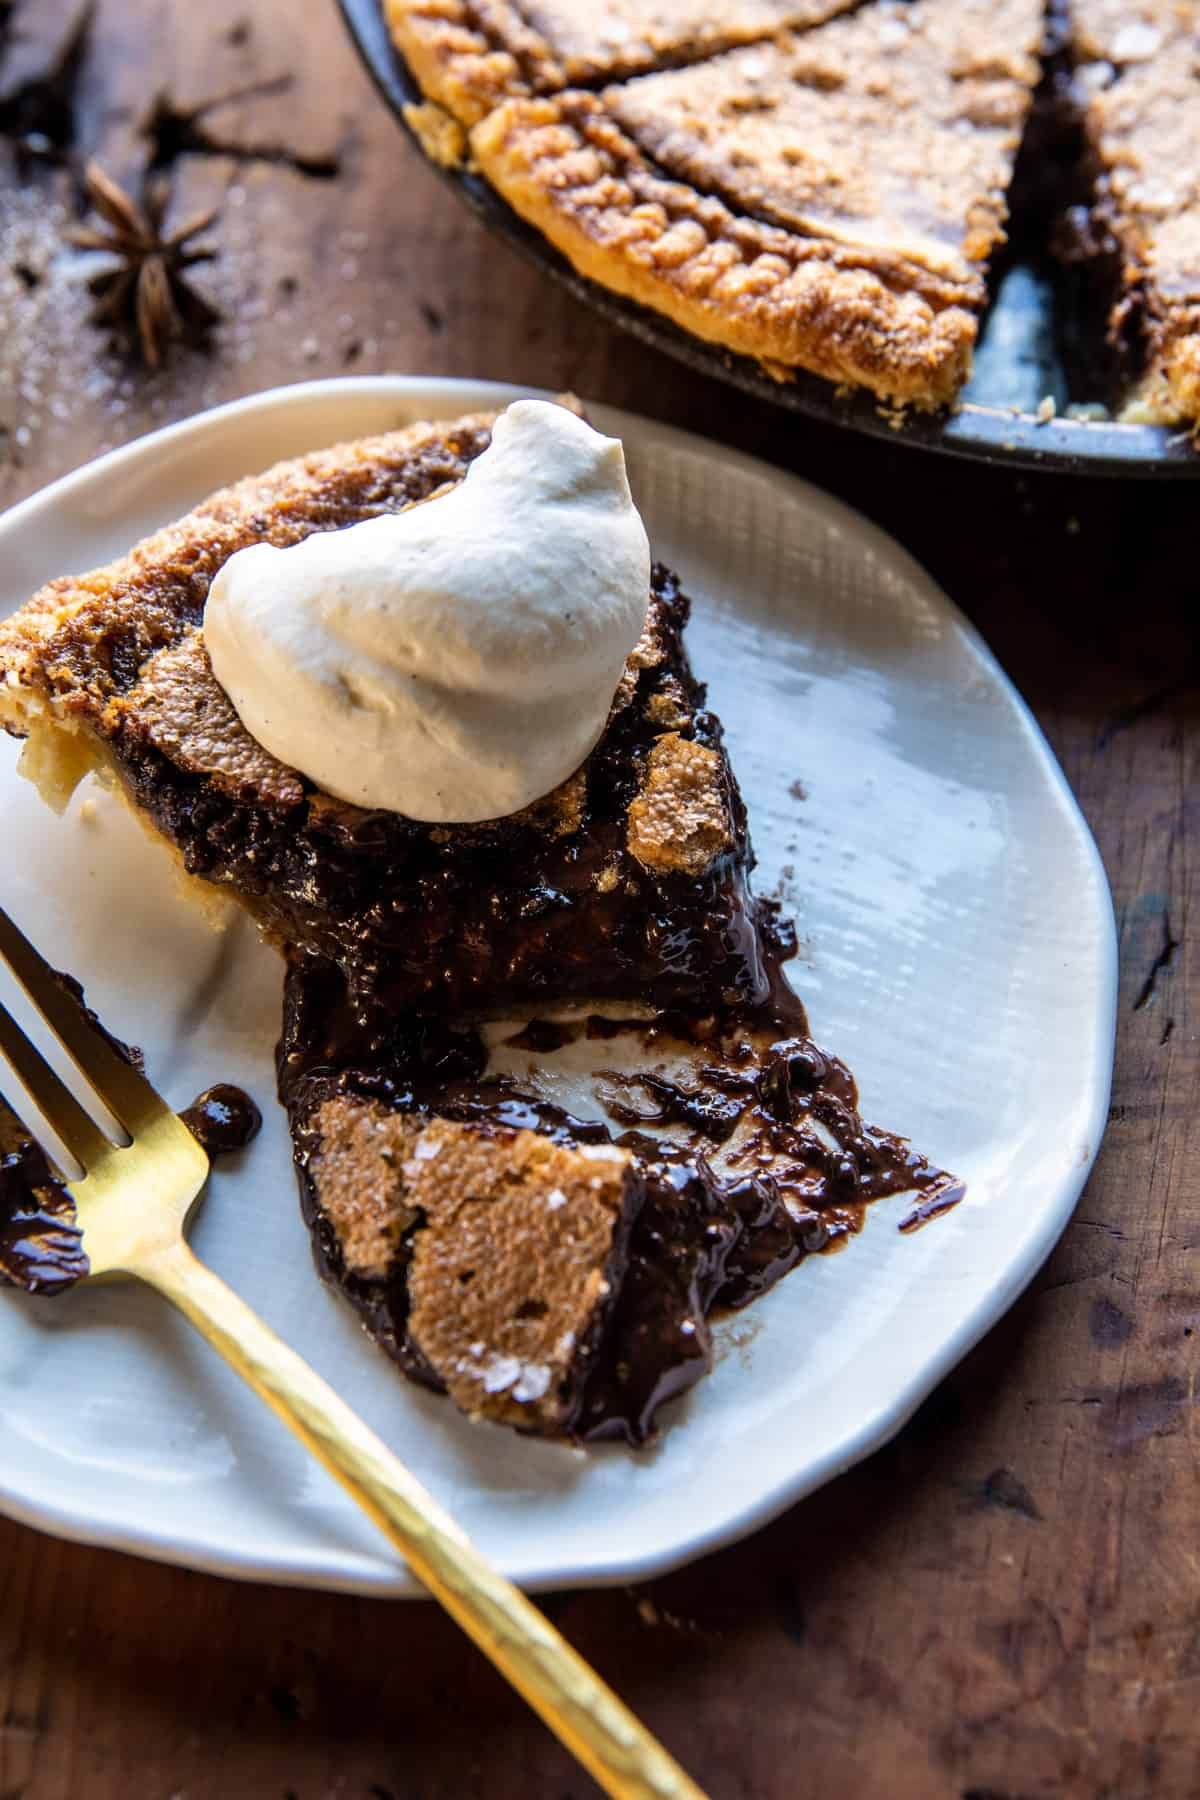
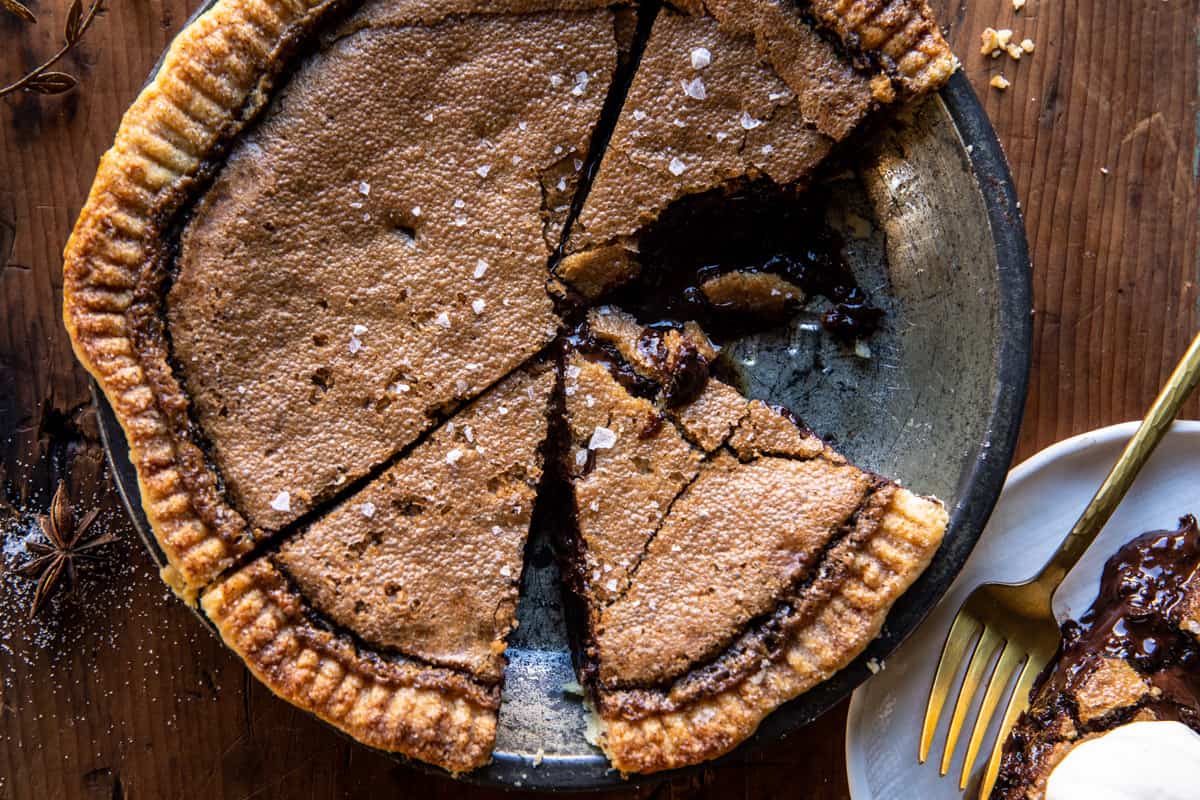
The best ever Brown Sugar Maple Cookie Pie. A super simple pie made with browned butter, brown sugar, maple, eggs, and plenty of chocolate. All baked together until puffed on top, but gooey in the center. The crust is buttery, flaky, and sprinkled with sweet vanilla sugar. Inside the filling is warm with pockets of melted chocolate, notes of maple, brown sugar, and vanilla. Delicious when served with a dollop of vanilla whipped cream. It’s the perfect Thanksgiving pie to add to your menu…or maybe just the perfect Friday night dessert!
Happiest Friday everyone! We’re talking more pie today because…tis the season! Clearly, I’m loving that the holidays are already in full swing and it’s not even the middle of November. The snow today just gives things a magical holiday feel and I couldn’t love it more.
I’m also really loving this pie. It took me many, many tries to get it just right for you guys, but here we are! Delicious Friday pie for November!
I spent a lot of time thinking about desserts for this year’s Thanksgiving dinner. Originally, I didn’t have any pies to share this year. But then someone lit a fire under me and I became determined to crank out a least one pie this holiday season.
That fire was lit by Little Miss Asher (my younger sister). This pie rivals her favorite chocolate chip cookie pie. I blame the warm puddles of chocolate and crackly salted top. And you know, I am so glad she got me going.
The flavor is so GOOD!
I’m sure some of you remember the brown sugar maple cookies I shared back in September. They’ve been a favorite cookie since the day I made them. Something about the combination of brown sugar and maple is just so delicious.
Which brings me to today’s recipe. I love a cookie pie, and I love those brown sugar maple cookies, so I wanted to attempt to combine the two. And what did I get? A cross between a cookie pie and a maple cream pie.
I didn’t know the two needed to be married together, but I do now. Guys, this pie is really really good.
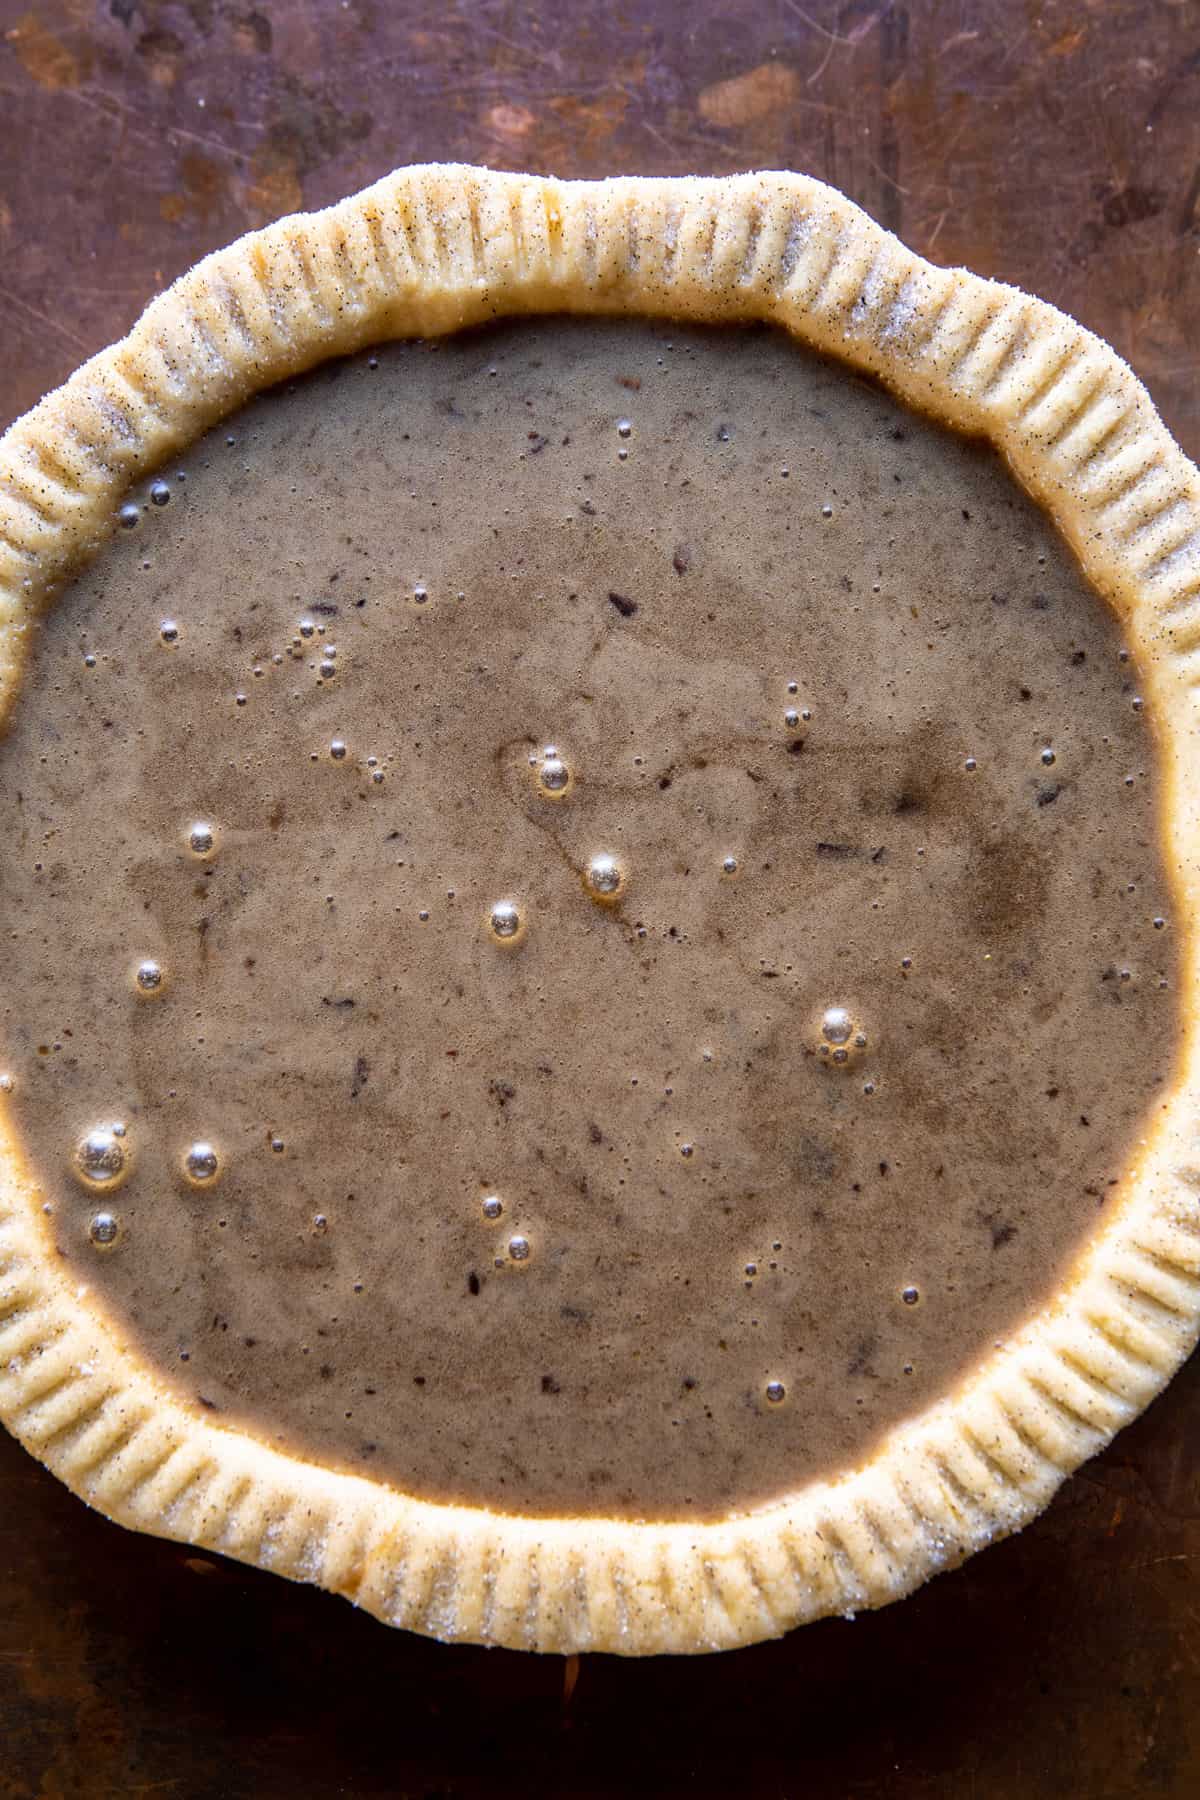
Start with the crust. I did make my own crust, and while I will tell you it’s better than store-bought. I will also tell you that if you don’t want to make the crust, you shouldn’t make the crust! Pies can be stressful, I get it. If the crust is stressing you out, pick up your favorite from the store. I hear Trader Joe’s and Whole Foods have great options!
Once you have your crust sorted out, sprinkle it with vanilla sugar (simply just sugar mixed with vanilla beans). No pre-baking the crust for this pie, which I found kind of nice!
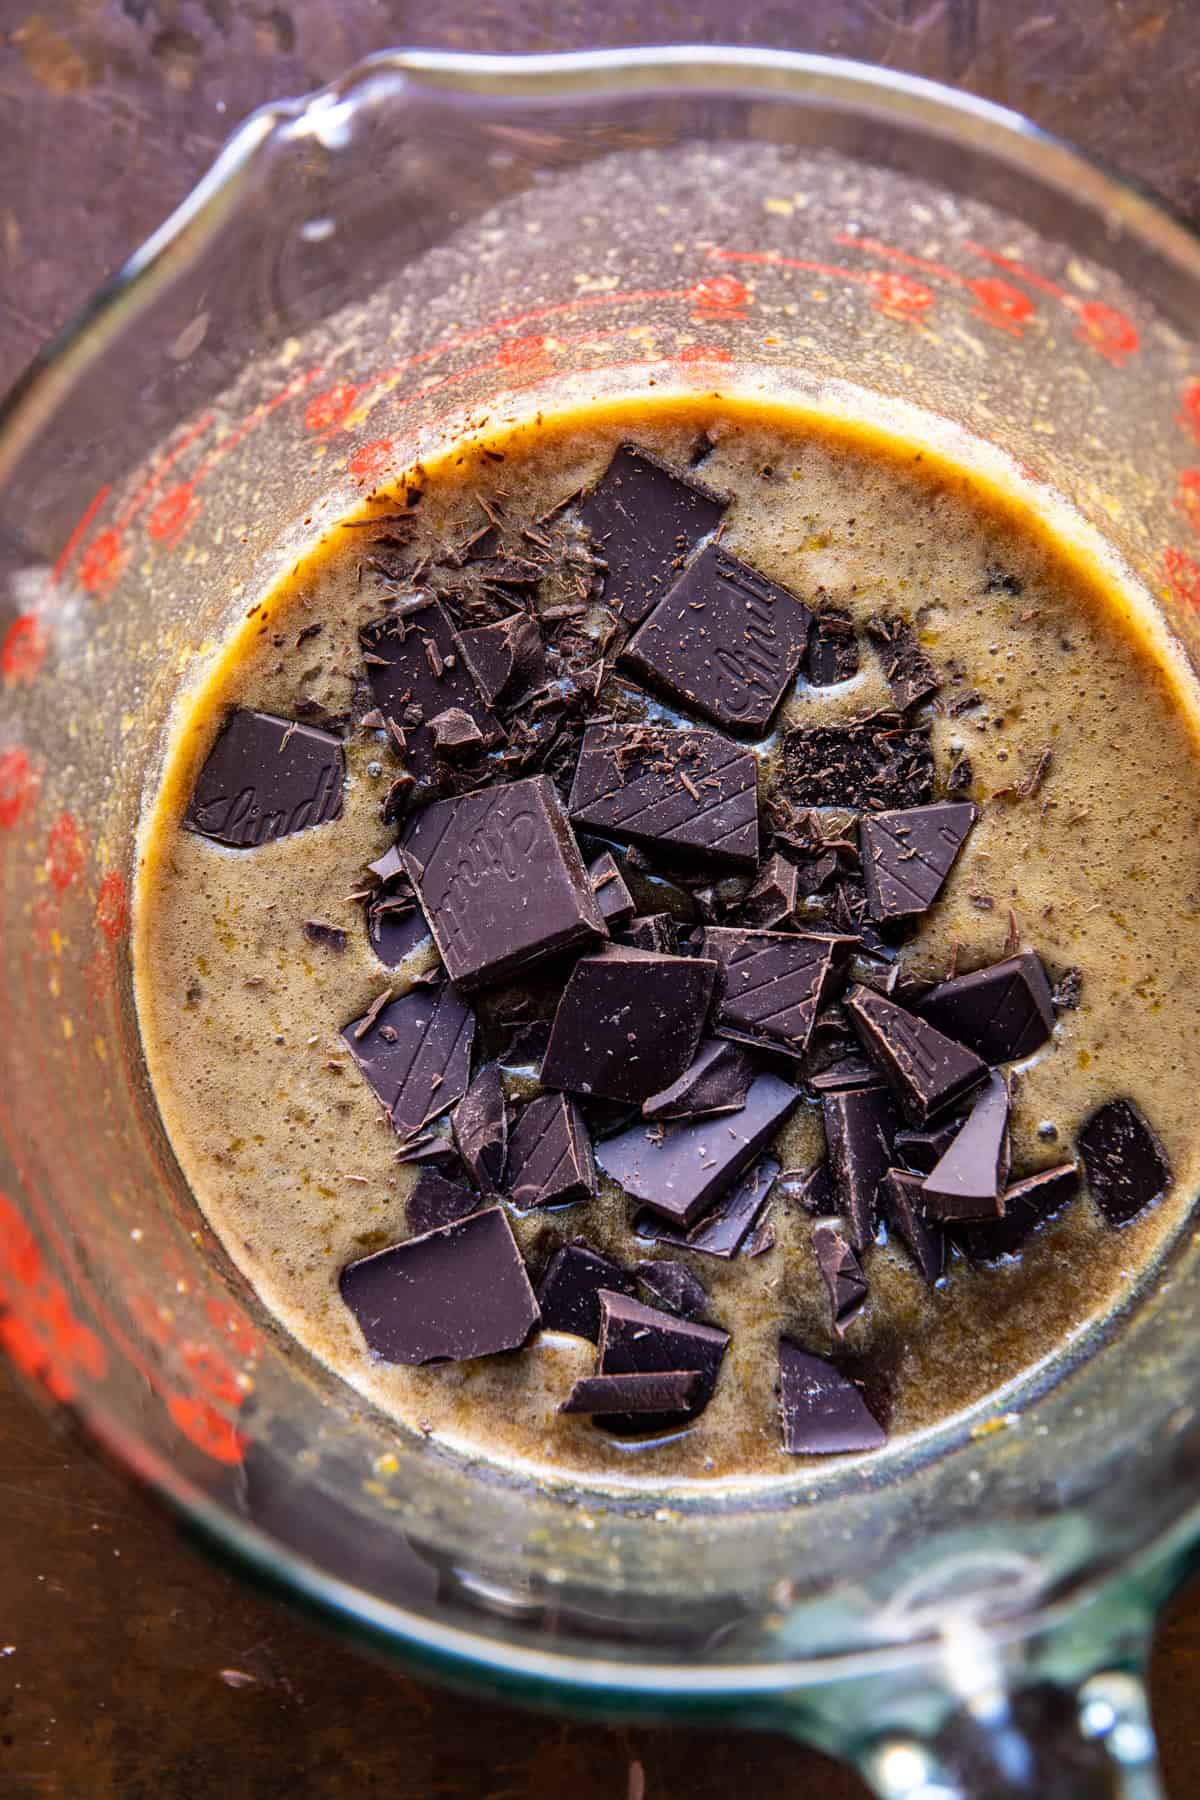
Now the filling, it’s easy and you don’t even need a mixer. What you do need is brown butter, so start with that. Just brown the butter on the stove until it smells nutty, then let it cool.
Next up, simply whisk together brown sugar, eggs, maple syrup, and cream. Then add in that brown butter and vanilla.
Whisk everything together and stir in plenty of chocolate.
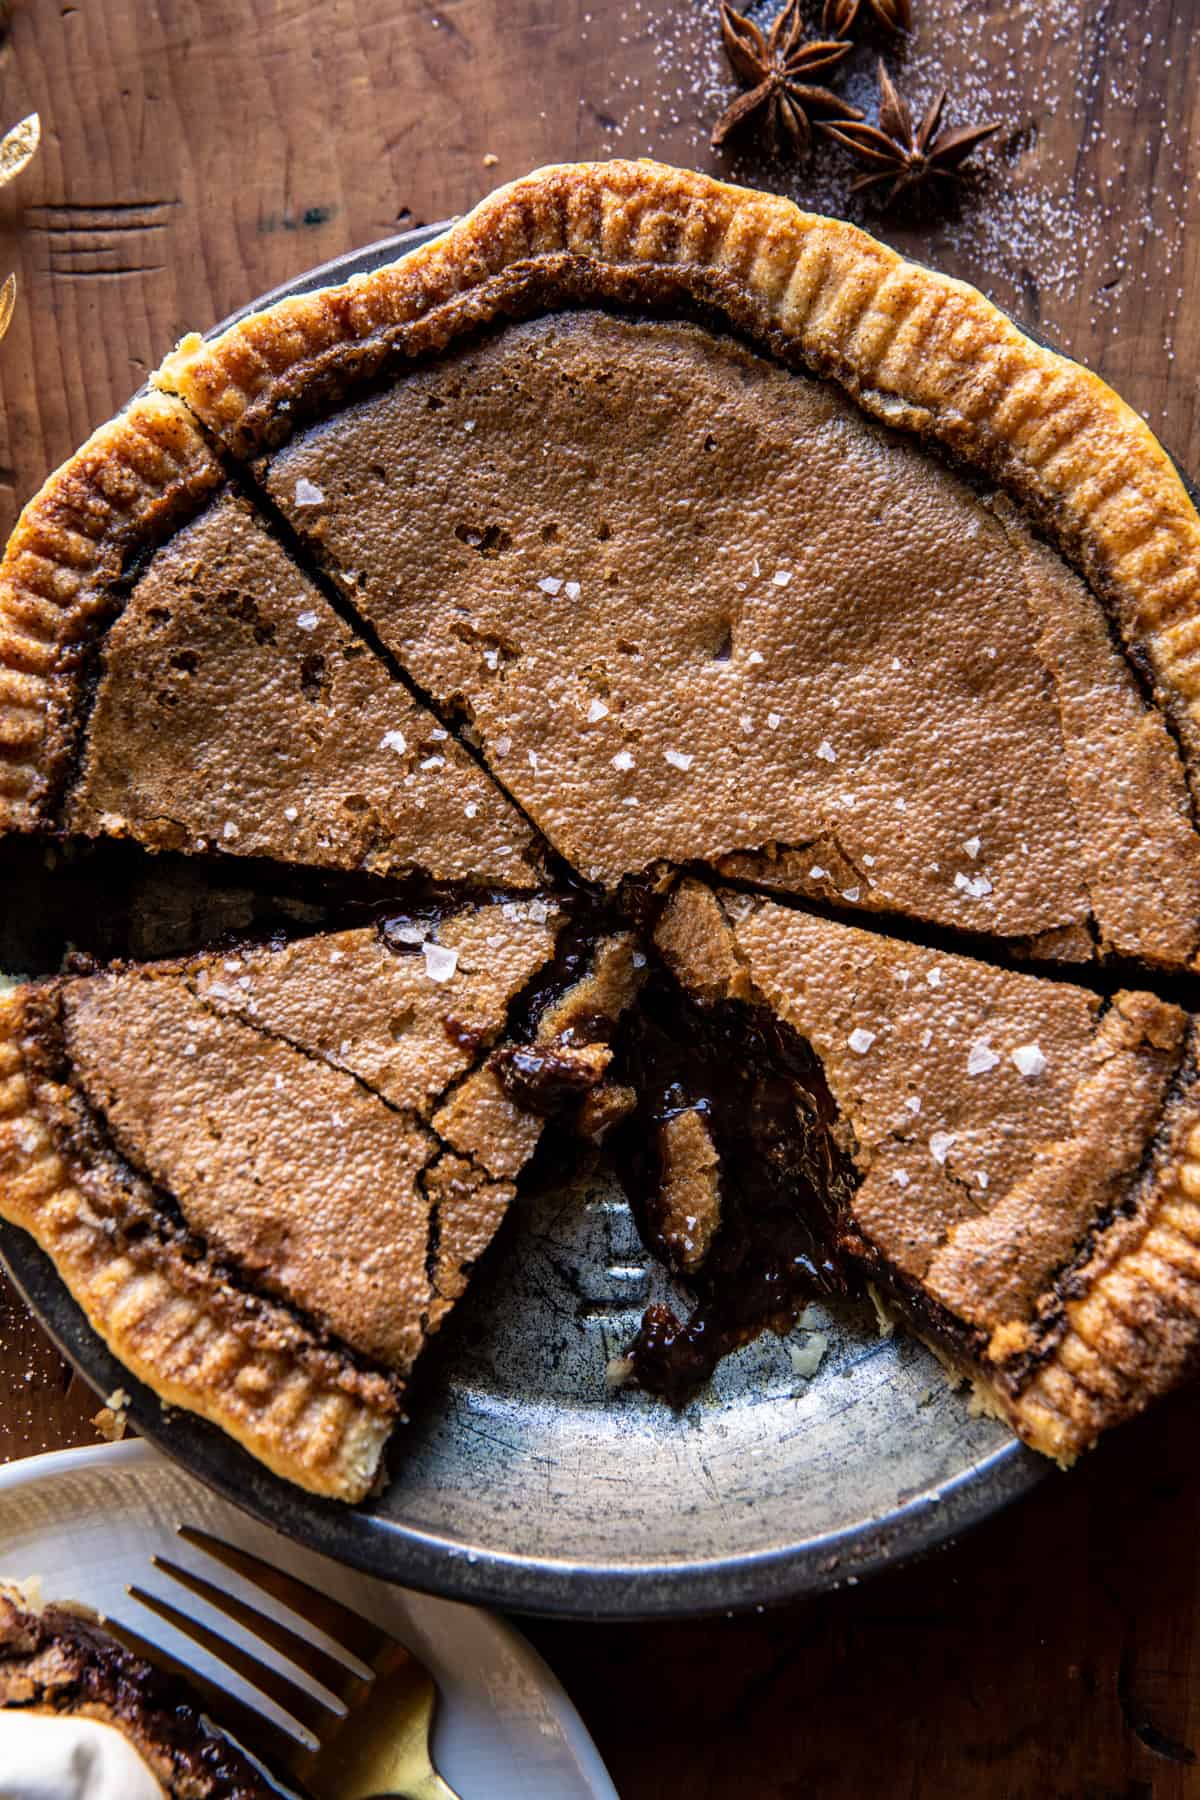
Chocolate chunks (or chips) folded into the batter just before baking. I prefer to use chunks for real puddles of melted chocolate, but chips work great too!
And then, vanilla sugar sprinkled over top of the crust for an extra sweet finishing touch. I did this with last year’s Molten Crackle Pie and it’s just the best special touch.
When the pie comes out of the oven, it will be very poofed on top with a slight bit of wiggle in the center. As the pie cools, it will fall and set up.
Wait a little bit to let it cool slightly, then cut and serve while still warm. Or at least that’s my personal favorite way to enjoy it. But honestly, this pie is great warm or cool, so serve how you like it.
And that’s kind of it! As always, my suggestion would be to test the pie tonight in preparation for Thanksgiving Day!
Enjoy! See ya tomorrow for another Thanksgiving cocktail!
Looking for other Thanksgiving desserts? Here are my favorites:
Gooey Chocolate Chip Cookie Pumpkin Pie
Chewy Brown Sugar Maple Cookies
Gooey Chocolate Chip Cookie Pie
Lastly, if you make this Brown Sugar Maple Cookie Pie, be sure to leave a comment and/or give this recipe a rating! Above all, I love to hear from you guys and always do my best to respond to each and every comment. And of course, if you do make this recipe, don’t forget to tag me on Instagram! Looking through the photos of recipes you all have made is my favorite!
Nutritional information is only an estimate. The accuracy of the nutritional information for any recipe on this site is not guaranteed.
Nutritional information is only an estimate. The accuracy of the nutritional information for any recipe on this site is not guaranteed.
As Seen In


Delish!!! So easy to make! I used store bought pie crust, didn’t cover it with foil while baking. Baked it for 1 hour, day before, and left out at room temperature. I used 1 cup of chocolate chips and 1/2 cup of chunks for variety. Turned out great! Served with whip cream and strawberries. Strawberries were great addition as it tastes like a chocolate covered strawberry
Hey Diana,
Happy Sunday! I appreciate you making this recipe and sharing your feedback, so glad to hear it was delish! xx
I cannot believe how good this pie is. It is so easy to make but tastes out of this world!! I baked two pies at one time, rotating halfway through and they turned out great. Brought one in to work for holiday party and every0ne was raving. I used really good quality chocolate. Just reheated a slice and wowed again.
Hey Joelle,
Happy Friday!!❄️🧑🎄 I appreciate you making this recipe and sharing your review, so glad to hear it turned out well for you! xx
I made this for Friendsgiving and it was a HUGE hit! I omitted the chocolate and it reminded us all of gooey pecan pie filling without the nuts. Also made it a few days in advance and just reheated in the oven at 300 before serving, which worked great. Everyone raved about it, and it has already been requested again, so this will definitely be staying in my dessert collection!
Hey Kym,
Happy Friday! ☃️ So glad to hear that this recipe was enjoyed, I appreciate you making it! xT
Can you double the recipe to make 2 pies?
Hey Karla,
Totally, that will work well for you! Let me know if you give the recipe a try, I hope it’s delish! xx
I made this post Thanksgiving but we still enjoyed it. 🙂 I used a store bought crust from Trader Joe’s. Followed recipe except for flaky sea salt (didn’t have any but I’m sure it enhances the deliciousness of the pie).
Hi Teri,
Amazing!! I love to hear that this recipe was enjoyed, thanks so much for giving it a try! xx
I made this pie for Thanksgiving this year. I made it the day before and stored it in my refrigerator. Thanksgiving Day before serving dessert, I kept it on my counter for a few hrs, then reheated in a 300 degree oven. DELICIOUS PIE! I made it as is and it was perfect! I know there’s a 1/3 cup of maple syrup in the recipe but you don’t really taste it in the pie unfortunately. I would advise anyone wanting to make this to cover your pie crust from the very beginning because it browns very quickly when baking in the lower third of your oven. Also I can’t comment on her pie crust recipe because I use my own. This is so chocolatey good and the sprinkle of vanilla sugar on the bottom of the crust is excellent!
Hi Cindy,
Happy Monday!! Thanks a bunch for trying this recipe out, I love to hear that it was enjoyed! Thanks for sharing your feedback!! xT
Made this a couple times and we love it!
Hey Teanna,
Fantastic!! So glad to hear that this recipe turned out well for you, thanks a bunch for giving it a try! xx
I made this for my family for Thanksgiving. It was perfect! I was hesitant when I read the comments about it coming out soupy but I followed your exact recipe and it turned out perfect. I baked it for 60 minutes and let it rest for 30 and had zero spillage.
I will be trying it will maybe a dark chocolate next time since semi sweet was even a bit too sweet. My children enjoyed it though haha.
Hey Erin,
Happy Monday!! Thanks a bunch for trying this recipe out, I love to hear that it was enjoyed! xT
I made this for Thanksgiving and it was a hit! My family normally prefers pumpkin pie, but this pie beat it out.
Make sure to do fork marks and add a 1/2 in extra of pie crust to hang over the edge because my crust shrunk! The second time, it was perfect.
Hey Mical,
Wonderful!! I love to hear that this recipe was a hit, thanks for giving it a try! Have a great weekend:)
This pie didn’t last long enough for a picture! I made it (with the homemade crust recipe listed), super easy. It turned out great! I did think the top was burning, but it was the most amazing crackle top. I didn’t make the maple cream topping. The pie was sweet enough on it’s own. I’ll be adding this one to my dessert collection.
Hey there,
Thank you so much for making this recipe, I love to hear that it was a winner! I hope you had a wonderful Thanksgiving! xx
I was worried when I read a lot of comments about the pie still being soupy. I followed the recipe, except I used 1/4 c maple syrup instead of 1/3 c, I didn’t have heavy cream, and the store was completely out, so I melted 4 tbsp of butter and let cool then added to 3/4 c whole milk. I used 1/3 c of that for heavy cream and saved the rest in my fridge for another recipe.
I already had a frozen pie crust from the store, so I buttered the edge and sprinkled the vanilla sugar on, baked pie crust for 9 min, then added in pie filling. Baked pie for 30 min as is, then foiled the edges and baked another 30 min, kicking it up to 400. Came out perfect! Not soupy, but nice and gooey!
Hey Michelle,
Thank you so much for making this recipe, I love to hear that it was a winner! I hope you had a wonderful Thanksgiving! Thanks for sharing what worked well for you! xx
Making this recipe now with a store bought pie crust. I saw other’s comments and wondering if there’s any way to make the filling a little thicker so it’s not so runny – like others?
Replying to my own comment. I made this recipe today and it was a hit! I used store bought (Pillsbury) crust, and it was rather crispy, but I put foil on the edges to prevent it from burning, and it worked! I did, however, add about 1/4 cup of flour and cooked it for about 68 mins total to try to avoid it being “soupy” like others had commented. It wasn’t soupy! It was served about 2 hours after baking, so room temp. Other than those changes, I followed the rest of the recipe.
Hey Sarah,
Thank you so much for making this recipe, I love to hear that it was a winner! I hope you had a wonderful Thanksgiving! xx
Hi Sarah,
I wouldn’t recommend adjusting the recipe, you should follow it as written:) Please let me know if you have any other questions! xx
If I make it a day early, does it need to be refrigerated?
Hi Jeanne,
Nope, just leave it at room temp:) I hope you love the recipe! Happy Thanksgiving! xx
Hello! I bought a premade-ready to eat crust this and don’t want to burn it..do you suppose I can make the filling and still put it in the oven then pour that into the crust..? Gah. I didn’t think this through! Thanks!
Hi Chloee,
I wouldn’t recommend that….so the crust is already cooked? I would follow the recipe as is and then cover the edges with foil so it doesn’t burn. I hope this helps! xx
Hi there! In the photo and video it looks like there are 2 pie crusts. One for the bottom and one for the top. But I can’t find any instruction for the top of the crust? Not sure if I’m reading it wrong? Love your recipes, follow you on IG. Happy Thanksgiving from Pennsylvania.
You can. That’s what I did! Didn’t burn it.
Hi Chelsi,
There is no top crust for this recipe:) Please let me know if you give it a try, I hope it turns out well for you! xxT
I made it with the top crust and it was just as good!
I’m now going to make it again for Christmas Eve. But prepping it today! Thanks for the reply! Merry Christmas to your family!
Hey Chelsi,
Happy Friday!!☃️ I love to hear that this recipe was a winner, thanks so much for making it and your comment! xT
Made this for my family thanksgiving lunch and this turned our very soupy. Not good, had the look of chili for consistency. Is there anything you recommend adding next time? Cooked it for 55 minutes and let it harden for 30 minutes, and still turned out like soup. Would love to bake this again if you have any recommendations for it not to turn out liquidy.
Hi Kelly,
So sorry to hear you had some issues with this recipe! Was there anything you adjusted at all? Any ingredient that you may have missed? Did you over-mix the batter? If you view the photos above you will notice that the filling is pretty soft. I hope this helps! xx
Hi Tieghan!
I followed everything like it said, I think with serving it warm it would have needed more time to set even past 30? Once I got it in the fridge it helped it set, which I know it’s a different type of taste served cold!
Great!!
Do you think it would work if I used coconut cream instead of the heavy cream? Thanks!
Hi Megan,
Yes, that should work well for you! Please let me know if you give this recipe a try, I hope it’s delish! xx
The same thing happened to my pie 🙁 I followed the recipe to a tee.