
This post may contain affiliate links, please see our privacy policy for details.

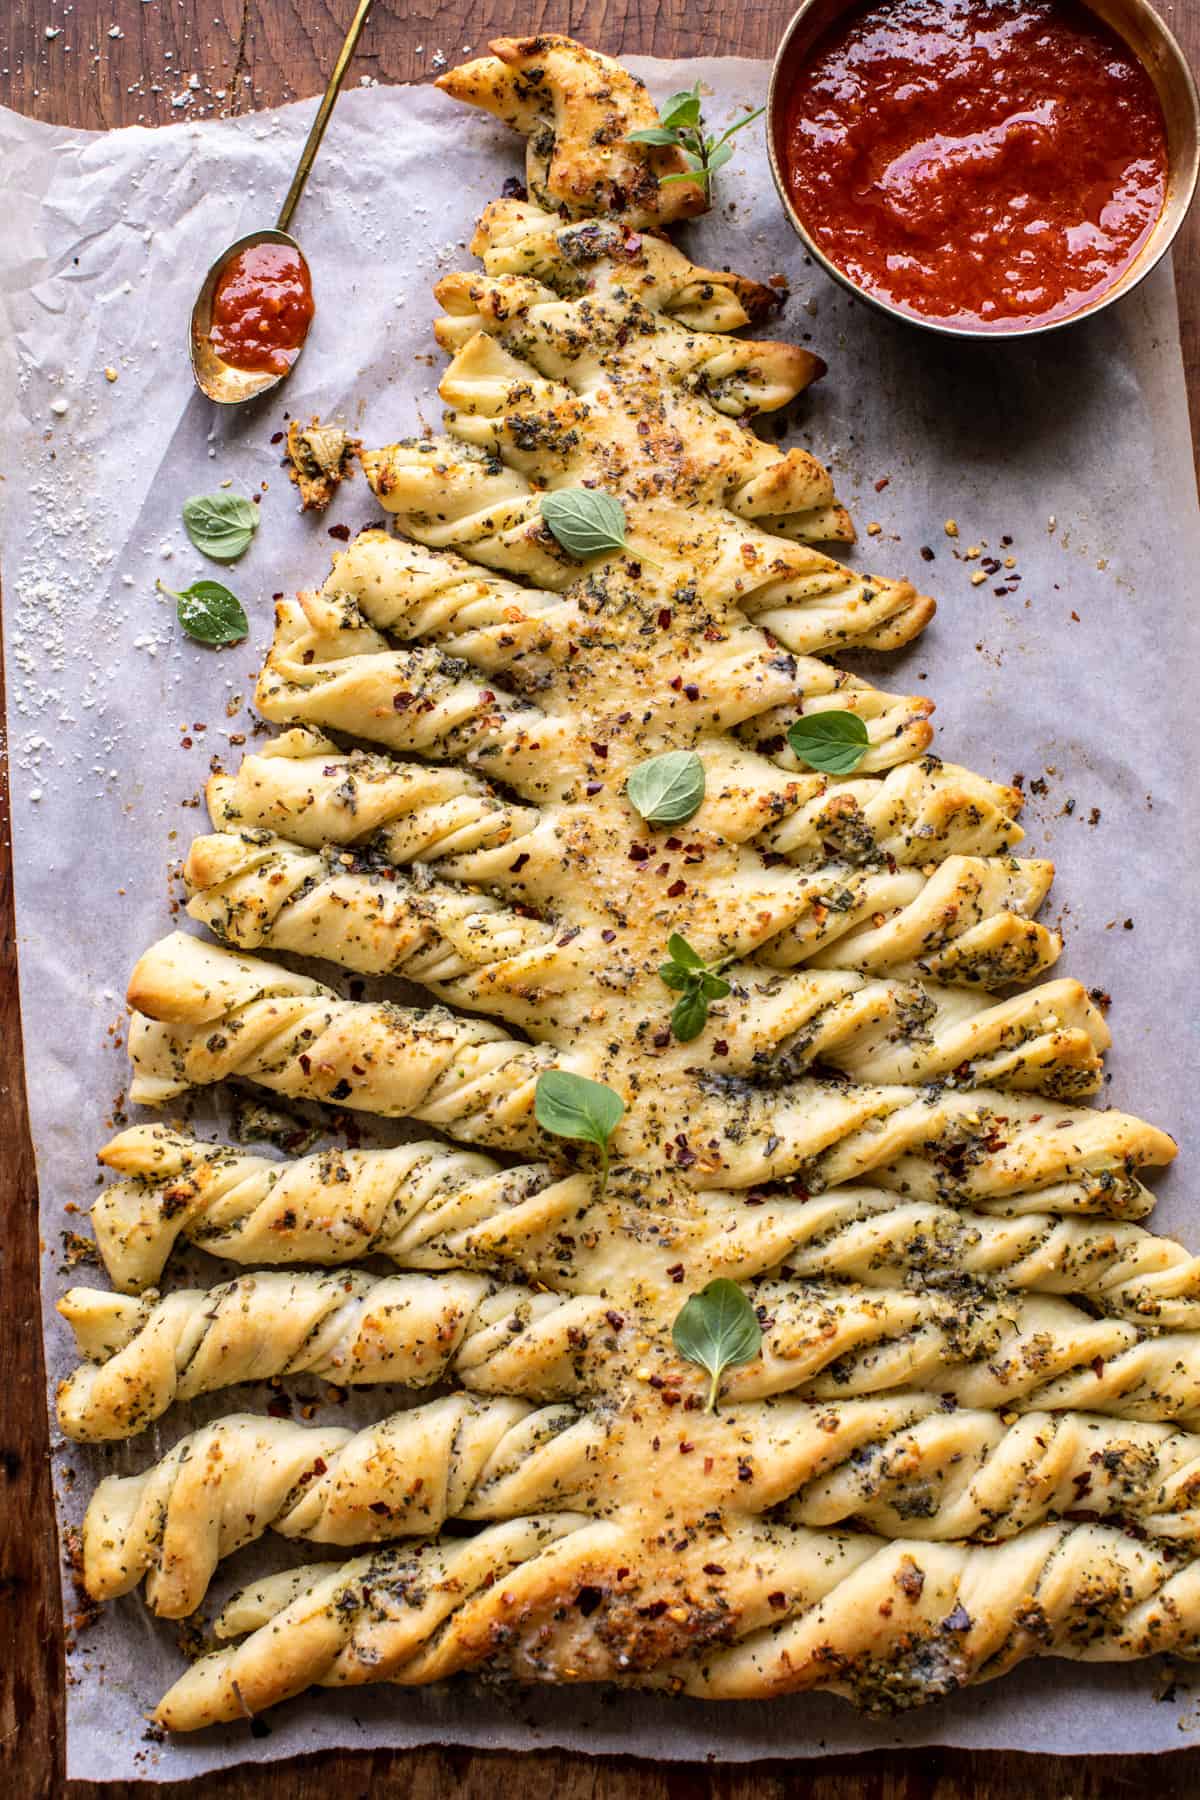
This festive Pull Apart Christmas Tree Garlic Bread is light, soft, buttery, garlicky, perfectly salted, and SO delicious. Serve this warm right out of the oven with a light sprinkle of flaky sea salt and marinara for dipping. It’s melt in your mouth good…and oh so impressive. This is simpler than you’d think to make, and such a fun pull-apart bread for all of your upcoming holiday dinners.
Half Baked Harvest At Home
20+ new recipes for wholesome comfort food made with everyday ingredients. Pre-order today! HBH At Home will be released on Tuesday, February 23rd!
Ingredients
- Garlic
- Extra virgin olive oil
- Warm whole milk
- Instant yeast
- Honey
- Large eggs
- All-purpose flour
- Kosher salt
- Salted butter
- Grated parmesan
- Chopped fresh sage
- Dried basil
- Dried oregano
- Dried parsley
- Chili flakes
What you will need in the kitchen:
- Stand mixer and bowl
- Foil
- Medium bowl
- Forks and knives
- Parchment paper
- Baking sheet
I’ve already made a pull apart wreath so I figured it was time to add a Christmas tree to the mix! I’ve seen these for years, but wanted to give it my own touch. And you guys, I love this bread!
It’s oddly simpler than you’d think to make (you have to look at the photos, visuals make it much easier). And so flipping good! It’s hard to beat garlic bread, but shape it like a Christmas tree?
Yes, it’s just that much better.

I’ve wanted to make this for a long time. Last year I ran out of days in December. So this year I put it on our content calendar way back in October…and never moved it off. When I told my mom the idea, she immediately said, “oh you have to make that!!”.
In our house, no holiday dinner is complete without a side of homemade bread. Most of the time I’ll make some form of a soft, buttery roll. But this year I wanted something a bit more festive.
Going into this recipe I wasn’t sure how it would turn out, I was actually nervous. I just wanted it to work and turn out great so badly! I had a vision in my head and it needed to match! And thankfully I got it just right!
It’s delicious, festive, and well…it smells amazing while baking away in the oven.
The details
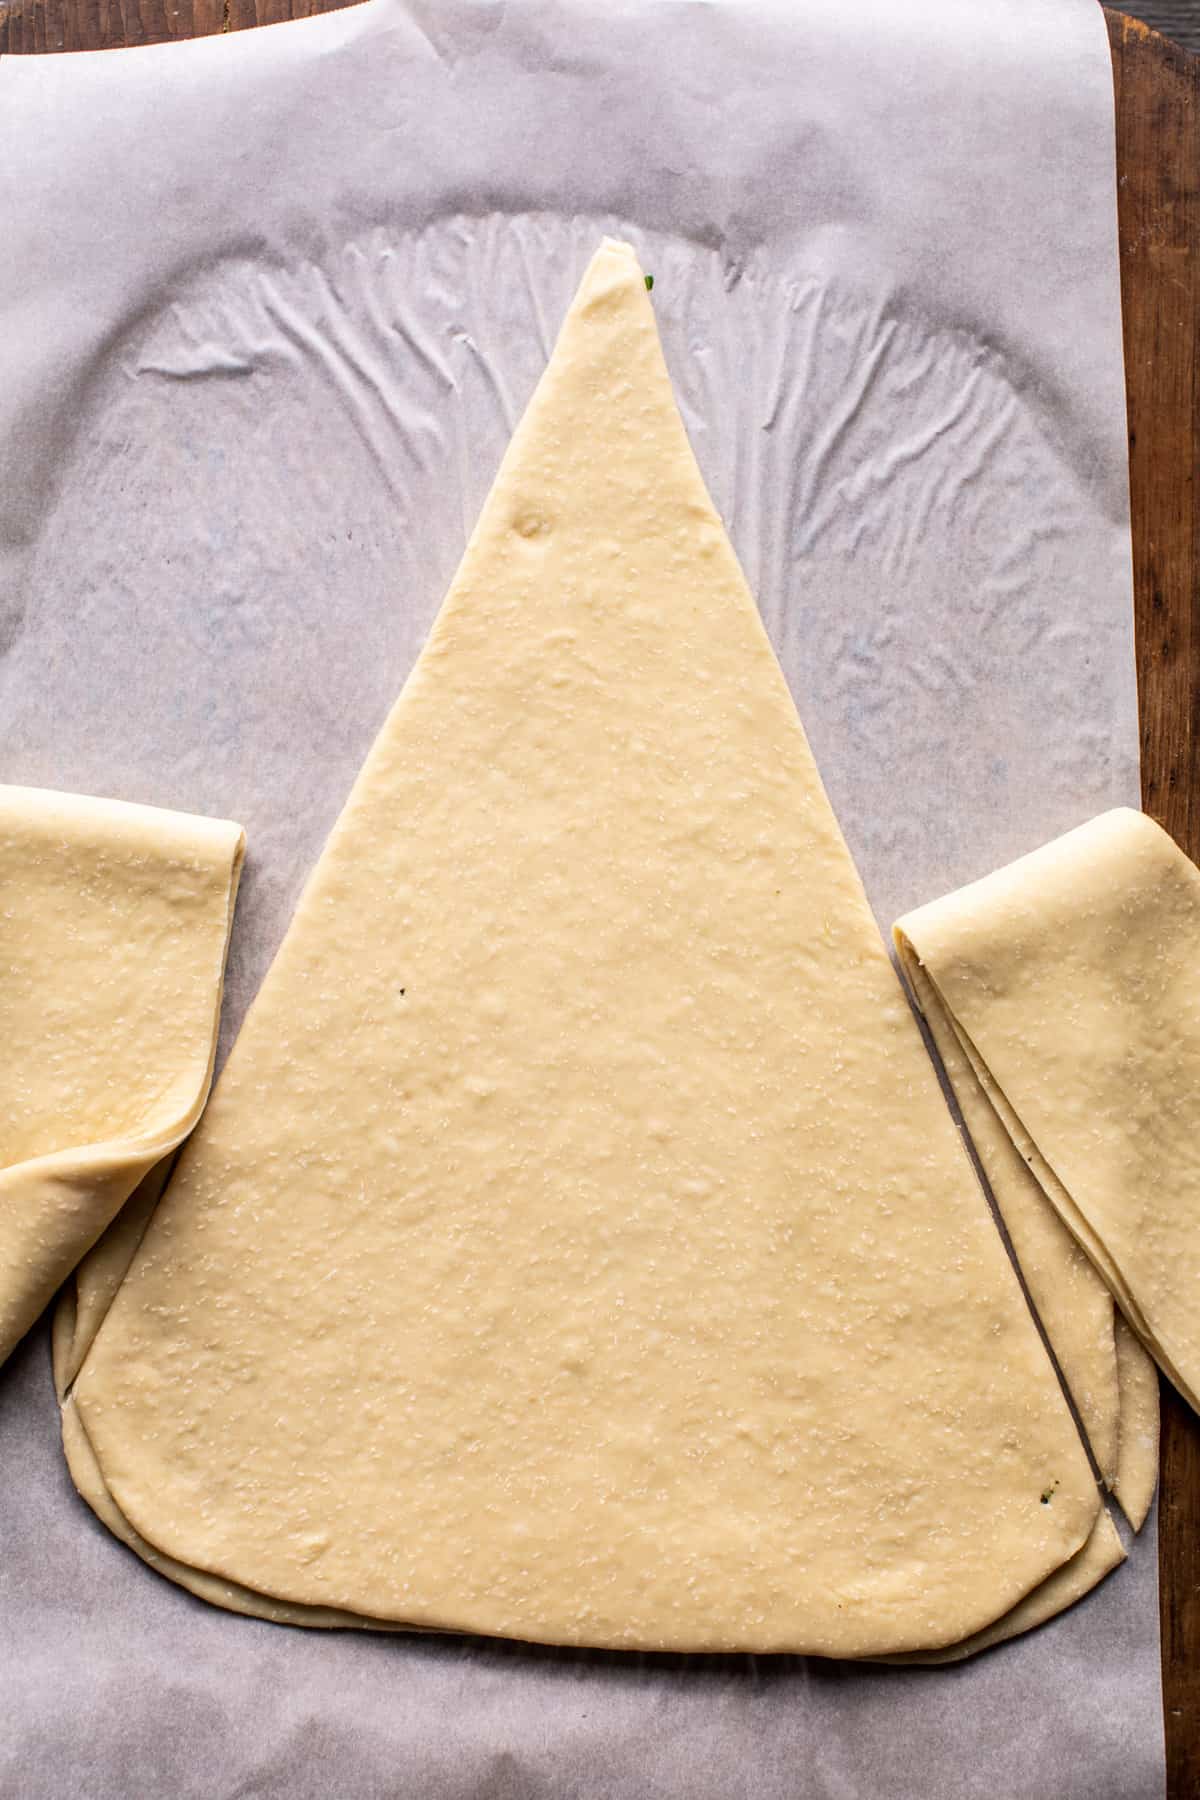
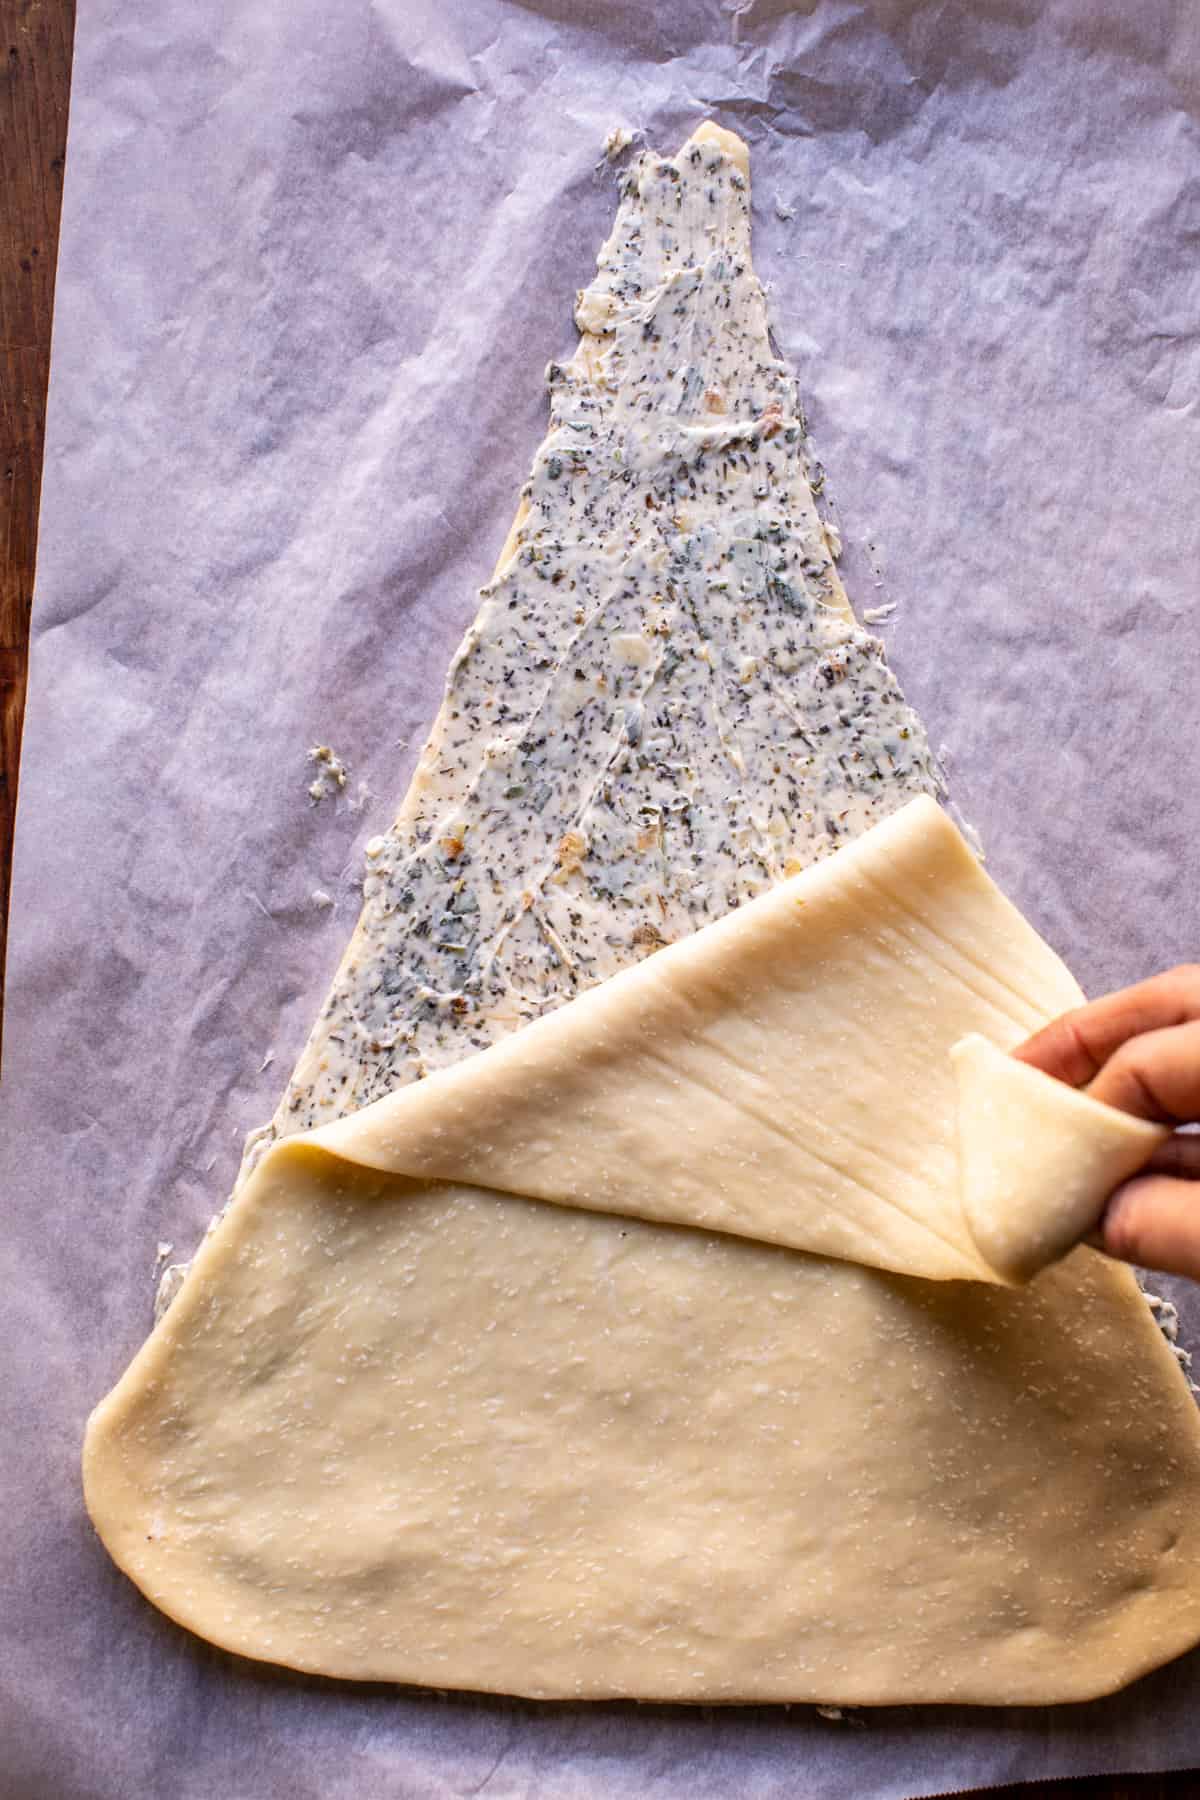
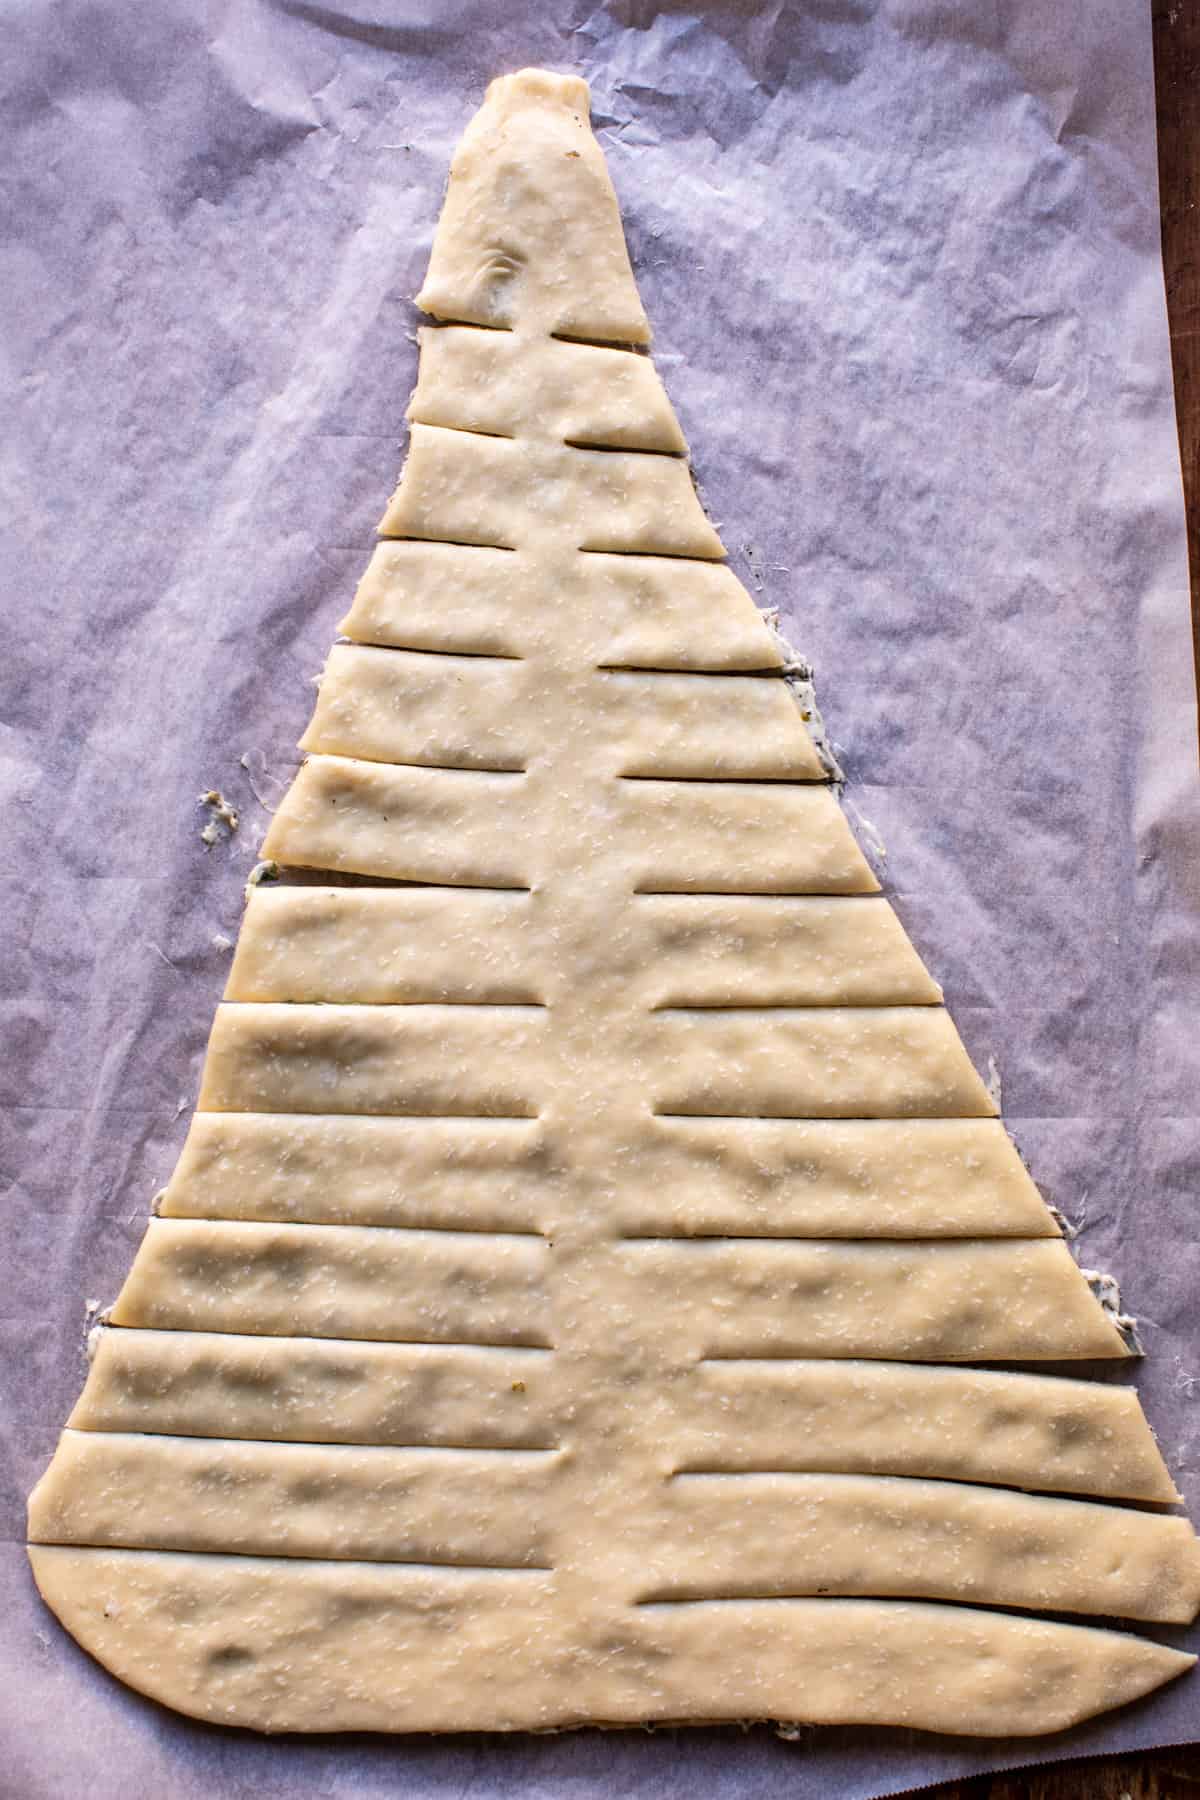
I know this bread might look like it takes hours to make, but trust me, it’s not as tricky as you think. First, make a milk-based bread dough, roll it out, then cut the dough into a triangle. Next, spread on plenty of roasted garlic butter. Then add another triangle of dough on top.
From here, simply cut slits up the tree and twist them! Seems crazy, I know, but it’s going to be great!!
Use the photos as a visual guide, they will really help!
The dough
Flour, instant yeast, and a pinch of salt with milk, eggs, and butter. The combination creates a beautiful golden crust on the outside, but the inside stays incredibly soft and fluffy.
I prefer to use instant yeast to keep the dough making process quick and simple! It also prevents the dough from rising too much in the oven, which helps the tree keep its shape better.


The roasted garlic butter
Roasting garlic is really easy. If you’ve never done it before it really adds a layer of deliciousness to your recipes.
Slice the top portion of the garlic head off to reveal the cloves. Then place the garlic on a small piece of foil, drizzle with olive oil, and wrap the garlic up. Roast for about forty minutes, until the garlic is deeply golden and soft.
I like to mash the garlic with butter, parmesan, and herbs. Nothing fancy, but wow, so good.

What’s great about this pull apart bread is that while it’s a nice addition to your dinner party menu, it also works as an appetizer. It would be nice to have this ready just as your guests arrive. They can snack on bread and enjoy cocktails before dinner. It’s always nice to have something for people to graze over while chatting away.
The most important thing you must do? Serve the bread warm with a sprinkle of flaky sea salt.
Truly nothing is more delicious. I can’t wait to serve this to my family on Christmas Eve…my brothers and Asher are already excited. They all love a soft garlic bread!

Looking for other bread recipes? Here are a few ideas:
Easy Pull Apart Garlic Parmesan Bread
Salted Honey Butter Parker House Rolls
Herby Everything Cheddar Swirl Buns
Lastly, if you make this Pull Apart Christmas Tree Garlic Bread, be sure to leave a comment and/or give this recipe a rating! Above all, I love to hear from you guys and always do my best to respond to each and every comment. And of course, if you do make this recipe, don’t forget to tag me on Instagram! Looking through the photos of recipes you all have made is my favorite!
Pull Apart Christmas Tree Garlic Bread

Ingredients
- 1 head garlic
- extra virgin olive oil
- 3/4 cup warm whole milk
- 2 1/4 teaspoons instant yeast
- 1 tablespoon honey
- 2 large eggs
- 3 1/4 cups all-purpose flour, plus more for rolling
- 1 teaspoon kosher salt
- 1 stick + 2 tablespoons salted butter, at room temperature
- 1/2 cup grated parmesan
- 1 tablespoon chopped fresh sage
- 2 teaspoons dried basil
- 1 teaspoon dried oregano
- 1 teaspoon dried parsley
- 1 pinch chili flakes
Instructions
- 1. Preheat the oven to 400° F.2. Slice off the top portion of the garlic head to expose some of the cloves. Place the garlic on a piece of foil. Drizzle with olive oil, wrap it up, and bake for 40-55 minutes, until deeply golden and very soft.3. In the bowl of a stand mixer combine the flour, yeast, and salt. Add the warm milk, honey, eggs, and 2 tablespoons butter. Using the dough hook, mix until the flour is completely incorporated, about 4-5 minutes. If the dough seems sticky, add the remaining 1/4-1/2 cup of flour. Cover the bowl with plastic wrap and let sit at room temperature for 30 minutes to 1 hour.4. Let the garlic cool, then squeeze the cloves out into a bowl. Add 1 stick butter, the parmesan, sage, basil, oregano, parsley, and chili flakes. Mash the cloves into the butter with a fork. 5. Line a baking sheet with parchment paper. Divide the dough in half. On a floured surface, roll each dough into a large rectangle (roughly 15×11 inches). Place one rectangle on top of the other. To cut a large triangle, cut from the bottom corner to the center of the top. Repeat on the other side to make a large triangle in the middle. Peel away the corners and save for another use. 6. Separate the 2 triangles and place 1 triangle on the prepared baking sheet. Spread 2/3 of the garlic butter over the triangle, carefully place the second triangle on top, matching the corners. Cut the triangle into horizontal slices about 1 inch apart from the top to bottom, leaving the middle “trunk” of the tree intact. Pull the strips and twist (see above photo).8. Brush the top with the remaining garlic butter. Bake 25-30 minutes, until golden brown. Serve with marinara sauce.
Nutrition
Nutritional information is only an estimate. The accuracy of the nutritional information for any recipe on this site is not guaranteed.
Did you make this recipe? Please rate & comment below.






















Can you bake this and refrigerate for later? Thank you.
Hi Talon,
If you bake this ahead of time, I would keep wrapped in an airtight container at room temp. You could also prep this and keep in the fridge and then bake. Please let me know if you have any other questions!
No. Thanks for the reply and the info!!
So I thought people wanted the temp turned down for the garlic… no the temp is too high and or the length of time for the actual bread to bake. I also had to take mine out after 15 min because it was already a golden brown.
Thanks so much for your feedback, Jenny! I hope it turned out well for you!
Cute idea but very dry. Baking time/temperature was way off and instructions are not clear. I know my way around baking so made do but next time will just make a baguette and smear it with garlic butter
Hi there,
Thanks for trying this recipe and sharing your feedback, very sorry to hear it was not enjoyed!
The time in the oven needs to be reduced. All that work and I had to throw it out 🙁 It did smell good, though.
This was easy to make and delicious. Mine only took 15 minutes so make sure you check early. I paired this with lasagna soup for a Christmas lunch.
Hey Erin,
Love to hear this recipe was enjoyed, thanks for making it and your comment!
Happy Holidays!🎄
I love all of your recipes. I made this tonight and I agree that the time is too long. I read the comments and only had it in at 400 for 15 minutes. If I had left it in longer it would have been too dark. It was delicious and I plan to make another for a party on Friday. Thanks!
Hey Rachel,
Perfect! Love to hear this recipe turned out nicely for you, thanks for making it! Thank you for the feedback regarding the bake time. Happy Holidays!🎁🎄
Can this be made gluten free?
Hi Katie,
Yes, that will work nicely for you! I hope you love this recipe!
Happy Holidays!
Hi! Can I add mozzarella cheese to this?! So excited to try it.
Hey Alicia,
Sure, I bet that would work nicely for you! I hope you love this recipe!
Happy Holidays!
Please change the oven time on this recipe. There are so many comments about it but I didn’t read it until after I baked and sure enough, overcooked. I’m sure it would’ve been amazing.
Hi Kelli,
I’m very sorry to hear this! The oven time and temp are both correct.
Thanks for trying the recipe. Happy Holidays!
Can this be made the day before and reheated or is there a step to stop at before baking so it can be done ahead of time?
Hi Kristen,
Sure, I would complete through step 6, cover tightly, and then bake as directed. I hope you love this recipe! Merry Christmas! xx
can u use premade dough ?
Hi Ann-Marie,
Totally, that would work nicely for you. I hope you love this recipe, please let me know if you give it a try! xx
Are you supposed to bake the bread at 400?
Hi Lacy,
Yes, that is correct. Please let me know if you have any other questions! xT
Hello I also had the same question on the temp of the oven when baking it. I only had it in the oven for 8 minutes and I had to take it out or it would have been burnt.
How Long can this dough stay in the fridge covered before baking?
Hi there,
I wouldn’t let is sit for more than 24 hours. I hope you love this recipe! xx
Can it be frozen and then bake later?
Hey! I haven’t ever tried that before so I can’t say for sure! So sorry! xT