Next Post
Creamy Sun-Dried Tomato Chicken Pasta.
Originally published Dec 15, 2021 • Updated Jul 15, 2025

This post may contain affiliate links, please see our privacy policy for details.
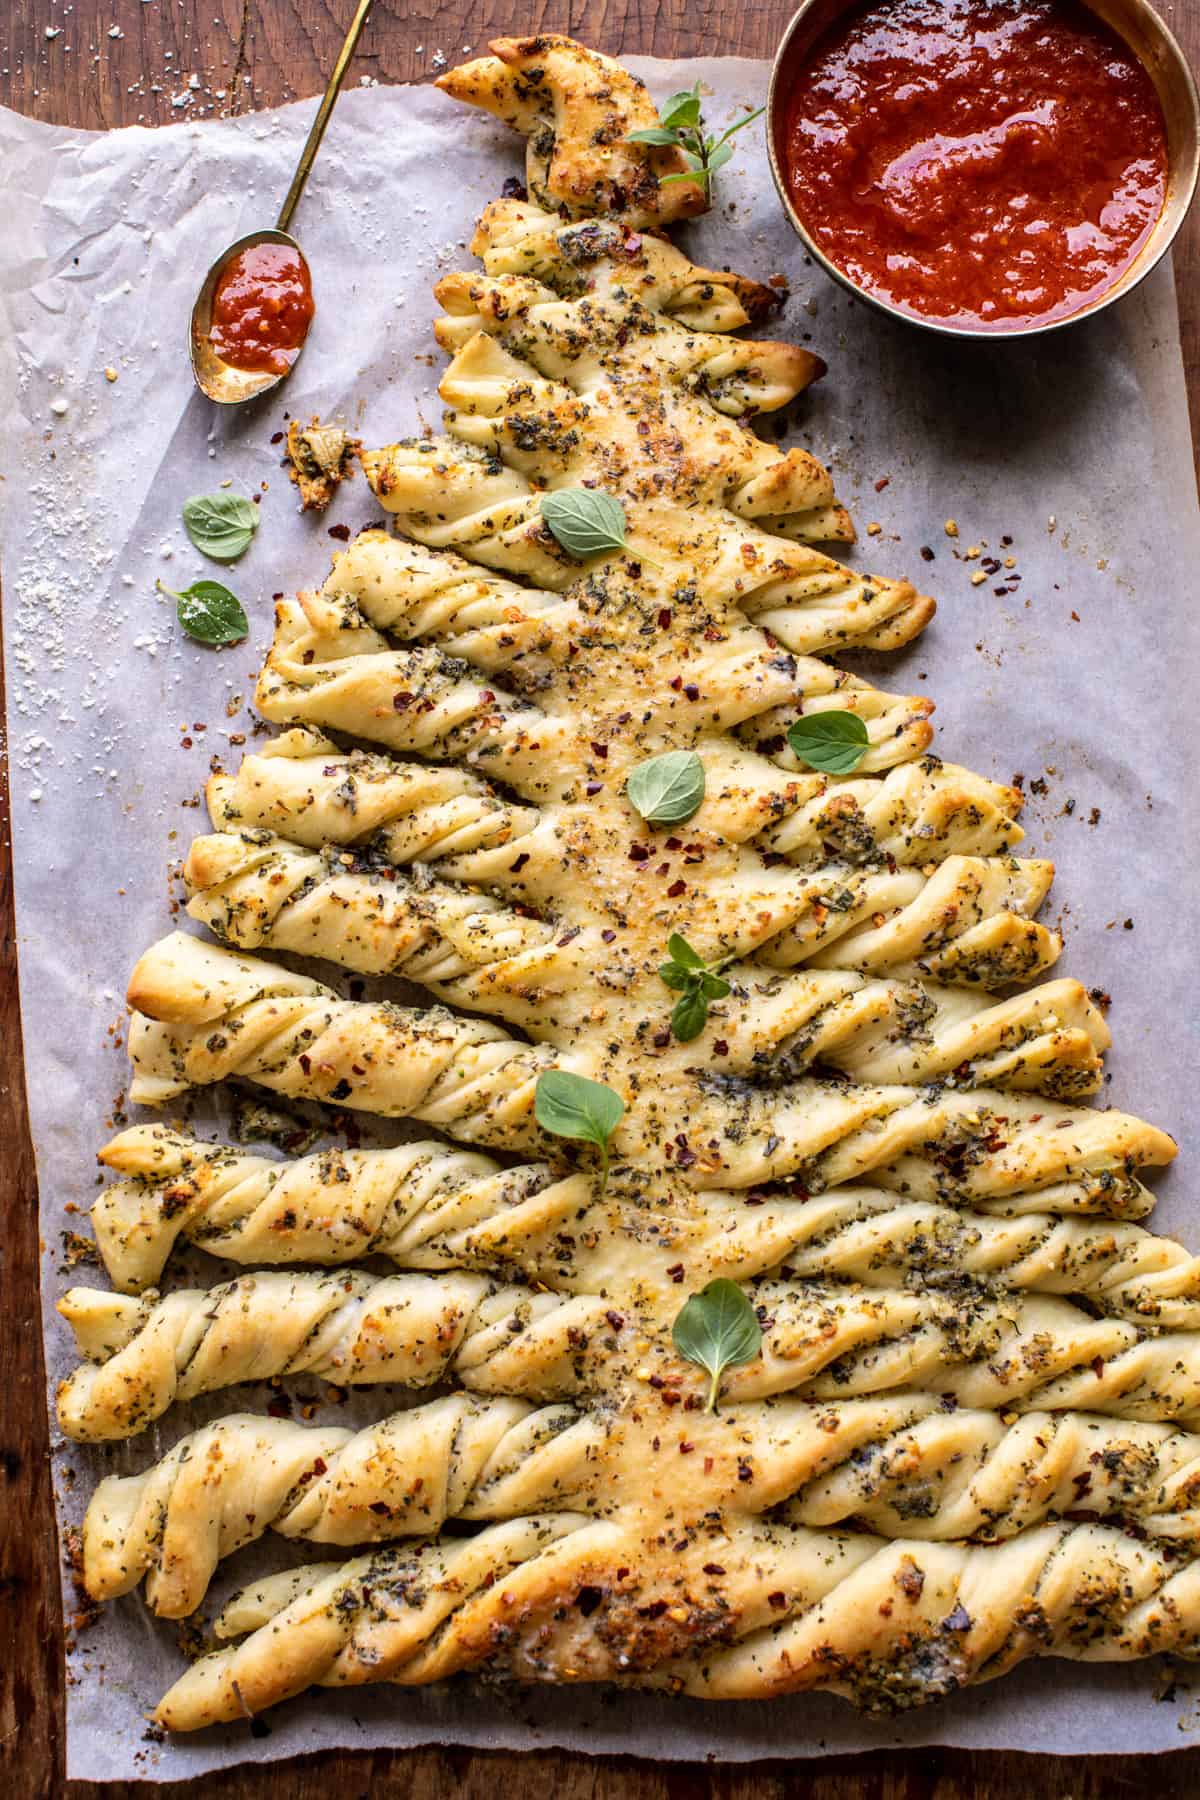
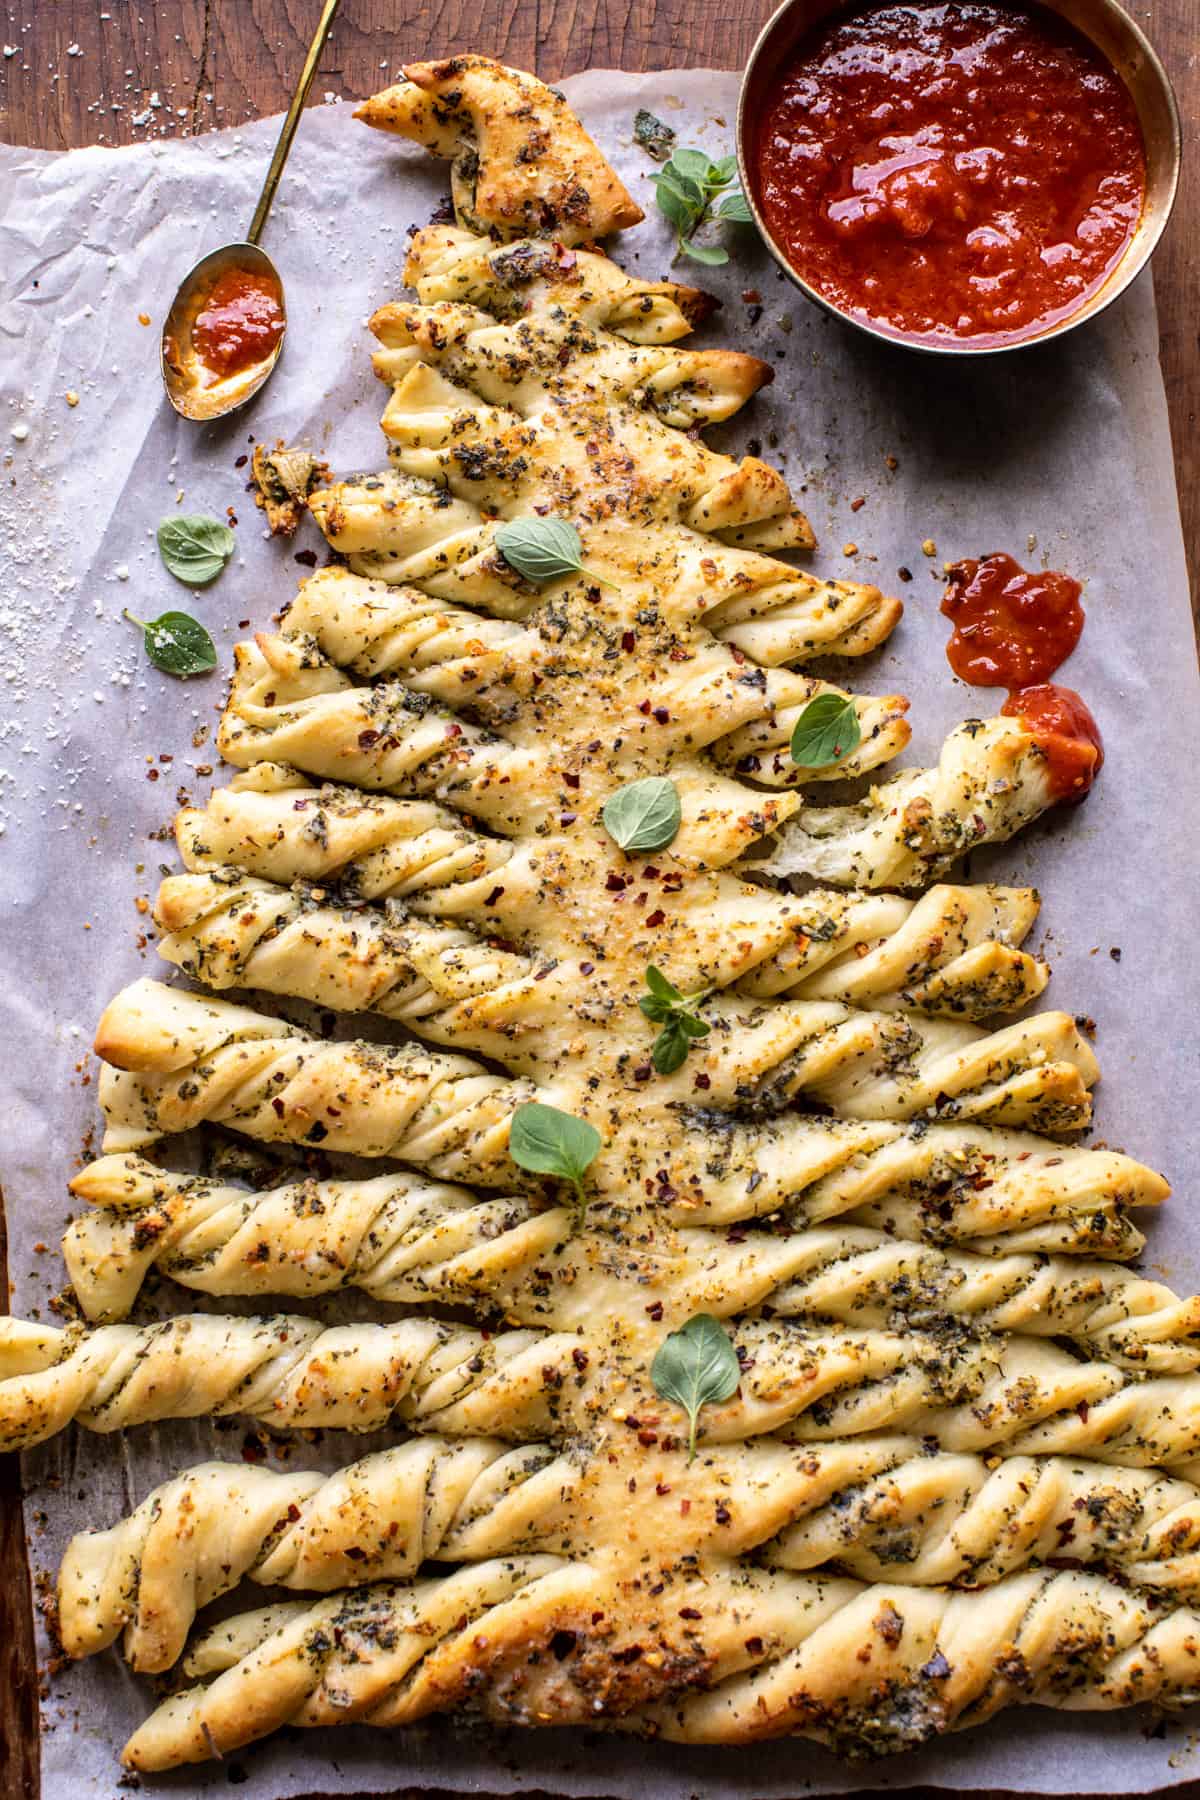
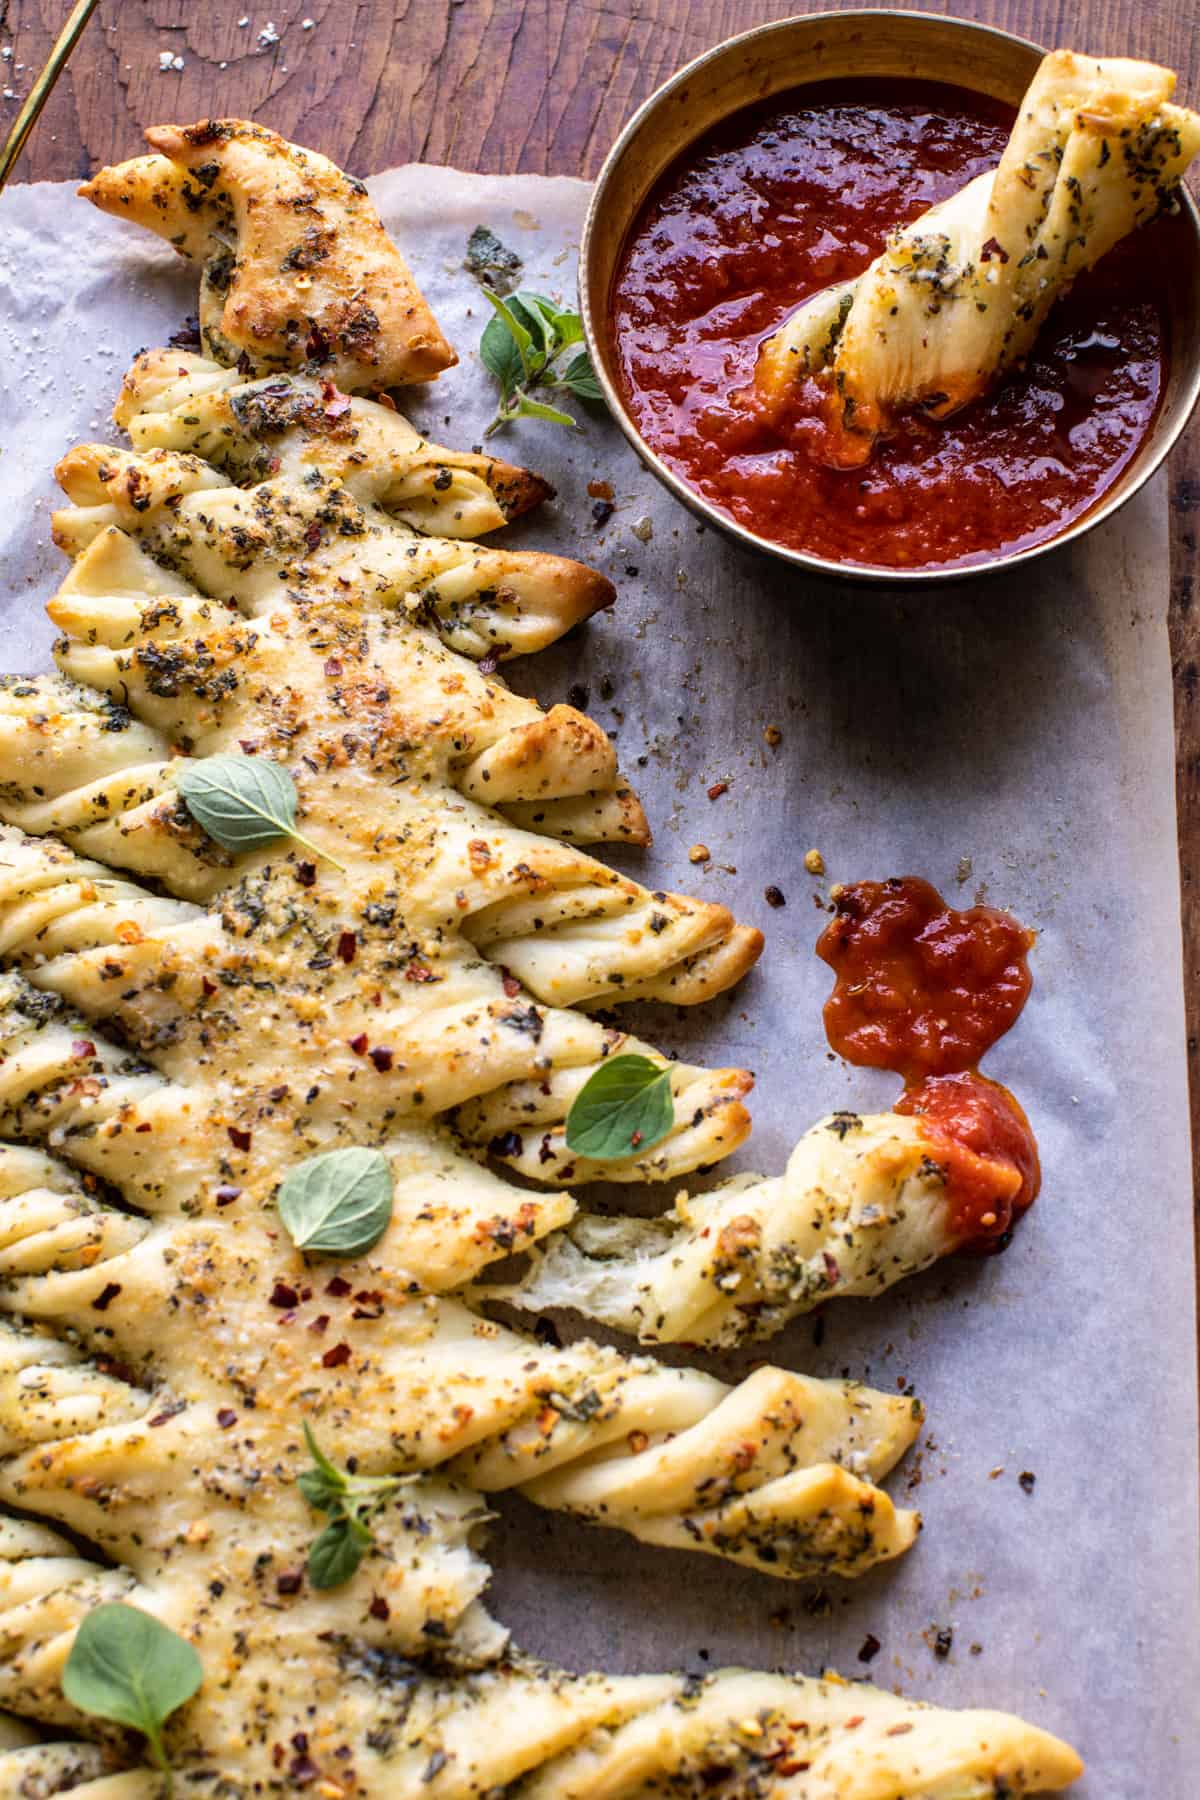
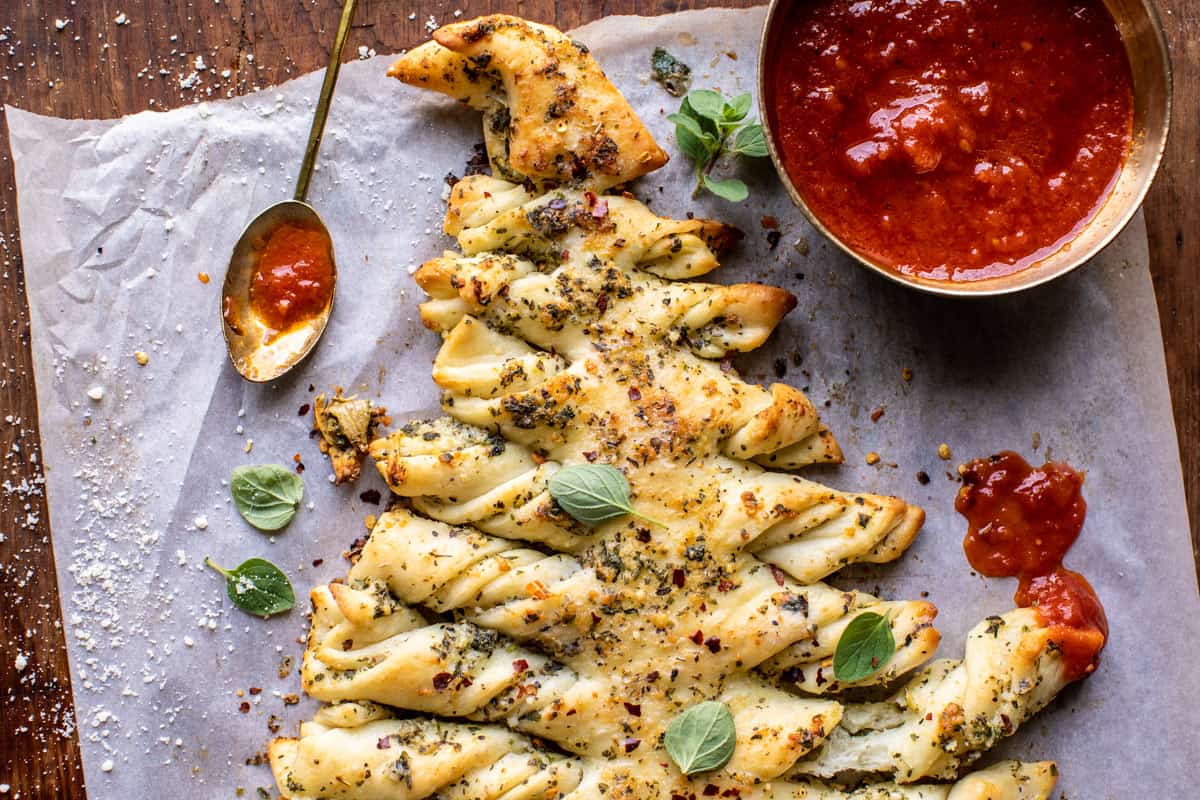
This festive Pull Apart Christmas Tree Garlic Bread is light, soft, buttery, garlicky, perfectly salted, and SO delicious. Serve this warm right out of the oven with a light sprinkle of flaky sea salt and marinara for dipping. It’s melt in your mouth good…and oh so impressive. This is simpler than you’d think to make, and such a fun pull-apart bread for all of your upcoming holiday dinners.
Ingredients
What you will need in the kitchen:
I’ve already made a pull apart wreath so I figured it was time to add a Christmas tree to the mix! I’ve seen these for years, but wanted to give it my own touch. And you guys, I love this bread!
It’s oddly simpler than you’d think to make (you have to look at the photos, visuals make it much easier). And so flipping good! It’s hard to beat garlic bread, but shape it like a Christmas tree?
Yes, it’s just that much better.

I’ve wanted to make this for a long time. Last year I ran out of days in December. So this year I put it on our content calendar way back in October…and never moved it off. When I told my mom the idea, she immediately said, “oh you have to make that!!”.
In our house, no holiday dinner is complete without a side of homemade bread. Most of the time I’ll make some form of a soft, buttery roll. But this year I wanted something a bit more festive.
Going into this recipe I wasn’t sure how it would turn out, I was actually nervous. I just wanted it to work and turn out great so badly! I had a vision in my head and it needed to match! And thankfully I got it just right!
It’s delicious, festive, and well…it smells amazing while baking away in the oven.
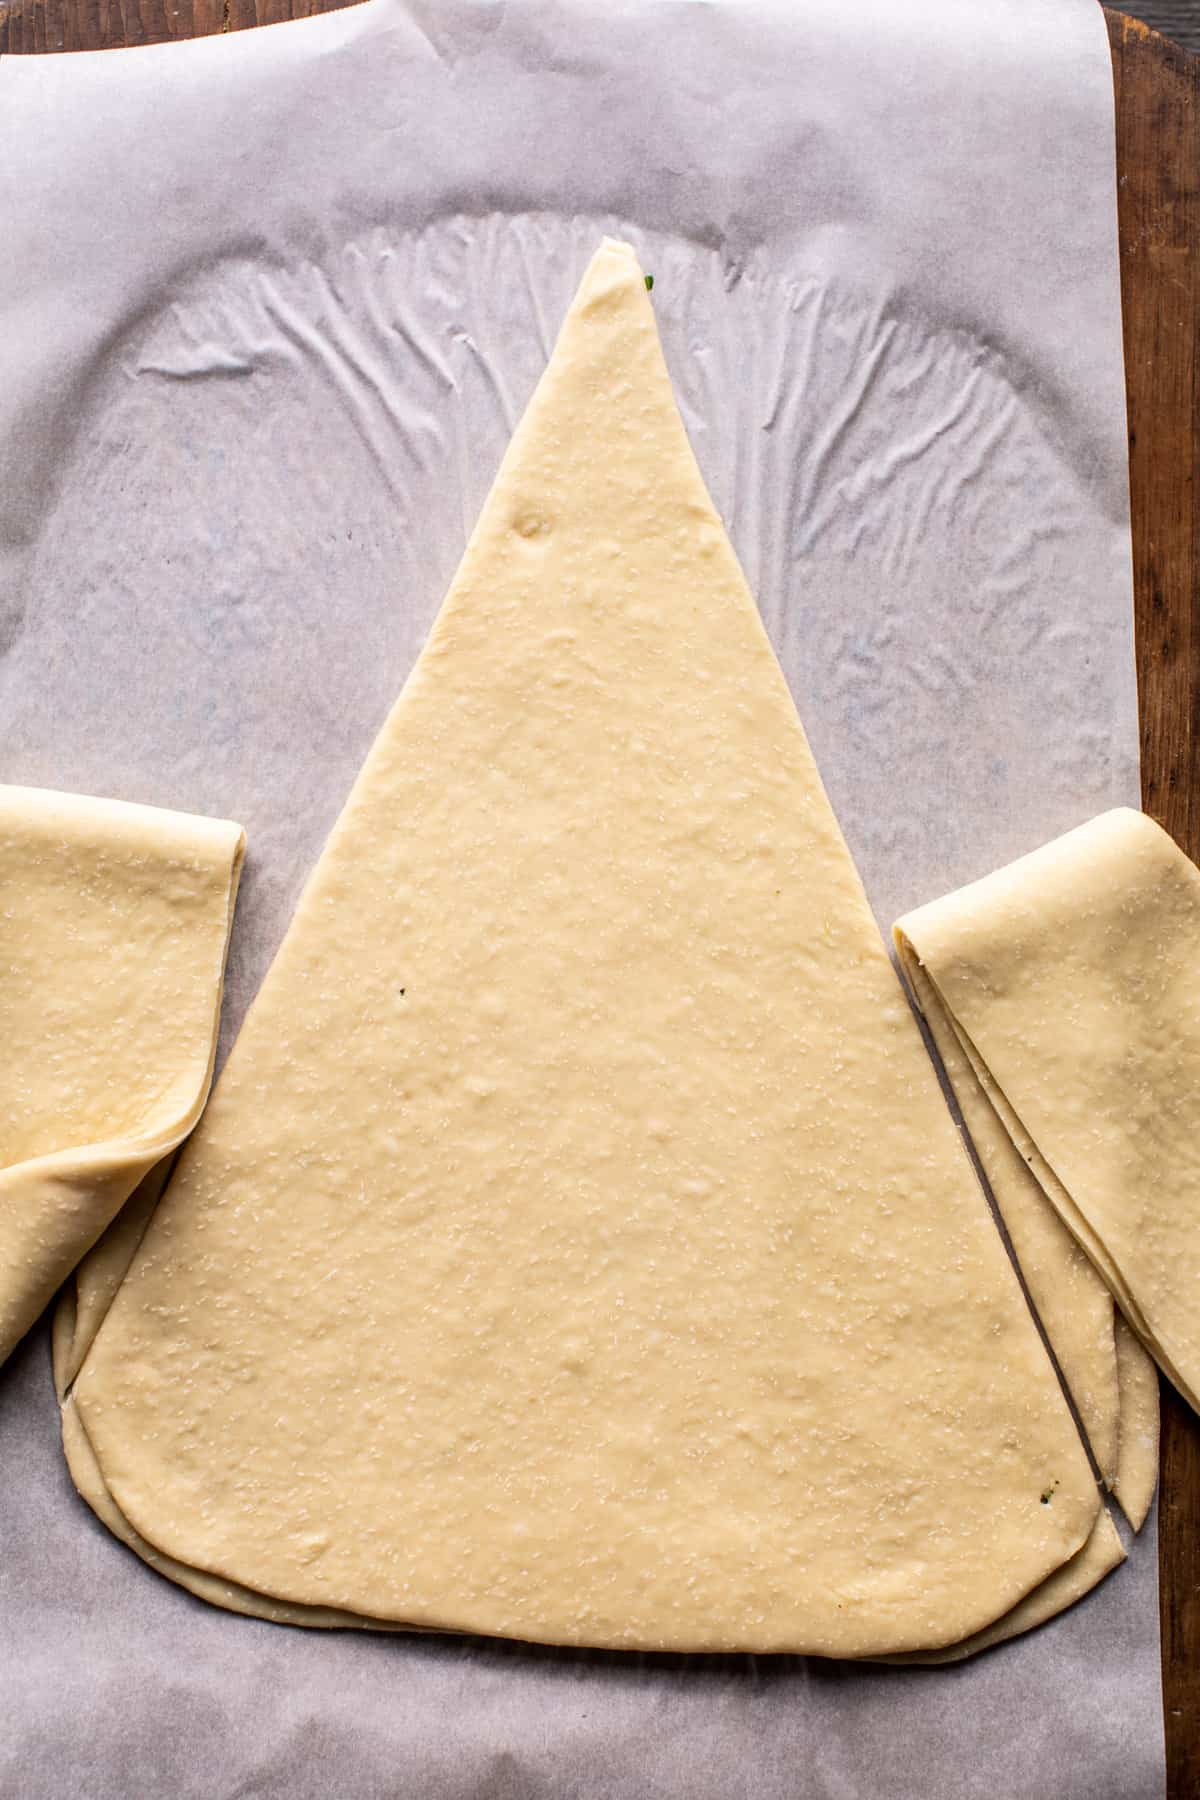
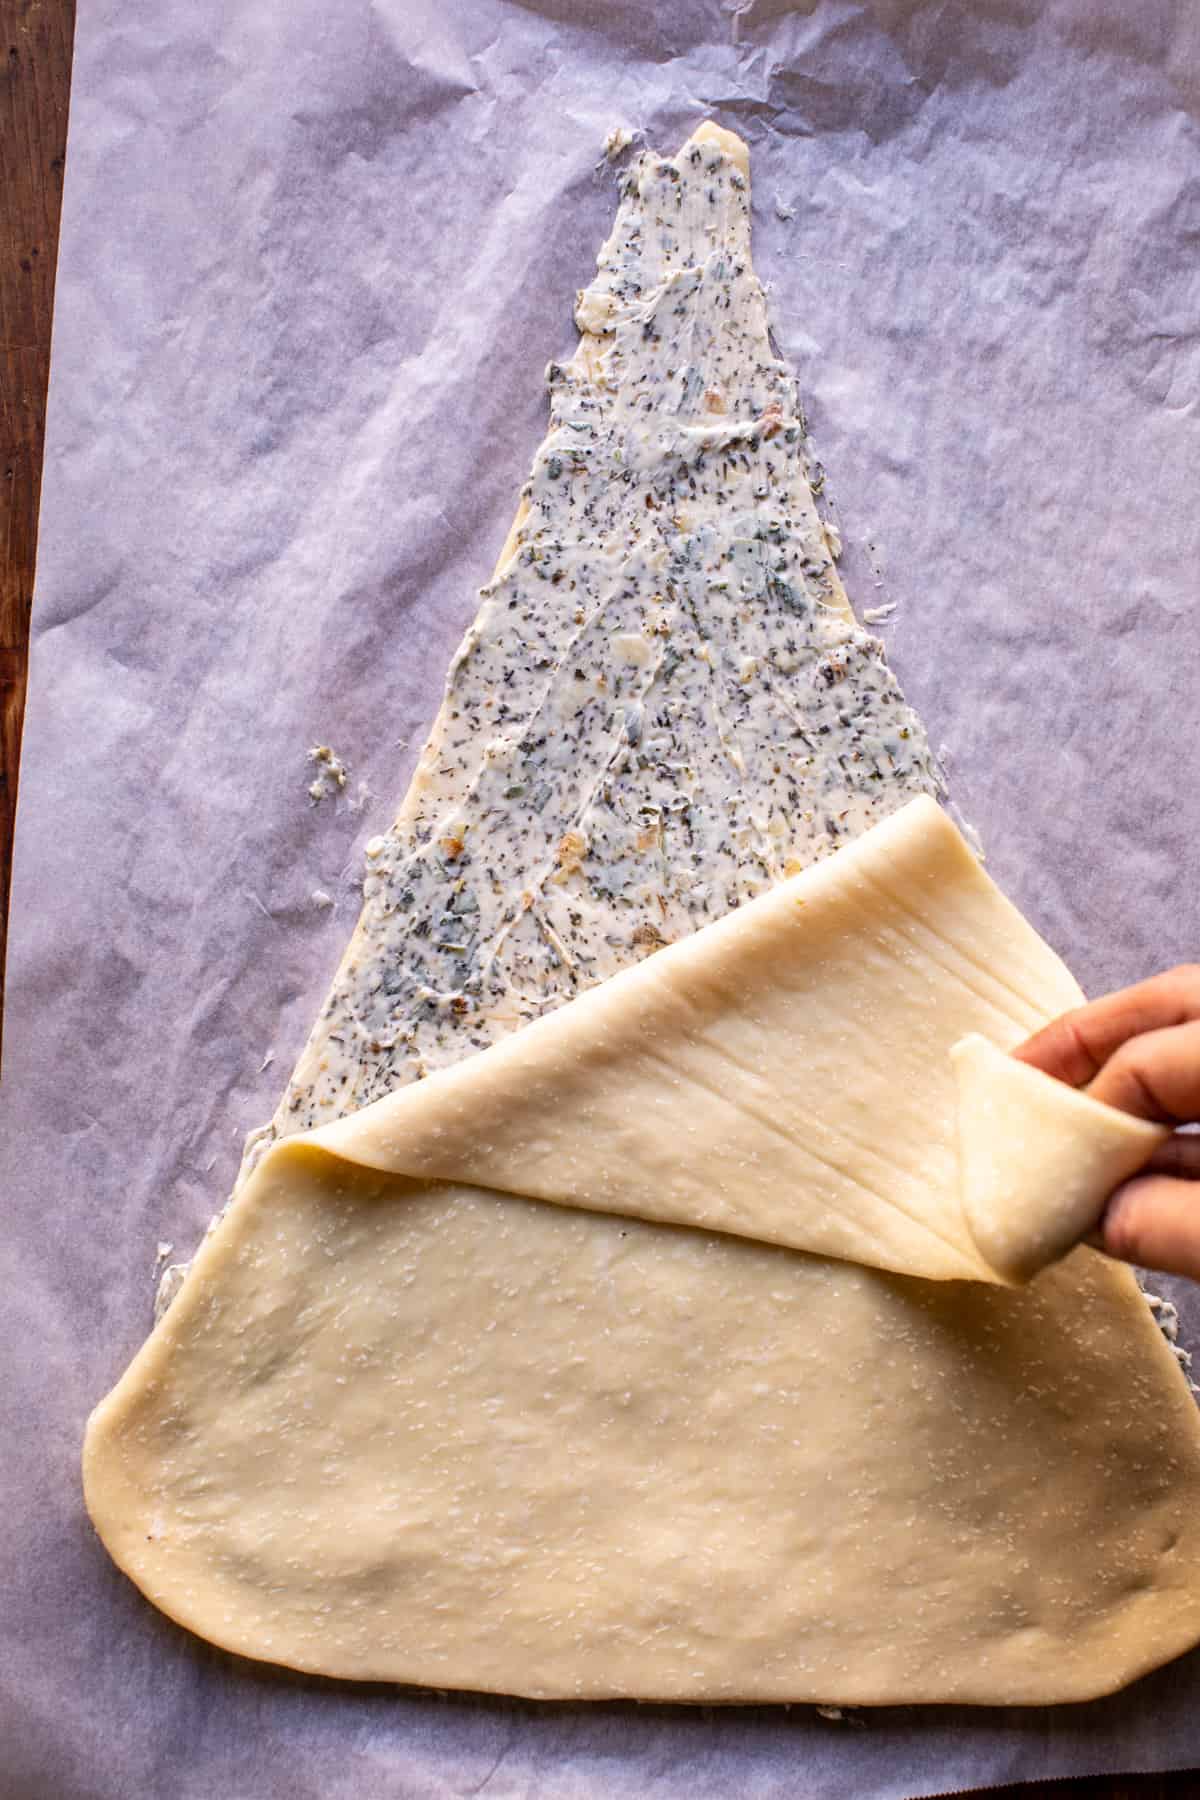
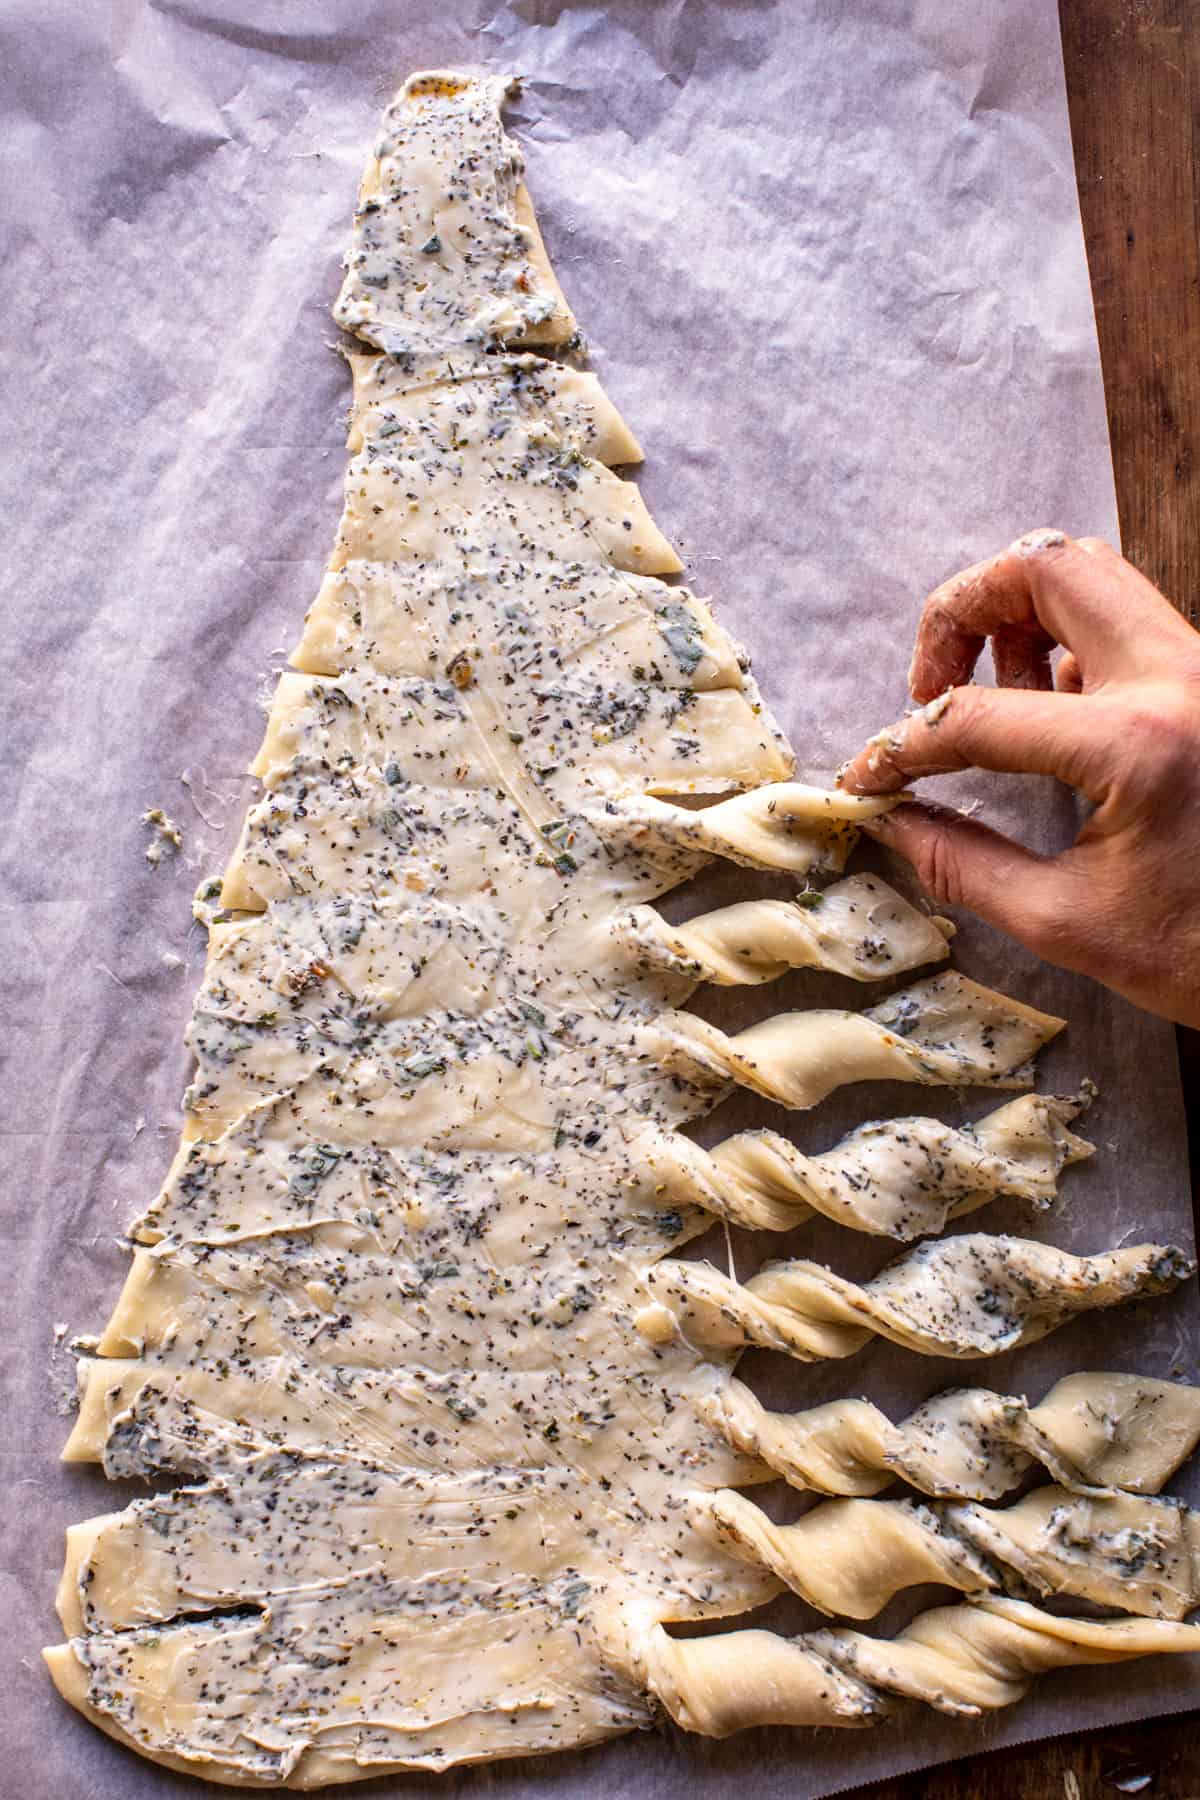
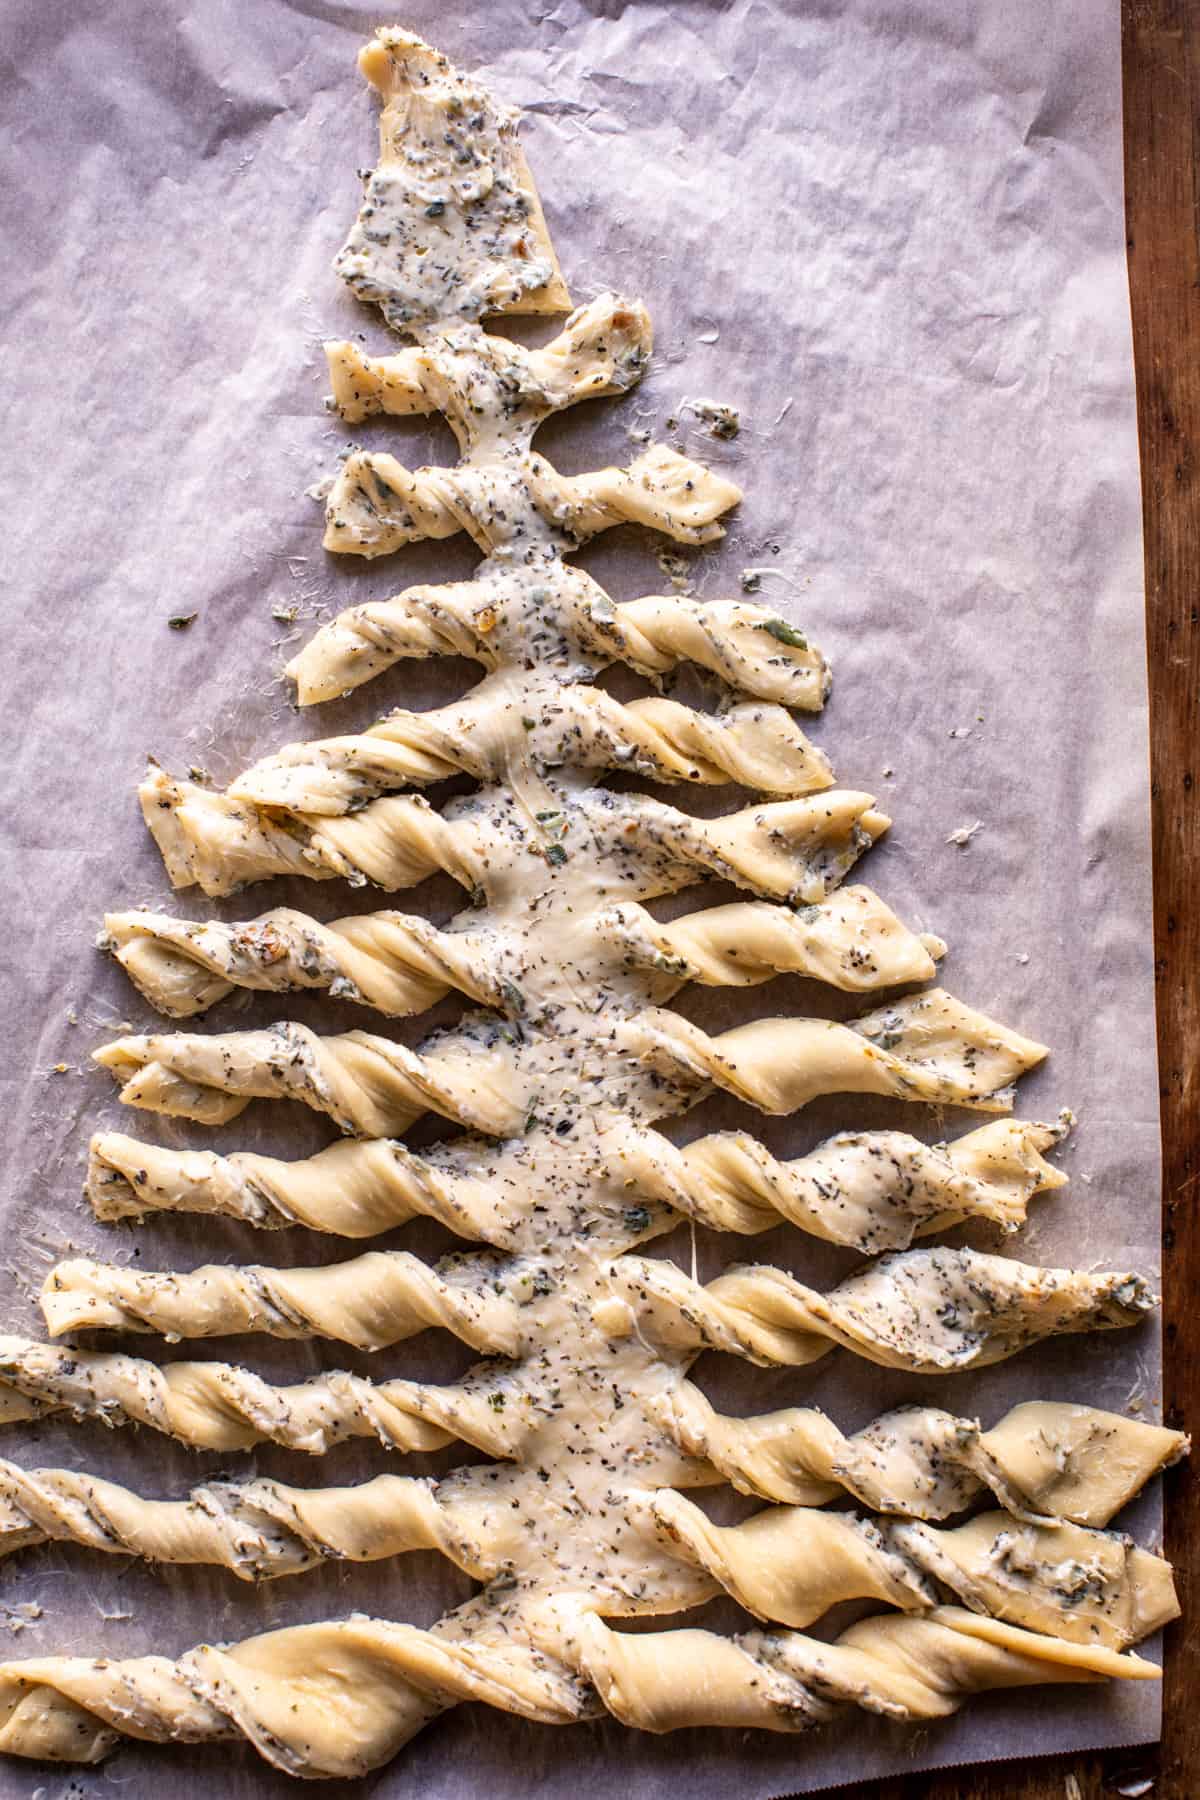
I know this bread might look like it takes hours to make, but trust me, it’s not as tricky as you think. First, make a milk-based bread dough, roll it out, then cut the dough into a triangle. Next, spread on plenty of roasted garlic butter. Then add another triangle of dough on top.
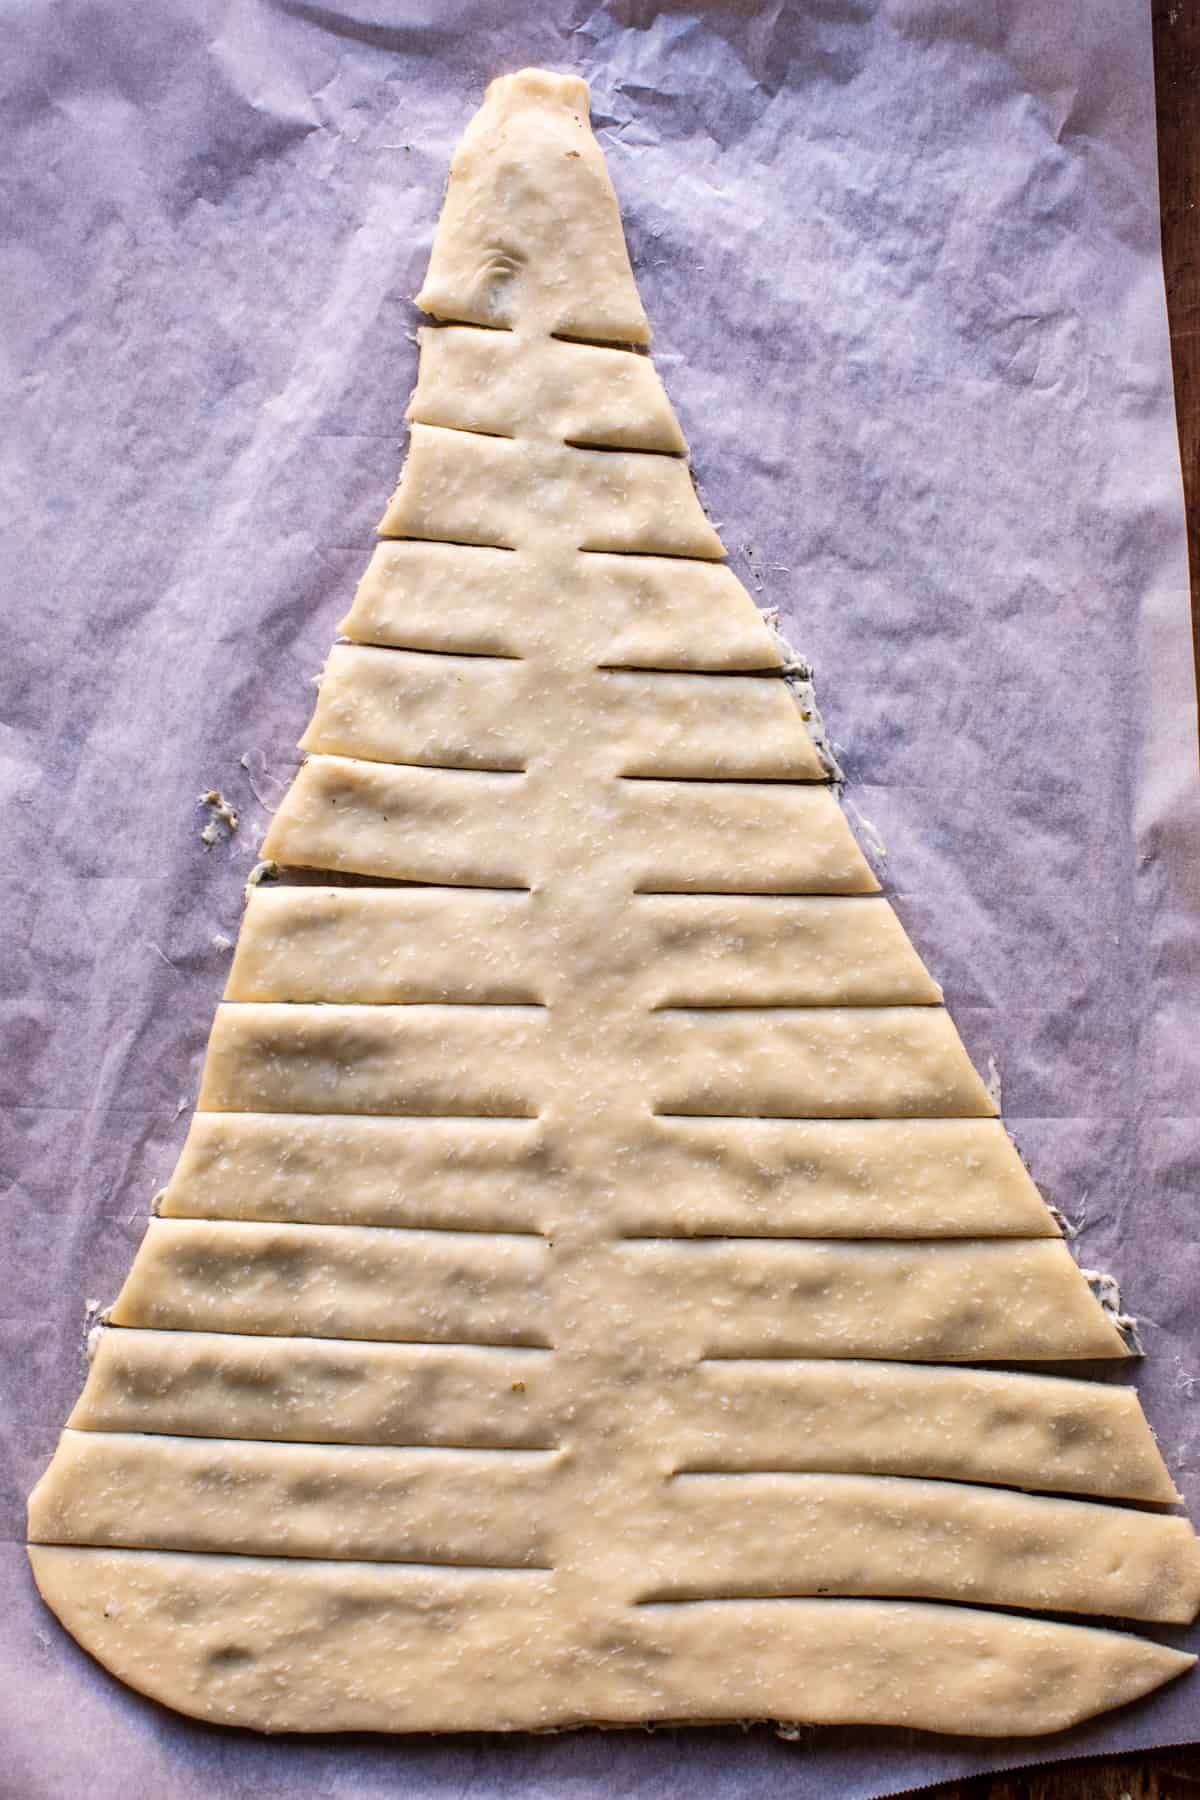
From here, simply cut slits up the tree and twist them! Seems crazy, I know, but it’s going to be great!!
Use the photos as a visual guide, they will really help!
Flour, instant yeast, and a pinch of salt with milk, eggs, and butter. The combination creates a beautiful golden crust on the outside, but the inside stays incredibly soft and fluffy.
I prefer to use instant yeast to keep the dough making process quick and simple! It also prevents the dough from rising too much in the oven, which helps the tree keep its shape better.
Roasting garlic is really easy. If you’ve never done it before it really adds a layer of deliciousness to your recipes.
Slice the top portion of the garlic head off to reveal the cloves. Then place the garlic on a small piece of foil, drizzle with olive oil, and wrap the garlic up. Roast for about forty minutes, until the garlic is deeply golden and soft.
I like to mash the garlic with butter, parmesan, and herbs. Nothing fancy, but wow, so good.
What’s great about this pull apart bread is that while it’s a nice addition to your dinner party menu, it also works as an appetizer. It would be nice to have this ready just as your guests arrive. They can snack on bread and enjoy cocktails before dinner. It’s always nice to have something for people to graze over while chatting away.
The most important thing you must do? Serve the bread warm with a sprinkle of flaky sea salt.
Truly nothing is more delicious. I can’t wait to serve this to my family on Christmas Eve…my brothers and Asher are already excited. They all love a soft garlic bread!
Looking for other bread recipes? Here are a few ideas:
Easy Pull Apart Garlic Parmesan Bread
Salted Honey Butter Parker House Rolls
Herby Everything Cheddar Swirl Buns
Lastly, if you make this Pull Apart Christmas Tree Garlic Bread, be sure to leave a comment and/or give this recipe a rating! Above all, I love to hear from you guys and always do my best to respond to each and every comment. And of course, if you do make this recipe, don’t forget to tag me on Instagram! Looking through the photos of recipes you all have made is my favorite!
Nutritional information is only an estimate. The accuracy of the nutritional information for any recipe on this site is not guaranteed.
As Seen In


Made this recipe for Christmas! I used the garlic butter and the dough in the recipe but instead of twisting it, I shaped it in small balls and filled them with mozzarella. Then I arranged them on the baking sheet in the shape of a christmas tree and brushed them with the remaing garlic butter. My guests devoured it! It was gone in 5 mins! Definitely making it again for New Year’s eve table!
Season’s greetings from Athens, Greece
Hi Alexia,
I love to hear that this recipe was enjoyed, thanks so much for giving it a try! Happy Holidays! xT
So yummy! I made this for Christmas dinner yesterday and it was perfect! Super easy, the pictures were so helpful! I used the scraps to make twisted bread sticks with just butter and parmesan because we have some family members who don’t like garlic (crazy, right!?!?). This will definitely be made again!! Thanks!
Hi Lisa,
I love to hear that this recipe was enjoyed, thanks so much for giving it a try! Happy Holidays! xT
This bread is amazing, adorable and easy to make. Turned out perfectly. I added extra cheese and next time would probably reduce the salt due to the saltiness from the cheese. I baked for about 18 min.
Hi Melissa,
I love to hear that this recipe was enjoyed, thanks so much for giving it a try! Happy Holidays! xT
I follow this recipe to a tee. It just wasn’t that good. The dough was not a really good breadstick dough. It looked really cute, but I would have been better off buying frozen bread.
Hi Annie,
Thanks for giving the recipe a try, so sorry it was not enjoyed! xTieghan
This was a lot of fun to make on Christmas! I did add more cheese to my butter mix. Some commentor said 25 minutes was too long. I found that to be true for me too. Heres what you do. Check your bread at 15 minutes. Then throw some tinfoil over the top to stop the browning and cook until it’s done. For me that was 20 minutes
Hi Rosita,
Thank you so much for making this recipe, I am so glad to hear it was enjoyed! Merry Christmas!?? xT
Did you bake the bread at 400? I left it at the temp for the roasted garlic but wasn’t monitoring it in the oven and it came out baked to a crisp after 25 minutes. The flavors were great though.
Hi Danielle,
So sorry to hear this, yes I baked at 400. Thanks for giving the recipe a try! xTieghan
Made this today for Christmas dinner. It’s really really good. I left out the parm as my mom is lactose intolerant and it’s still absolutely scrumptious. I imagine with the cheese it would be even better!
Hi Tiffany,
Thank you so much for making this recipe, I am so glad to hear it was enjoyed! Merry Christmas!?? xT
Ok this was the first yeasted bread I can recall making. Holy hell so good!! The smell from the first moments in the oven I knew it was going to be a winner. Didn’t take long to make at all, the butter was so flavorful and the bread was light and crisp. Will definitely make again, certainly for Christmas next year!
Hi Alexandra,
Thank you so much for making this recipe, I am so glad to hear it was enjoyed! Merry Christmas!?? xT
Beautiful presentation and great texture and flavor. I’d suggest a rimmed cookie sheet as we had butter drip all over the bottom of the oven.
Hi there,
Thank you so much for making this recipe, I am so glad to hear it was enjoyed! Merry Christmas!?? xT
Really yummy! Cooked for 17 mins and it was golden..all ovens are different. I did need perhaps a cup more flour than the recipe called for in order for dough to not stick to the bowl when mixing. I was worried it would be too dense but that was not the case. I also made sure to let it rise for the full hour (half hour didn’t allow it to double. Would definitely make this again.
Hi Liz,
Thank you so much for making this recipe, I am so glad to hear it was enjoyed! Merry Christmas!?? xT
I made this and it’s very cute and looks delicious but it’s a good thing I checked it about halfway through the baking time because it was already quite brown and nearly overcooked. If I make again next Christmas I will definitely cook at a lower temp for a shorter amount of time.
Hi Melissa,
Thank you so much for making this recipe, I am so glad to hear it was enjoyed! Merry Christmas!?? xT
Because Teigan lives in a higher altitude than most people, the temperature she bakes at and the length of time will almost always be hotter and longer than if you live in a more typical altitude area.
Let me know if you give the recipe a try Heather!
Came out perfect!! Thanks for sharing!!
Hi Lori,
Thank you so much for making this recipe, I am so glad to hear it was enjoyed! Merry Christmas!?? xT
This is really cute and all but it came out super dry and the bottom was burnt – this was after only 17 minutes in the oven. I usually read the comments but didn’t in this case.
Hi Erin,
So sorry to hear this! Thanks for giving the recipe a try! xTieghan
I made this recipe for a big family gathering and it was such a hit and so festive and fun!! Will definitely be repeating for Christmas next year!!
Hi Addison,
Thank you so much for making this recipe, I am so glad to hear it was enjoyed! Merry Christmas!?? xT