Next Post
Snowflake Pull-Apart Monkey Bread.
Originally published Dec 11, 2017 • Updated Jul 12, 2018

This post may contain affiliate links, please see our privacy policy for details.
Starting Monday off right with Homemade Cheddar Pierogies.

This is one of those recipes that I probably should have shared with you guys years ago, but just never got around to it. Well, the time has finally come to talk about Pierogies here on HBH, and I’m pretty happy about it.
When I was growing up, my mom used to feed my brothers and I Mrs. T’s Pierogies topped with generous amounts of extra cheddar cheese. I loved them so much. When I started cooking for my family I got into the habit of making homemade Pierogies ever few months and keeping them in the freezer for easy meals. My brother Kai loved them the most and always said the homemade Pierogies were far superior to the frozen ones from the store.
To be honest, it’s been ages since I’ve made homemade Pierogies, but when my cousin Maggie mentioned that they might be a fun recipe for December, I was sold the second I saw her text come across my phone screen. Pierogies just sounded so comforting and delicious. Plus, I loved her idea of making them for a holiday girl’s night in of cooking, Pierogi eating, and Christmas movie watching.
It sounded perfect, so I went for it, and you guys, I am not regretting it one bit.


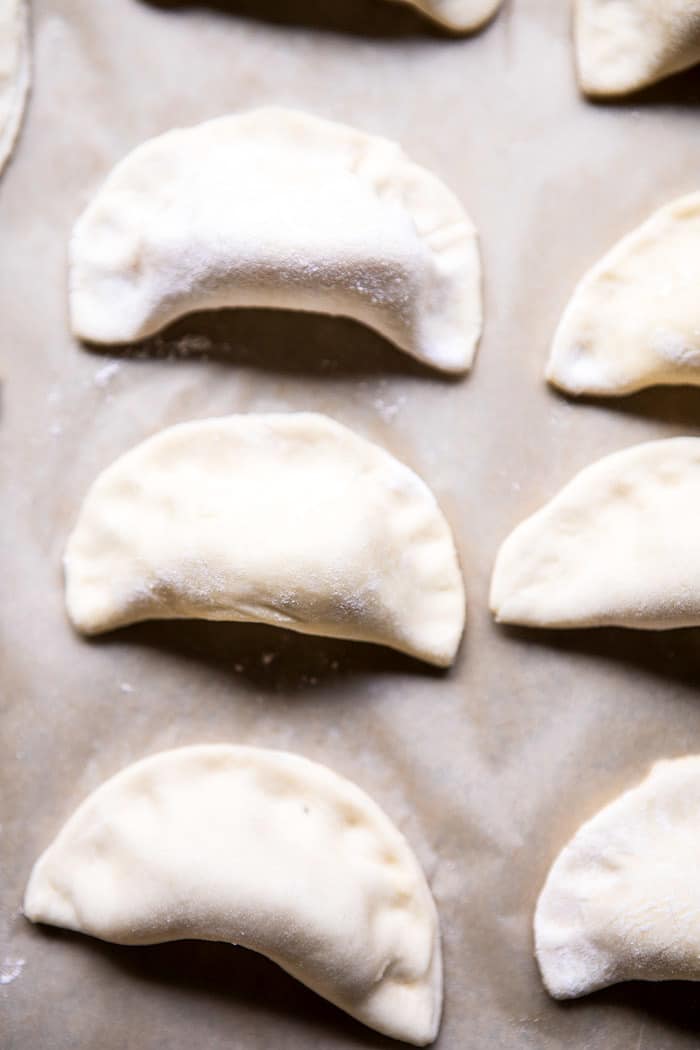
If for some reason you’ve never had Pierogies, let me tell you about them. Pierogies are a traditional polish dumpling consisting of dough stuffed with a savory or sweet filling. I think a potato Pierogi is most common, but I know that there are many varieties. I of course love the potato cheddar Pierogi because not much beats the combo of potatoes and cheddar cheese, plus it’s what I grew up eating and loving, so it’s total childhood comfort food for me.
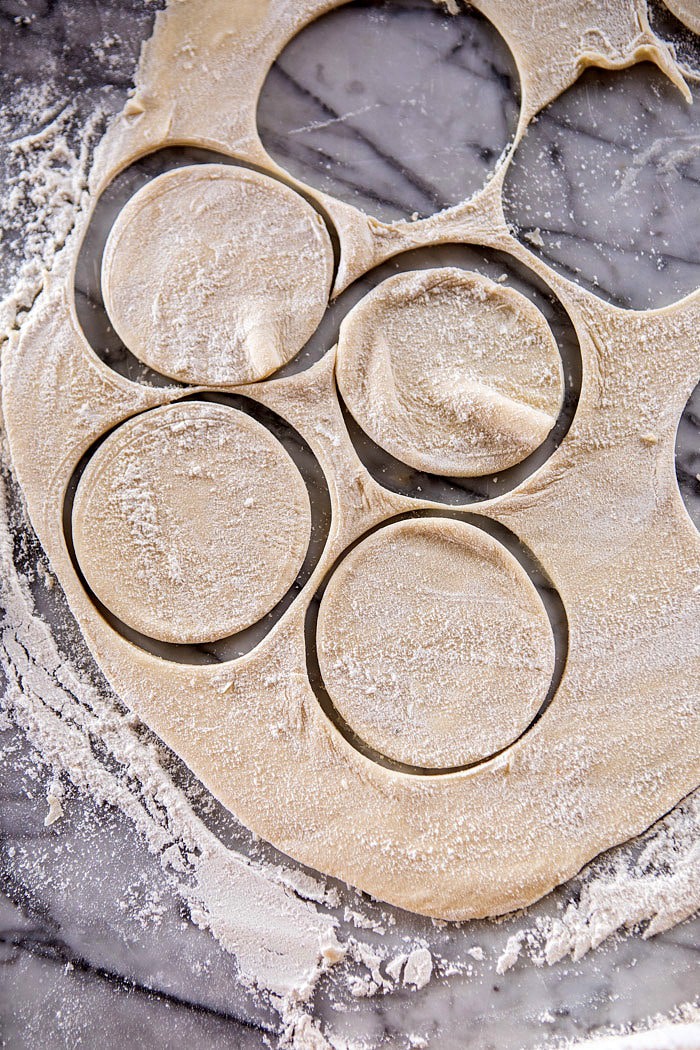
The dough is pretty simple. It’s your basic, flour, egg, salt, combo, but what’s unique about most Pierogi recipes is the use of sour cream in the dough. The sour cream keeps the dough moist and adds the slightest tang. Since I don’t cook with sour cream, I like to swap in plain greek yogurt, which works perfectly.
The key to a good Pierogi though is not about the dough, it’s all about the filling. Enter mashed potatoes with a little cheddar. Simplest filling ever, but so, so, so good. What’s not to love about a pasta style dough filled with cheesy mashed potatoes?
It’s the best.

The most important rule of Pierogi eating though?
Plenty of melted cheddar overtop each and every single Pierogi on your plate. I don’t know if this is how the Polish do it, but it’s how we do it in the Gerard household, and for me, nothing can beat it.
Especially when finished off with a little rosemary butter sauce. Yes, rosemary butter sauce. So. Good.
My family is in agreement that this is one of those recipes that everyone loves. Everyone from the picky eaters to the those with a more sophisticated palate. It’s just an all around favorite dish.

Nutritional information is only an estimate. The accuracy of the nutritional information for any recipe on this site is not guaranteed.

What’s not to love of about a pillowy cheese filled dumpling with rosemary butter sauce, you know?
As Seen In


Does the potato filling need to cool before making the pierogies?
Hi Bridget! Yes, I prefer to let the filling cool a little before using. Please let me know if you have any other questions. I hope you love this recipe! Thank you! xTieghan
Thank you so much for this recipe! I have Polish heritage but had never tried making pierogies before. We always eat them at Easter, and I wanted to try making homemade ones for the holiday. It was easy and they’re so yummy! I boiled them for about 2 minutes, then fried them up in butter for about 4-5. Served with a little sour cream and it’s so good. I can’t wait to share these with my family during the holiday. Thank you again! I check your website daily for new recipes and you never disappoint. xoxo
I am so glad you love these Kelly!! I hope everyone at your Easter dinner loves these as well! Thank you! xTieghan
Thank you so much for this recipe! I grew up eating pierogies so these were so fun to make. The dough was PERFECT. I sautéed chopped onions and added them to the potato and cheese mixture instead of using the onion powder which turned out great. I’m used to eating them with sour cream, but made the rosemary, butter topping and WOW! It was incredible. I’ll definitely be making these again.
I am so glad these brought you back to your childhood, that is too sweet! Thank you for trying these Rachel! xTieghan
Have you tried this with Gluten Free flour?
Hey Stacy, I have not used GF flour for these, so I am unsure of the results. I recommend trying Bob’s Red Mill GF flour blend. Please let me know if you have any other questions. I hope you love this recipe! Thank you! xTieghan
Just made these today! Absolutely delicious. They’re a little bit time-consuming, but on a relaxing lazy day, wandering around the kitchen making these can be really nice. Mine made WAY too much filling though; at least twice of what I needed, so I’ll end up freezing the filling and using it another time for more perogis. I added some extra onion powder, and served it crisped up in a pan with saurkraut. Also used sour cream in the dough instead of yogurt.
Hi Hannah! I am so glad you loved this recipe and it turned out amazing for you! Thank you so much! xTieghan
Made a batch last year, and just finished making another batch this year. Did the dough in a food processor, kneading it by hand for a couple of minutes after it was mixed. Dough was super easy to work with, and my Polish grandmother would be proud of how they turned out. The wife loves them, too. I boiled them for a minute then threw thin the pan with the sautéed onions and garlic. Great recipe!,
Made a batch last year, and just finished making another batch this year. Did the dough in a food processor, kneading it by hand for a couple of minutes after it was mixed. Dough was super easy to work with, and my Polish grandmother would be proud of how they turned out. The wife loves them, too. I boiled them for a minute then threw thin the pan with the sautéed onions and garlic. Great recipe,,
I am so glad you have been enjoying this recipe, Michael! Thank you so much! xTieghan
So I have been wanting to make perogies for some time now, and gave your recipe a try. I have to say I am amazed by the dough…it was not heavy at all. Most store bought are, and usually after a couple you are full. I was able to eat a few of these. Little bit time consuming. for the first timer it took me 4 hours. I had a little bit of trouble with how much filling to put in and then closing the dough. I have never made pirogi by hand before so it was a learning experience. Hats off to those that make them on a daily basis. I will make these again but next time I am using a pirogi press from Amazon. My guy and I love Rosemary, I grow it every year in my herbs. We gave your rosemary butter a try…it did NOT disappoint. Thanks for sharing!! (I used sour cream in place of yogurt and it was amazing!)
So I have been wanting to make perogies for some time now, and gave your recipe a try. I have to say I am amazed by the dough…it was not heavy at all. Most store bought are, and usually after a couple you are full. I was able to eat a few of these. Little bit time consuming. for the first timer it took me 4 hours. I had a little bit of trouble with how much filling to put in and then closing the dough. I have never made pirogi by hand before so it was a learning experience. Hats off to those that make them on a daily basis. I will make these again but next time I am using a pirogi press from Amazon. My guy and I love Rosemary, I grow it every year in my herbs. We gave your rosemary butter a try…it did NOT disappoint. Thanks for sharing!!
Hi Yvonne! I am so glad you loved this recipe and I hope it takes you a lot less time with the pierogi press!! Thank you so much for trying it! xTieghan
Can you skip the boiling if you put them in the freezer before that step? When you take them out can you just pan fry to cook them like store bought pierogies or are those preboiled?
HI! I recommend always boiling these as you need to pre-cook the dough before pan frying. Freezer before boiling works great! Please let me know if you have any other questions. I hope you love this recipe! Thank you! xTieghan
Very tasty perogies! I made a few on the fly changes and used coconut yogurt rather than Greek and realized I only had sweet potatoes rather than rustic. I did up a batch of carmelized onions and placed the perogies into their pan as they were finished in water. To finish, I fried some sage and crumbled on top. Delicious recipe but perhaps my coconut yogurt sub made the dough too wet, requiring a lot of additional flour to be added when kneeding. Thanks for a great dinner idea!
I am so glad you liked this recipe, Hailey! Thank you so much!
Can you replace the yogurt with sour cream?
Can you replace the yogurt with sour cream? We only have Vanilla flavored yogurt or plain sour cream… want to try to make this tomorrow.
Hi! Sour cream will work really well! Please let me know if you have any other questions. I hope you love this recipe! Thank you! xTieghan
Hi! I made these the other day and they are fantastic! I grew up eating pierogies and they were always a favorite. This recipe is so easy and delicious. Thank you for sharing!
I am so glad you loved this Talia! Thank you!
HI Tieghan! Absolutely love your recipes and excited to make this for New Years Eve (with collards and black eyed peas haha). Do you think it would be okay to make the filling in advance? I would think I could just heat it back up slightly over the stove before filling it, but wanted to check your thoughts!
Thanks!
HI Christeen! You can prepare these all the way up until boiling, just leave them in a single layer on a baking sheet and keep in the fridge (or freezer) until you are ready to boil them off. Please let me know if you have any other questions. I hope you love this recipe. Thanks so much!! xTieghan